FLX500-maintenance.pdf - 第6页
Data I/O FLX500 Chptr 1 —2— On early models using PS/2 ports , the system power must be recycled after connecting a key- board and mouse. Connecting a keyboard and mouse depends on your model. See the configuration…
—1—
Installing a Keyboard and
Mouse
The FLX500 incorporates a touch screen; however,
some maintenance procedures require the use of
a keyboard and mouse. The keyboard and
mouse plug into the back of the FLX500. See Fig-
ure 1 on the next page.
1 … Tools and
Materials
Data I/O
FLX500 Chptr 1
—2—
On early models using PS/2 ports, the system
power must be recycled after connecting a key-
board and mouse.
Connecting a keyboard and mouse depends on
your model. See the configuration in Figure 1
that matches your model.
Connecting a PS/2 Keyboard and
Mouse:
1. End a job if one is running.
2. Exit the FLX500 application–
3. Plug in the keyboard and mouse according
to the label. See Figure 1.
4. Switch off the power by pressing the power
switch (right side) once and releasing. Then
push it and release once more to turn the
power back on again.
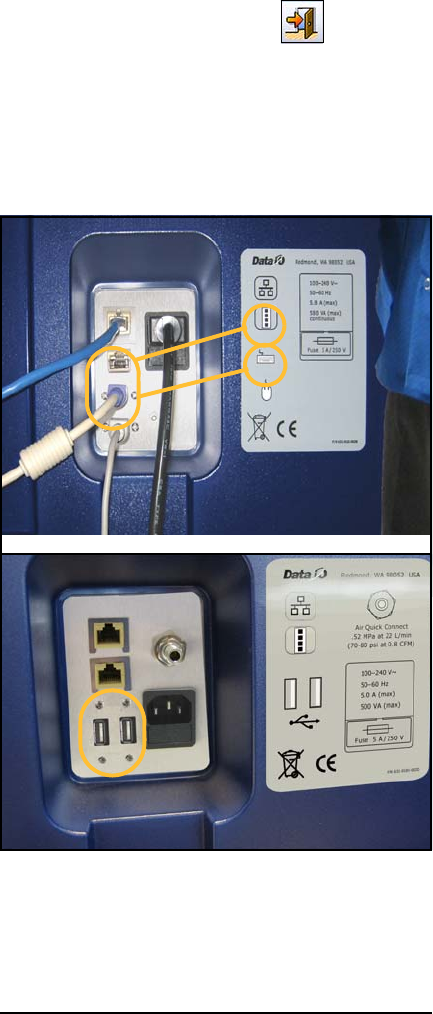
Figure 1—Keyboard and Mouse Connections on the
back of the
FLX500
. Early models require PS/2 con-
nections (A). Later models require USB
connections (B).
PS/2
USB
A.
B.

1 … Tools and Materials Log File
—3—
Figure 2—Power Switch on the right side of the
FLX500
is a spring-loaded rocker switch.
Connecting a USB Keyboard and
Mouse:
Plug in the keyboard and mouse using either
USB port first. See Figure 1. (Power does not
need to be cycled.)
Log File
The FLX500 provides a log file that helps when
diagnosing problems. The file name has the date
and time the log was created and ends with .txt.
For example: FLX_20070607_162818.txt.
Log files are typically saved to the C: drive of the
FLX500 —C:\Flx_500\Log.
You can also save a log file to a different location:
1. Tap the Version button –
2. Tap Save Log –
3. Select a drive and path where you want the
FLXLog.zip file written, or insert a USB
memory stick and select (tap) the USB drive
listed.
4. Tap OK [], then OK, and close the dialog.