BA-UI-EN-D33363.pdf - 第37页
D33363 | Date 01/2020 37 Menu mode 7.2 Basic operation in menu mode using the example of language selection In general, all settings in menu mode are done just like in manual mode: Activate the re- spective display , use…
36 D33363 | Date 01/2020
Menu mode
7. Menu mode
In menu mode, you can make basic settings as well as adjust appliance parameters.
Caution:
Before changing menu settings, read the description of the respective functions on the fol-
lowing pages to avoid possible damage to the appliance and/or chamber load.
To enter menu mode, press the MENU key.
To exit the menu mode at any time, press the MENU key
again. The appliance then returns to manual mode. Only
changes accepted by pressing the confirmation key are
saved.
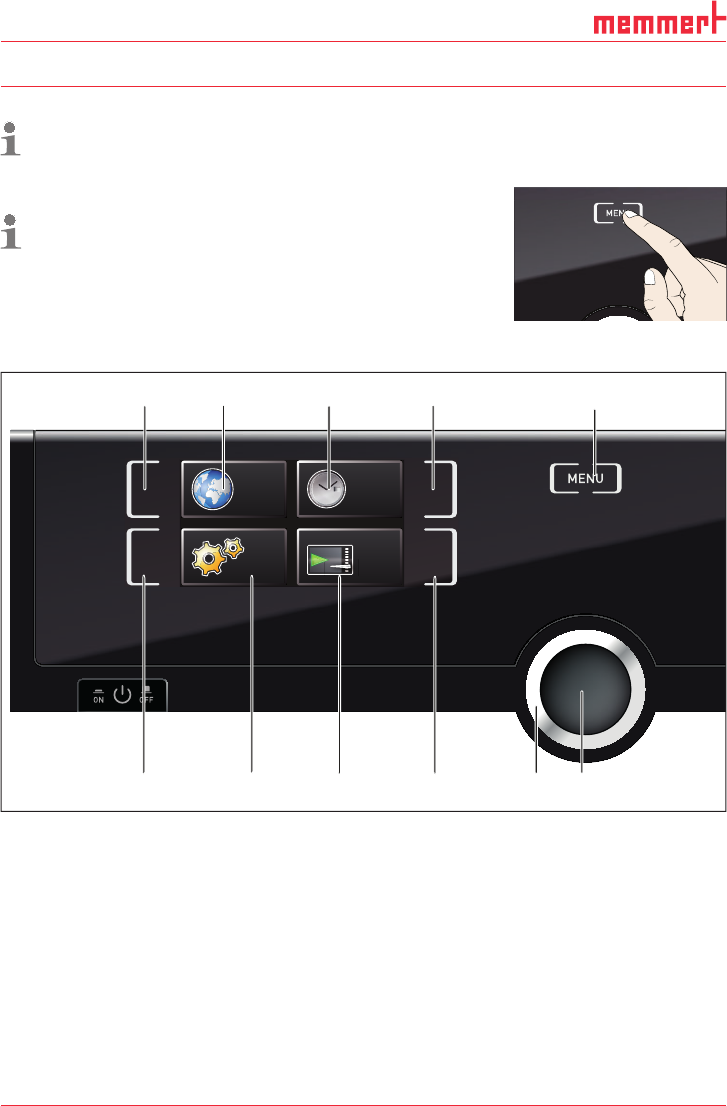
7.1 Overview
Press the MENU key to change between the displays in menu mode:
SETUP
SIGNALTÖNE
CALIB
LANGUAGE
TIME
12 34 5
6789 1011
Fig. 21 ControlCOCKPIT in menu mode
1 Language selection activation key
2 Language selection display
3 Date and time display
4 Date and time setting activation key
5 Return to manual mode
6 Setup activation key (basic appliance set-
tings)
7 Setup display (basic appliance settings)
8 Adjustment display
9 Adjustment activation key
10 Turn control for adjustment
11 Confirmation key (accepts setting made
with the turn control)
D33363 | Date 01/2020 37
Menu mode
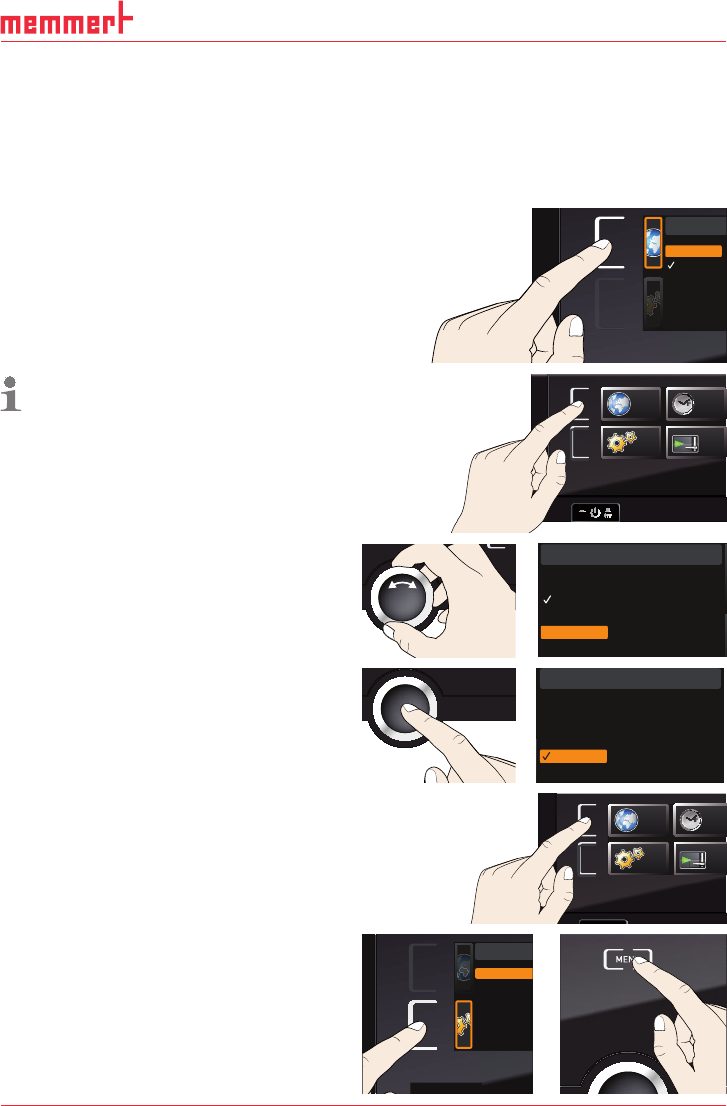
7.2 Basic operation in menu mode using the example of language
selection
In general, all settings in menu mode are done just like in manual mode: Activate the re-
spective display, use the turn control for setting and press the confirmation key to accept
the change. A more detailed description is provided in the following, using the example of
language selection.
1. Activate the desired parameter (in this
example the language). To do so, press
the corresponding activation key on the
left or right of the respective display. The
activated display is enlarged.
ENGLISH
DEUTSCH
ESPANOL
POLSKI
CESTINA
FRANCAIS
If you want to exit or cancel your settings,
again press the activation key which you
have used to activate the display. The
appliance returns to the menu overview.
Only the settings that you have con-
firmed by pressing the confirmation key
before cancelling the setting procedure
are accepted.
SETUP
SIGNALTÖNE
CALIB
LANGUAGE
TIME
ON
O
O
ON
N
N
N
O
O
N
O
2. With the turn control, select the desired
new setting, e.g. Español (Spanish).
3. Save the setting by pressing the confir-
mation key.
SPRACHE
ENGLISH
DEUTSCH
MAGYAR
ITALIANO
ESPANOL
FRANCAIS
POLSKI
CESTINA
4. To return to the menu overview, press the
activation key again.
SETUP
SIGNALTÖ
N
CALI
B
LANGUAGE
TIM
You can now
► activate another menu function by press-
ing the corresponding activation key or
► return to manual mode by pressing the
MENU key.
Balance
Einheit
IP Adresse
Alarm Tem
p
Timer Mod
e
Unit
IP address
Subnet mas
k
Alarm temp
Timer mode
Slide-in unit
SPRACHE
ENGLISH
DEUTSCH
MAGYAR
ITALIANO
ESPANOL
FRANCAIS
POLSKI
38 D33363 | Date 01/2020
Menu mode
All other settings can be made accordingly. The settings possible are described in the follow-
ing sections.
If no new values are entered or confirmed for approx. 30 seconds, the appliance automati-
cally returns to the main menu and restores the former values.
7.3 Setup
In the SETUP display, you can set the following parameters:
► the IP address and Subnet mask of the appliance's Ethernet interface (for connection to
a network)
► the Unit of the temperature display (°C or °F, see page 39)
► the type of temperature monitoring (TWW or TWB, Alarm Temp, only if equipped with
a second temperature sensor, option A6) and the trigger temperature of the monitoring
function (
Max alarm, see page 40)
► how the digital backwards counter with target time setting works (Timer mode, see page
41)
► the type of the slide-in unit (Grid or Shelf, see page 41)
► Remote control (see page 41)
► Gateway (see page 42)
If the SETUP menu contains more entries than can be
displayed, this is indicated by the display “1/2”. This
means that there is a second „page“ of entries.
To display the hidden entries, use the turn control
to scroll beyond the lowest entry. The page display
changes to “2/2”.
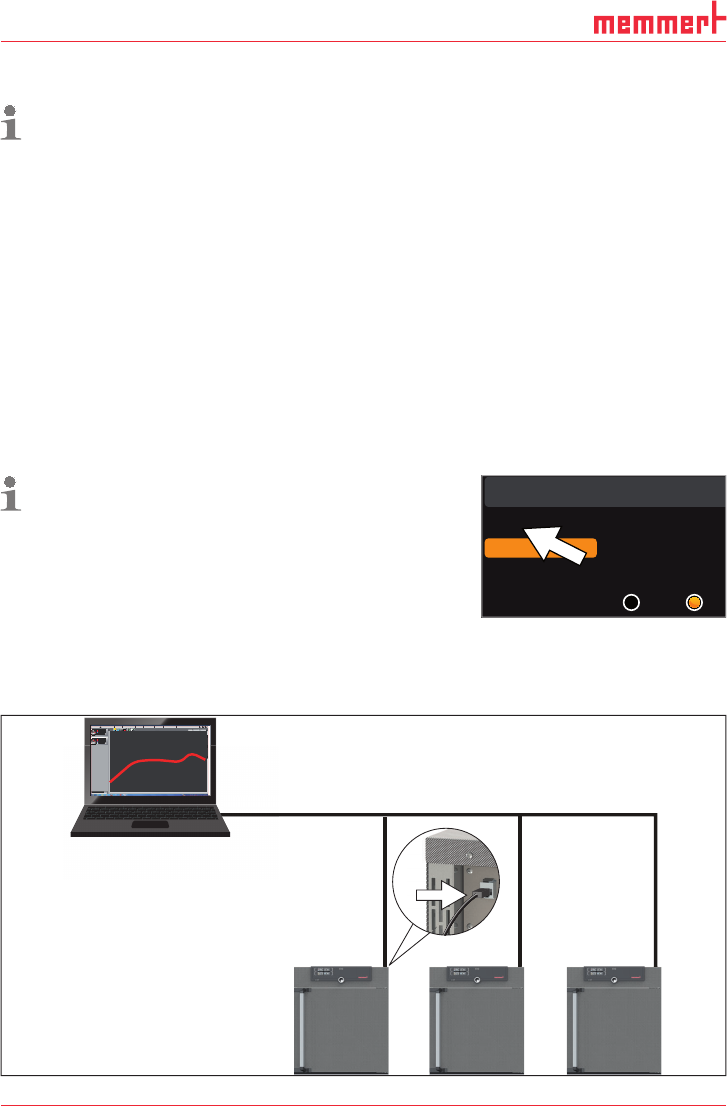
7.3.1 IP address and subnet mask
If you want to operate one ore more appliances in a network, each appliance must have its
own unique IP address for identification. By default, each appliance is delivered with the IP
address 192.168.100.100.
LAN 1: 192.168.1.233
192.168.1.216
LAN 2: 192.168.1.215
LAN 3: 192.168.1.241
1
9
2.1
68
.
1
Editor
Programmname
Simulation Protokoll
-
+
-
+
INP 250 Test 01
180
.0°C
i
HPP 250 Labor
i
37
.0°C
44
.4%rh
151
5
STAND BY
Programm negnulletsniEllokotorPtäreG efliHnekcurD
AtmoCONTROL
Fig. 22 Operation of several appliances in a network (schematic example)
Setu
p
Unit
IP adress 255.145.136.
2
Subnet mask 255.255.0. 0
°C F
1/2