BA-UI-EN-D33363.pdf - 第40页
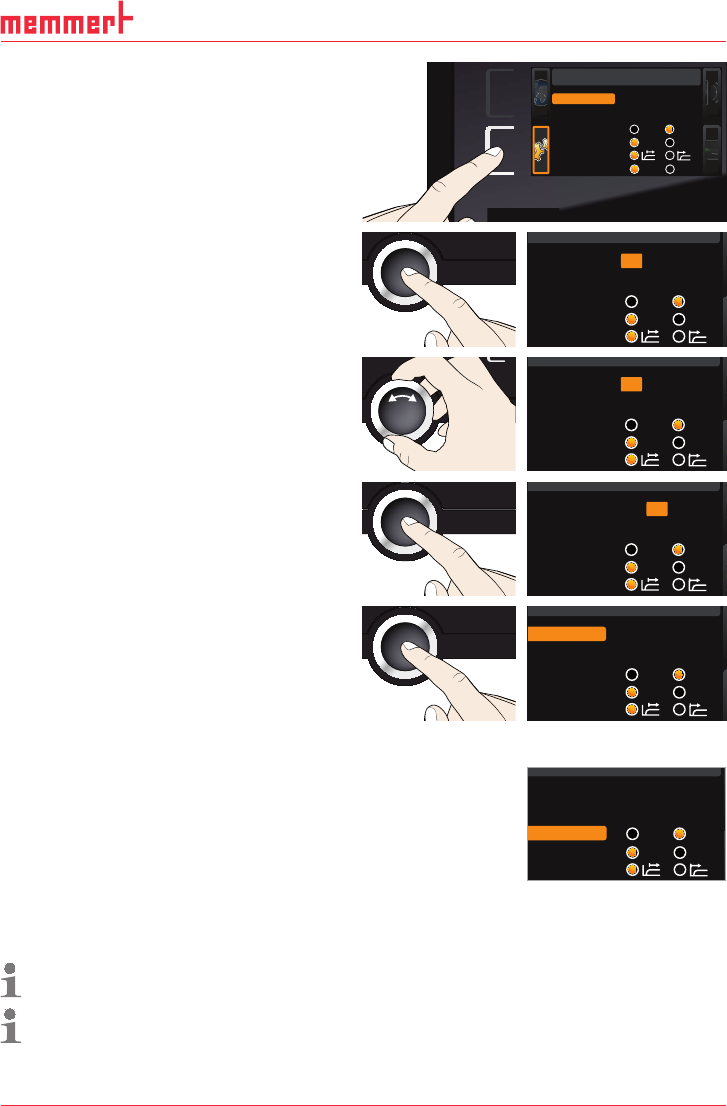
40 D33363 | Date 01/2020 Menu mode 1. Activate the SETUP display and select Alarm temp with the turn control. SETUP Unit IP address 255. 145 .136.2 2 5 Subnet mask 255. 255. 0 . 0 Alarm temp °C F TWW TWB Timer mode Slid …
D33363 | Date 01/2020 39
Menu mode
1. Activate the
SETUP display. The entry
IP address is automatically highlighted.
SETUP
Balance
Einheit
IP Adresse
+30%
192.168. 1 0 0 .100
Alarm Temp
°C F
TWW TWB
Timer Mode
Setup
Unit
IP address 192.168. 1 0 0. 100
Subnet mask 255.255. 0 . 0
Alarm temp
°C F
TWW TWB
Timer mode
Slide-in unit
Grid Shelf
2. Accept the selection by pressing the con-
firmation key. The first three digits of the
IP address are automatically selected.
SETUP
Unit
IP address 192.168.100.100
Subnet mask 255.255. 0 .0
Alarm temp
°C F
TWW TWB
Timer mode
3. With the turn control, set the new num-
ber, e.g. 255.
SETUP
Unit
IP address 255.168.100.100
Subnet mask 255.255. 0 .0
Alarm temp
°C F
TWW TWB
Timer mode
4. Accept the selection by pressing the con-
firmation key. The next three digits of the
IP address are automatically selected. Set-
ting these is done with the turn control
according to the description above.
SETUP
Unit
IP address 255.168.100.100
Subnet mask 255.255. 0 .0
Alarm temp
°C F
TWW TWB
Timer mode
5. After setting the last three digits, accept
the new IP address by pressing the con-
firmation key. The selection returns to the
overview.
The subnet mask is set accordingly.
SETUP
Unit
IP address 255.145.136.225
Subnet mask 255.255. 0 .0
Alarm temp
°C F
TWW TWB
Timer mode
7.3.2 Unit
Here, you can choose whether the temperature is displayed in °C
or °F.
7.3.3 Temperature monitoring ( Alarm Temp and Max
Alarm)
Here, the type of monitoring function that should be activated (TWW or TWB, description
from page 30) can be set (
Alarm Temp), as well as the temperature at which the automatic
temperature monitoring should be triggered (
Max alarm).
The selection option TWW/TWB is only available for appliances with a second temperature
sensor (option A6).
The monitoring temperature must be set sufficiently high above the maximum set tem-
perature. We recommend 5 to 10 K difference for UN
.../UF... and 1 to 3 K difference for IN.../
IF
...
SETUP
Unit
IP address 255.145.136.225
Subnet mask 255.255. 0 .0
Alarm temp
°C °F
TWW TWB
Timer mode
40 D33363 | Date 01/2020
Menu mode
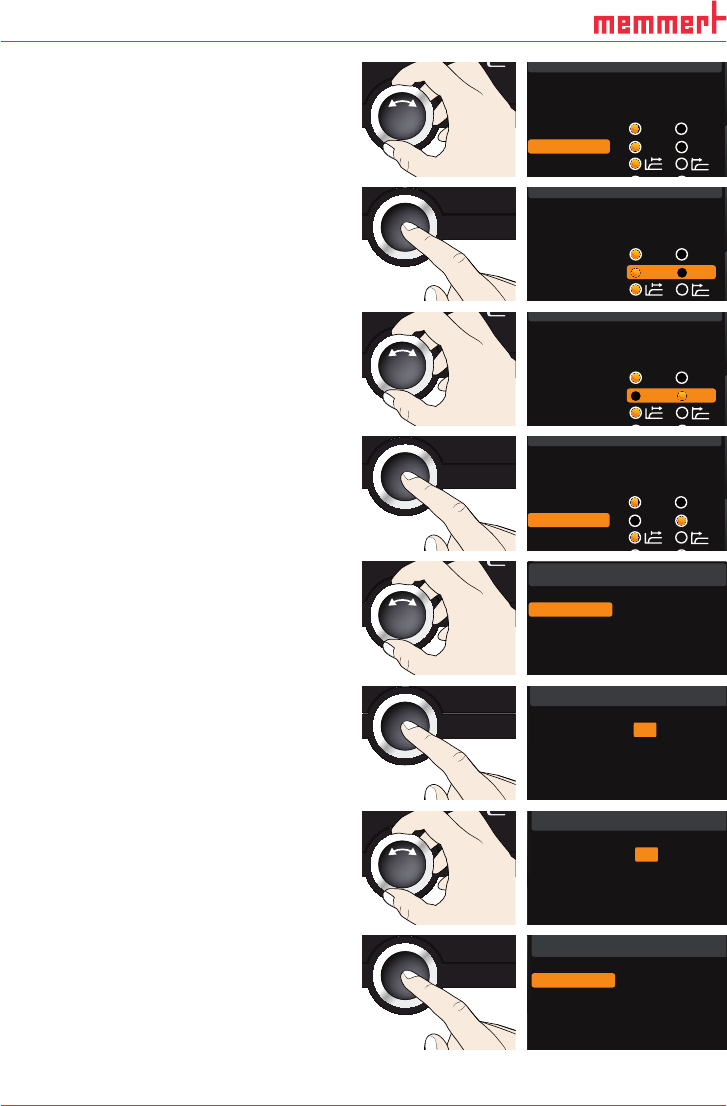
1. Activate the
SETUP display and select
Alarm temp with the turn control.
SETUP
Unit
IP address 255.145.136.225
Subnet mask 255.255. 0. 0
Alarm temp
°C F
TWW TWB
Timer mode
Slid i i
2. Accept the selection by pressing the con-
firmation key. The adjustment options are
automatically highlighted.
SETUP
Unit
IP address 255.145.136.225
Subnet mask 255.255. 0. 0
Alarm temp
°C F
TWW TWB
Timer mode
3. With the turn control, select the desired
setting – in this example TWB.
SETUP
Unit
IP address 255.145.136.225
Subnet mask 255.255. 0. 0
Alarm temp
°C F
TWW TWB
Timer mode
Slid i it
4. Save the setting by pressing the confir-
mation key.
SETUP
Unit
IP address 255.145.136.225
Subnet mask 255.255. 0. 0
Alarm temp
°C F
TWW TWB
Timer mode
Slid i it
5. Select Max Alarm with the turn control.
SETUP
Max Alarm
190 °C
2/2
6. Accept the selection by pressing the
confirmation key. The current settings are
automatically highlighted.
SETUP
Max Alarm
190 °C
2/2
7. With the turn control, select the desired
new trigger temperature - in this example
160 °C.
SETUP
Max Alarm
160 °C
2/2
8. Save the setting by pressing the confir-
mation key. The electronic temperature
monitoring system will now be triggered
when the actual temperature reaches 160
°C.
SETUP
Max Alarm
160 °C
2/2
D33363 | Date 01/2020 41
Menu mode
7.3.4 Timer Mode
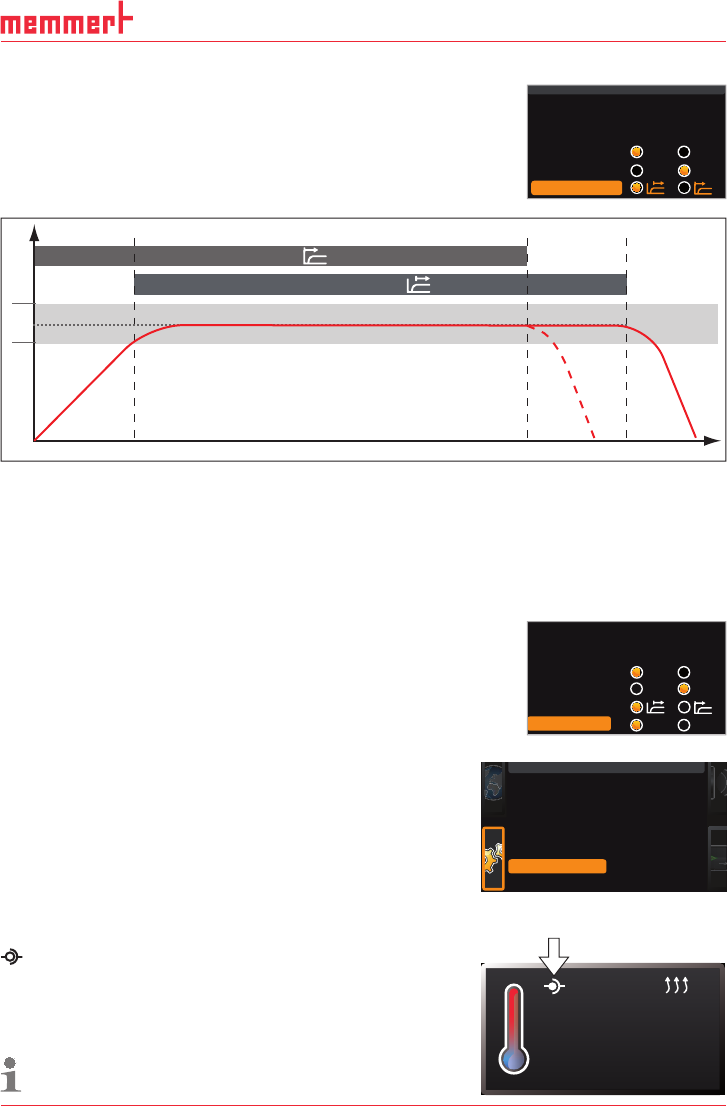
Here, you can choose whether the digital backwards counter with
target time setting (see page 29, timer) should run setpoint-
dependent or not – this determines whether the timer should
not start until a tolerance band of ±3 K around the set
temperature is reached (Fig. 23, B) or whether it should start
right after activation (A).
t
Timer
t
Timer
A
B
°C/°F
t
6 K
Fig. 23 Timer Mode
A Timer independent of setpoint: Timer starts right after activation
B Timer setpoint-dependent: Timer does not start until tolerance band is reached
If the temperature tolerance band is exceeded in setpoint-dependent operation, the timer will
be interrupted and only be resumed when the setpoint temperature has been reached again.
7.3.5 Type of the slide-in unit (Grid or Shelf)
Here, you have to set the type of the slide-in unit (grid or shelf)
used. The selection Shelf enables you to adjust the control
function to the different air flow characteristics in the interior
when using optional sliding shelves instead of the grids that are
part of the standard delivery.
7.3.6 Remote control
In the setup entry Remote control, you can set whether the
appliance should be controlled via remote control and if
so, in which mode. These settings are available:
► Off
► Read Only
► Write + Read
► Write + Alarm
When the appliance is in remote control mode, the
symbol appears in the temperature display. In the
settings
Write + Read and Write + Alarm, the appliance
cannot be controlled at the ControlCOCKPIT until the
remote control has been switched off (setting Off) or set
to
Read Only.
In order to use the remote control function, program-
ming skills and special libraries are required.
SETUP
Unit
IP address 255.145.136.225
Subnet mask 255.255. 0 .0
Alarm temp
°C F
TWW TWB
Timer mode
Unit
IP adress 255. 145.136.225
Subnet mask 255.255. 0 .0
°C °F
Timer mode
Alarm temp
TWW TWB
Slide-in unit
Grid Shelf
Setup
Balance
Remote Control Off
Gateway 192.168.5 .1
+30 %
2/2
23.2 °C
TEMP
Set 38
.0 °C