OM-1241-005_w.pdf - 第104页
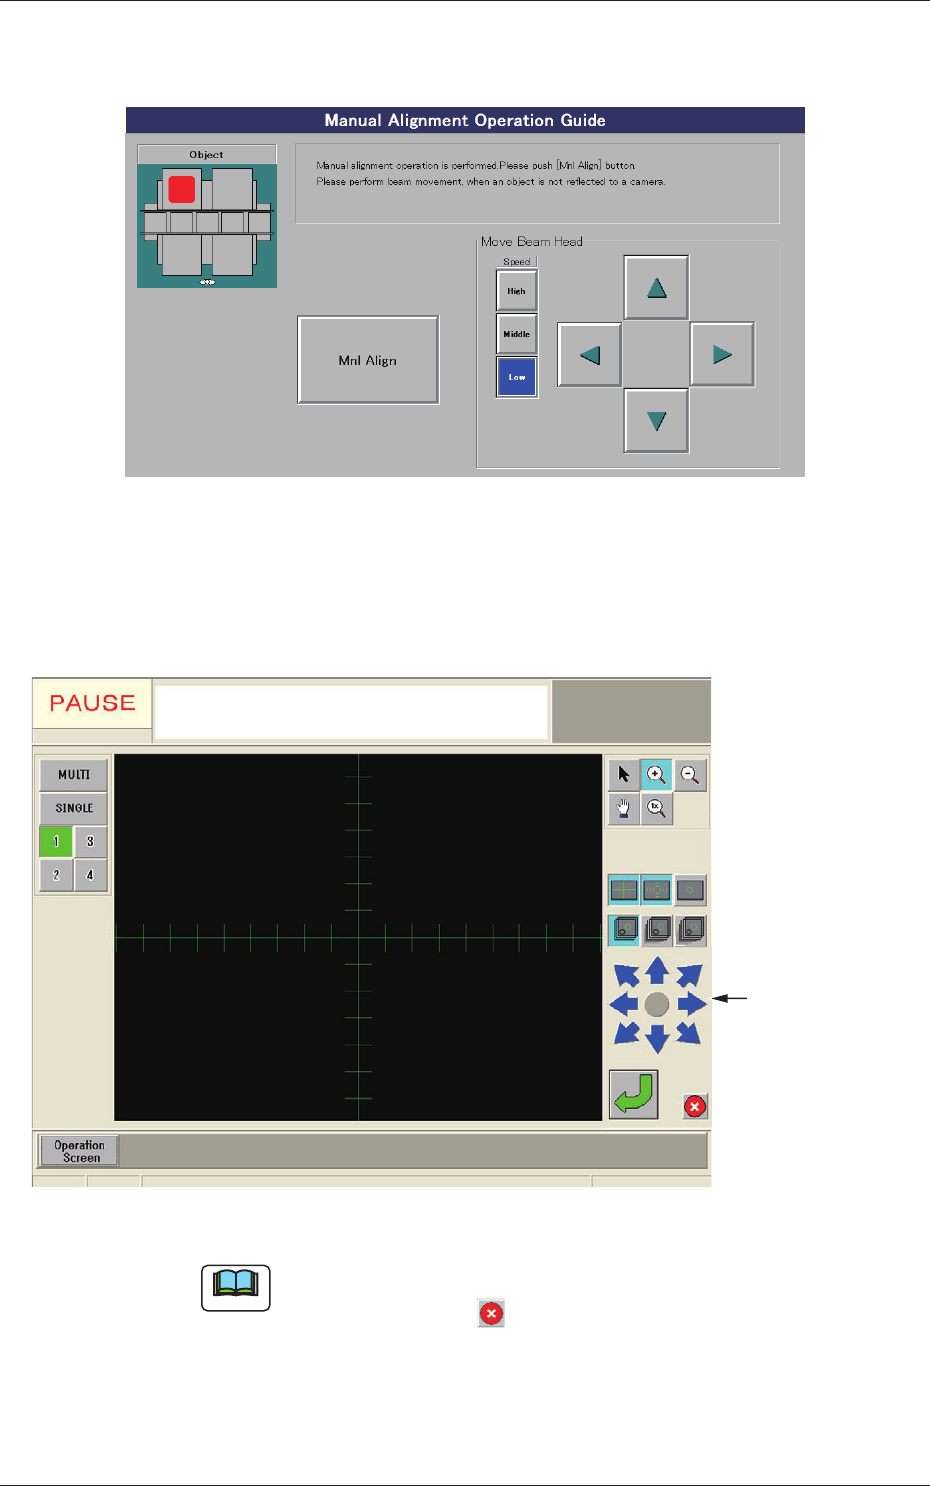
2-40 AIX-ML T-ID 0806-001 3.4 T eaching Operation (4) When the [Dt Pos Move & Mnl Align] button is pressed, the "Manual Alignment Operation Guide" window appears. Fig. B33 "Manual Alignment Operation G…
2-39
AIX-MLT-ID
0806-001
3.4 Teaching Operation
[3] Operation Buttons
[Dt Pos Move & Mnl Align] Button
When pressed, this button performs a teaching operation on the pickup
position.
When the [START] button on the operation panel is pressed in 10
seconds after this button, the "Manual Alignment Operation Guide"
window appears.
[All Beam Heads Zero] Button
When pressed, this button zeroes the stage on which a teaching
operation is performed.
[Beam XY zero move] Button
When pressed, this button returns the beams to their X and Y origins.
[4]
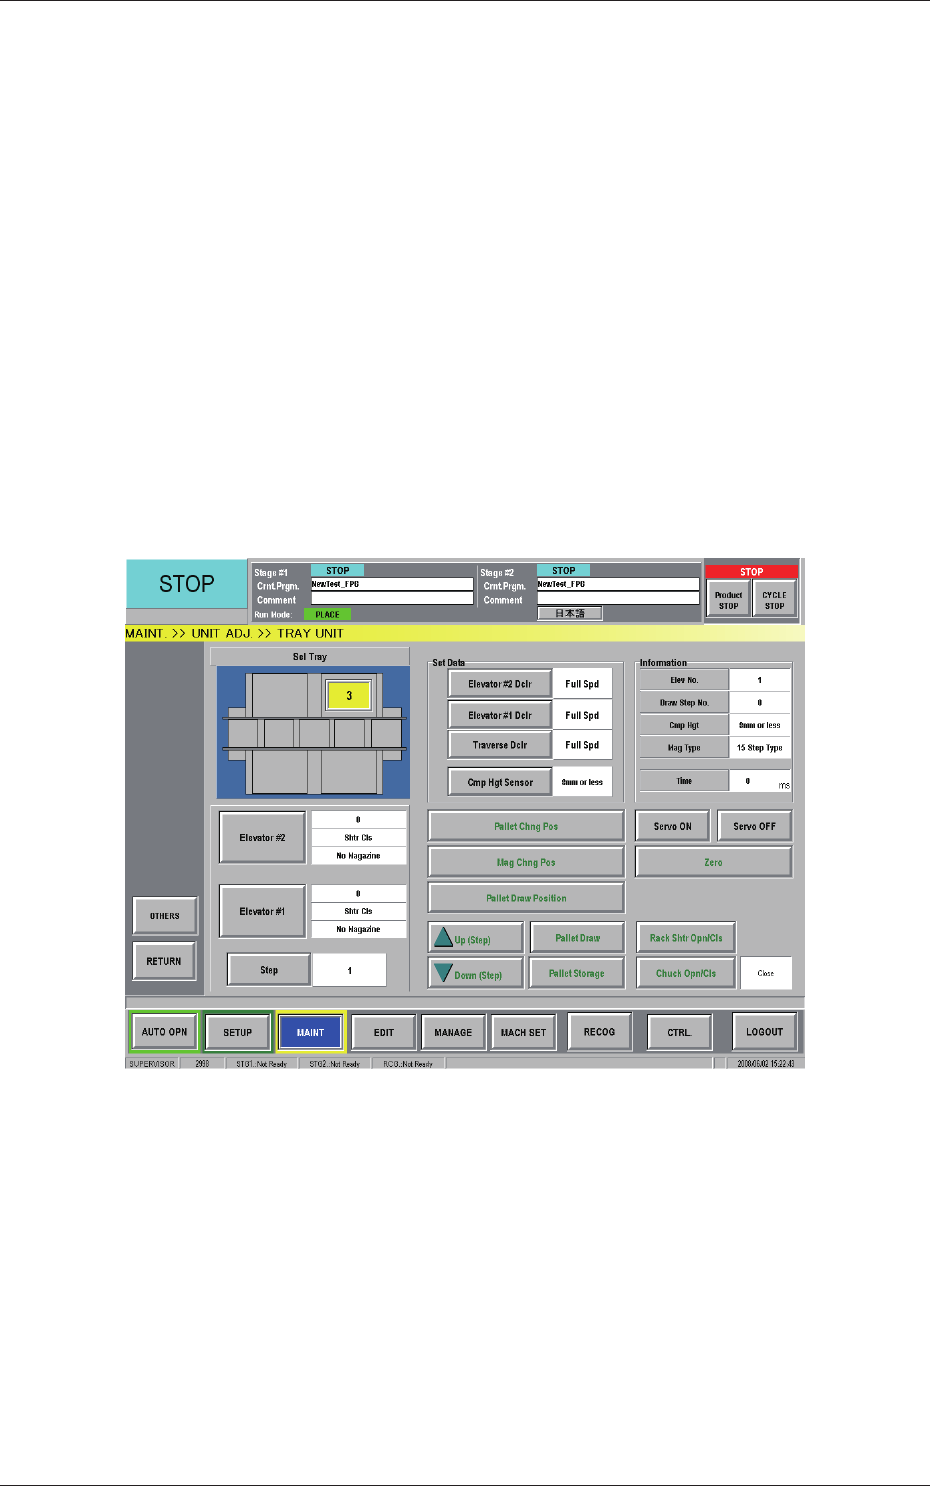
[Tray Unit Adj.] Button
When pressed, this button opens the "TRAY UNIT" window.
Fig. B32 "TRAY UNIT" Window
·
Procedure for T
eaching Operation
(1) Select the feeder base for which the teaching operation should be
performed.
(2) Press the [Fdr No.] button and enter the required feed
er No.
(3) Press the [All Beam Heads Zero] button to zero the stage on the
teaching side.
2-40
AIX-MLT-ID
0806-001
3.4 Teaching Operation
(4) When the [Dt Pos Move & Mnl Align] button is pressed, the "Manual
Alignment Operation Guide" window appears.
Fig. B33 "Manual Alignment Operation Guide" Window
(5) When the [Mnl Align] button is pressed, a recognition window
appears, making it possible to perform the manual alignment
operation.
Image Movement
Buttons
Fig. B34 Recognition Window
Note
When an image of the object for the manual alignment cannot be captured
by the camera, press the button in the recognition window. The "Manual
Alignment Operation Guide" window resumes. Perform a beam movement
operation for the adjustment.

2-41
AIX-MLT-ID
0806-001
3.4 Teaching Operation
(6) Move the object component matrix teaching position for the manual
alignment operation with the image movement buttons until it is
located at the center of the crosshair.
(7) Press the
button in the recognition window to determine the
position.
The recognition window closes and the "Matrix Pitch
XY-Side
Length" window resumes.
(8) The results of the teaching operation appear in the tex
t boxes
entitled "Adj" in the "Matrix Pitch XY-Side Length" window.
(9)
Whenthe[End]buttonispressed,the"ConrmationtoSaving"
dialog box opens, asking you to answer if the data should be saved
or not.
Whenthe[Y
es]buttonispressed,thedataisreectedonthe
component library data is written over the previous one.
Pressing the [No] button cancels the data save operation.
[5] [Feeder No. Tray Set] Button
This button enables you to set the feeder No., the magazine, and the
step for the components to be picked up.
When this button is pressed, a feeder selection becomes possible.
[6]
Comp ID
Displayed is the component library data related to the component on
which a teaching operation is performed.
[7]
Teaching Method
[Tray Zeroing Corner] Button
When this button is pressed, a teaching operation is performed to
specify the component data offsets X and Y.
[Pick-Up First Pos.] and [Pick-Up Last Pos.] Buttons
When these buttons are pressed, the [Center 1-Pt.], [1Point], and [2Point]
buttons are displayed.
Side Lengths X and Y and Pitches X and Y are determined according to
thetaughtrstandlasttakeoutpositions.