00197490-03_SM_CP20-P-M2_EN保养维护.pdf - 第82页
10 Miscellaneous 10.1 Replacing the handle 82 Service Manual SIPLACE SpeedStar (C&P20 P / C&P20 M2) 03/2018

10 Miscellaneous
10.1 Replacing the handle
Service Manual SIPLACE SpeedStar (C&P20 P / C&P20 M2) 03/2018 81
10 Miscellaneous
10.1 Replacing the handle
Parts
●
Head handle SIPLACE C&P20P/M2 [03139524‑xx]
Overview
Fig.123: Head handle SIPLACE C&P20P/M2 [03139524‑xx]
1. Head handle SIPLACE C&P20P/M2
[03139524‑xx]
2. Three screws fastening the handle
(hexagon socket ISO4762M3x12)
Preparation
► Remove the head from the machine. For details about removing and fitting the placement
head, refer to the service manual for your machine.
Fit the head on the head mount [03056231‑xx].
► Make sure that the component sensor protective cap is fitted.
1.1.3 "Safety instructions for the component sensor" [}6]
Removal
► Remove the three screws fastening the handle and then take the handle off.
Installation
► Follow the removal instructions in reverse order for installation.

10 Miscellaneous
10.1 Replacing the handle
82 Service Manual SIPLACE SpeedStar (C&P20 P / C&P20 M2) 03/2018
11 Software functions
11.1 Zero point correction for the Star and Z axis
Service Manual SIPLACE SpeedStar (C&P20 P / C&P20 M2) 03/2018 83
11 Software functions
11.1 Zero point correction for the Star and Z axis
11.1.1 Transfer head specific data to the machine data after manual head exchange
NOTICE
Fast Head Exchange
If a head exchange is carried out with the FHE function, the head specific data will be auto-
matically transferred to the machine data.
Transferring head specific data manually
Precondition: The head needs to have been referenced (star and Z axis).
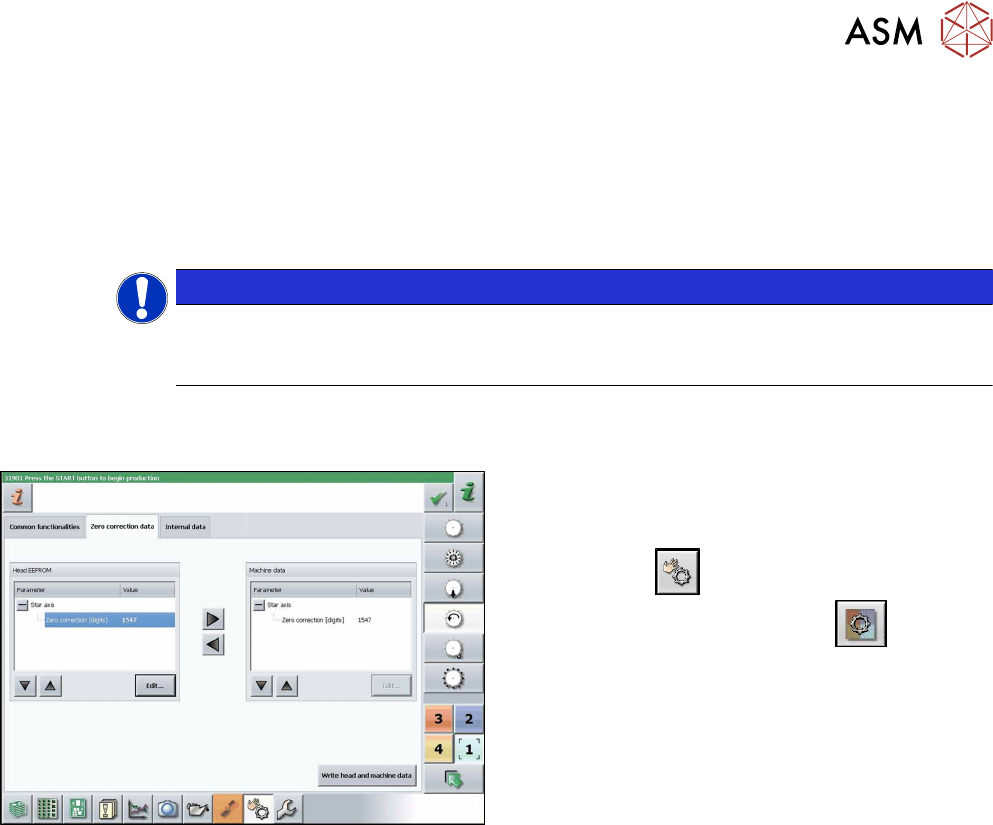
Fig.124: Zero correction data
► Switch over to operator level SIPLACE (cus-
tomer).
► Select Manual operations (Check sensors and
functions)
--> Check sensors and func-
tions of specific components
.
► Select the relevant head.
► Select Z axis.
► Select Zero correction data.
► In the Head EEPROM section, select the relevant
parameters, then click on Edit and enter the cor-
responding value.
► Use the arrow button of the head EEPROM to
transfer the data to the machine data.
► After correcting the parameters, select Write
head and machine data.
► Repeat these settings for the star axis.