DFD6361-Maintenance.pdf - 第234页
C-22 3. Axis Operation Check Summary of this sectio n This section desc ribes the procedures to affirm that there is no abnormality in the machine by individually operating each axis at a specified speed. When you find a…
C-21
2-2-5. Completion of conditioning
Procedures for completion of conditioning
CAUTION
If the <EXIT> button is pressed to cancel the conditioning mode with
jigs or other items left on the chuck table, the microscope or air
curtain may be damaged.
After conditioning, remove jigs, dial gauge and other items from the
chuck table upper surface, and then press the <EXIT> button.
Step No. Do This
(Continued from the previous section)
1
Remove the conditioning jig and dial gauge from the chuck table
upper surface.
2
Close the splash cover.
3
Press the <EXIT> button.
- The X- and Y-axes move to their origins.
- The display returns to the ENGINEERING MAINTENANCE
screen [screen 7.0].
4
Make sure that the spindle rotation and all axes stop.
5
Replace the chuck table for dressing with the work cutting chuck
table.
- For the chuck table replacement procedure;
See the section B-1, [Chuck Table Replacement].
6
Make sure that the chuck table is firmly secured.
When it is not secured;
Open the CHANGE FRAME SIZE screen [screen 6.1] and
press the <F3> button to secure the chuck table.
7
Pull off the maintenance key from the maintenance switch.
8
Have the maintenance key properly stored by the maintenance
personnel.
9
Install the blade and perform the following setup operation.
- For the standard machine: Conduct the contact setup.
- For the machine incorporating the non-contact setup feature
[optional accessory]: Conduct the sensor calibration setup.
- For setup procedures;
See the section B-7, [Setup] of the Operation Manual.

C-22
3. Axis Operation Check
Summary of this section
This section describes the procedures to affirm that there is no abnormality in
the machine by individually operating each axis at a specified speed.
When you find any abnormal condition, such as an inoperative of an axis,
contact your DISCO Service Office.
Procedures for axis operation check
WARNING
- For the axis operation check purposes, the axes are operated with
the interlock feature disabled by the maintenance key. In this
inspection, therefore, the personnel could be injured or the machine
could be damaged.
This operation must be carefully carried out by the qualified
maintenance personnel.
- While the AXIS OPERATION screen is displayed, the axes can be
operated with the axis operation buttons. The maintenance
personnel may therefore be injured if any unexpected machine
operation is invoked.
Ensure that no person other than the maintenance personnel
touches the machine.
- If the person other than the maintenance personnel touches the
machine, the machine operates and the maintenance personnel
may be injured.
Ensure that no person other than the maintenance personnel
touches the machine.
- If a touch panel control is activated, for instance, by a person's
elbow, to invoke an unexpected machine operation, the operator
may be injured.
While you don't use the touch panel, press the Disco's logo button
located at the upper left of the screen in order to lock up and
deactivate the touch panel.
C-23
Procedures for axis operation check (Continued)
Step No. Do This
1
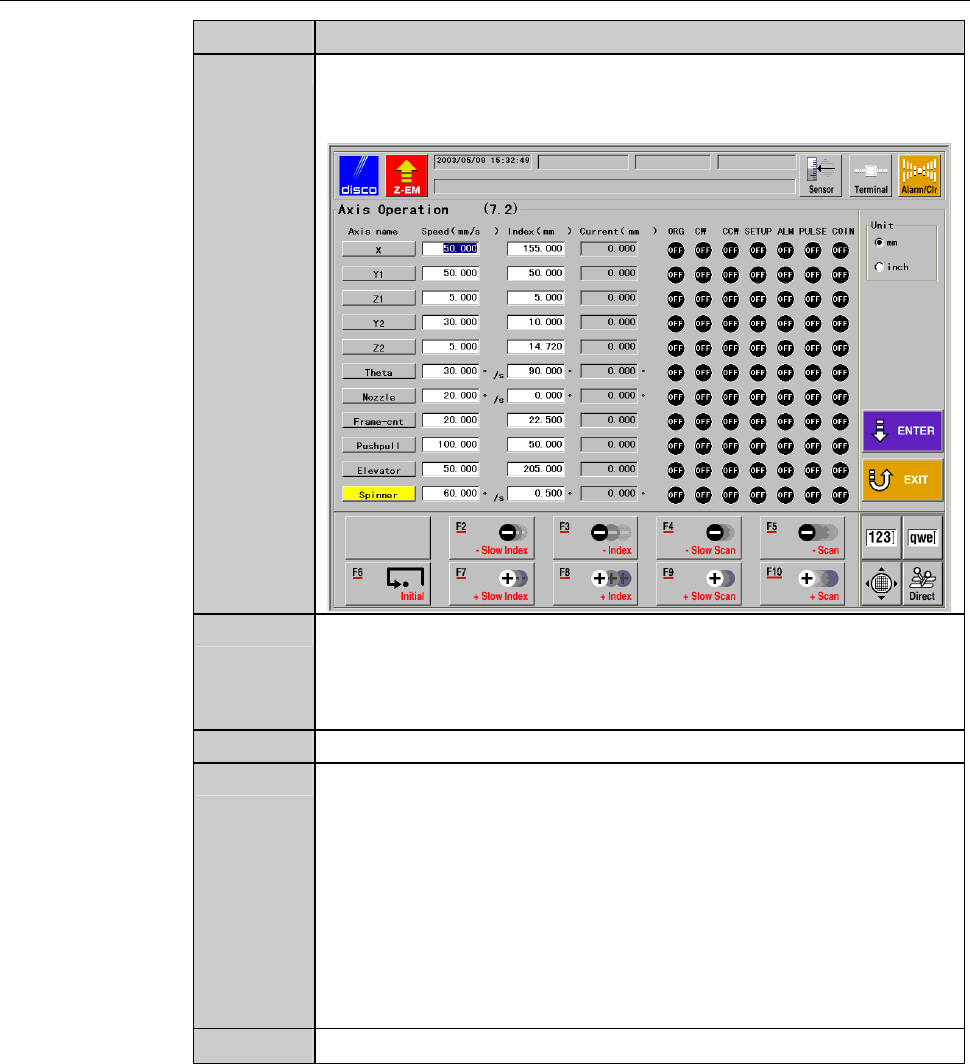
From the ENGINEERING MAINTENANCE screen [screen 7.0],
press the <F2> button.
- The AXIS OPERATION screen then appears.
2
With numeric buttons enter the scan speed [2] and index amount
[3] for the axis to be subjected to operational checkout, and then
press the <ENTER> button.
- The data setup is then finalized.
3
Select the axis to be checked.
4
When performing axis operation checks with the splash cover or
arm section cover open, proceed as follows.
1) Obtain the maintenance key, which is stored under
maintenance personnel control, and insert it into the
maintenance switch.
2) Rotate the maintenance key clockwise and placed in the
OVERRIDE position.
3) While pressing the override button, open the splash cover or
arm section cover.
5
Using function buttons (F2 ∼ F10), perform operational checks.