00192377-02.pdf - 第111页
SIPLACE S-23 HM 2 Retrofitting Instruct. S-23 HM to SW V 502.xx incl. RV6-DLM 1 Head (Option) 07/01 Issue 2.10 SITEST: Adjust Configuration, Entry Zero Point Compens. Values RV6 Head 111 2.10 SITEST : Adjust Configuratio…

2 Retrofitting Instruct. S-23 HM to SW V 502.xx incl. RV6-DLM1 Head (Option) SIPLACE S-23 HM
2.9 Sequence: Software Upgrade on the Station Computer 07/01 Issue
110
2.9.4 Installing the V 502.01 Station Software
2.9.4.1 General Recommendation
Due to the large number of new features in the software, we strongly recommend that you read
the Software Version Description for the V 502.01 Station Computer software. 2
2.9.4.2 Installation
Å Check: The monitor must be installed correctly prior to installation (touch screen). If this is not
done, the software insallation for the monitor will not function correctly.
No error message is issued!
NOTE:
The touch screen may also be installed with the Microtouch Setup program on the installation CD
(directory: D:\Siplace\Micro..\Disk1\setup... ; use Express setup). 2
Å Install the V 502.01 software (CD from the retrofit kit, for article no. see Section 2.5). Proceed
as described in the following instructions:
– Software Guide SITEST, V 502.xx, Item no. 00192656-01
– if necessary, Software Version Description V 502.01, Item no. 00192395-01
Å AFTER installation, first upgrade ALL the available firmware (axes, TSP210 ...) in SITEST:
BIOS AND APPLICATION.
Å The BIOS versions must be loaded separately for each module.
Å The applications can be loaded in one operation (multiple download):
Click "Check" -> "Download").
2.9.4.3 Machine Data:
All files containing measurement data still exist as before.
All other files have been replaced by a database. A tool is available for changing certain
parameters.
Install this tool if required -> for instructions, see the "DB Editor" guide.
Back up the machine data on 2 floppies: Disk 1: Database; Disk 2: Other files.
2.9.4.4 Tray Description:
The coordinate system for trays has been rotated by 90° as of version 502.01 of the line
computer. All values refer to the edge of the tray (and not, as previously, to the carrier) -> see the
online Help system in the line computer and the Software Version Description LRU V 502.xx.

SIPLACE S-23 HM 2 Retrofitting Instruct. S-23 HM to SW V 502.xx incl. RV6-DLM1 Head (Option)
07/01 Issue 2.10 SITEST: Adjust Configuration, Entry Zero Point Compens. Values RV6 Head
111
2.10 SITEST: Adjust Configuration, Entry Zero Point
Compens. Values RV6 Head
DANGER
Note the DANGER text for the work with the SITEST program in Section 2.4. 2
2.10.1 First Start after Installing Software
Å Boot up the machine after installing the software V 502.01.
Å If the error message "Head type unknown" is displayed while running up, change over to the
SITEST program.
NOTE: This may occur with heads manufactured up to approximately October of 2000 be-
cause no head type is entered in the EPROM of these heads.
Å In this case, first enter the relevant type of DLM1 head (6-or 12-segment) in the menu "Head
exchange" as described in SITEST Software Guide V 502.xx, chapter "Head Exchange: RV
Head 1, RV Head 2".
2 Retrofitting Instruct. S-23 HM to SW V 502.xx incl. RV6-DLM1 Head (Option) SIPLACE S-23 HM
2.10 SITEST: Adjust Configuration, Entry Zero Point Compens. Values RV6 Head 07/01 Issue
112
2.10.2 Configuration: RV6-DLM1 Head
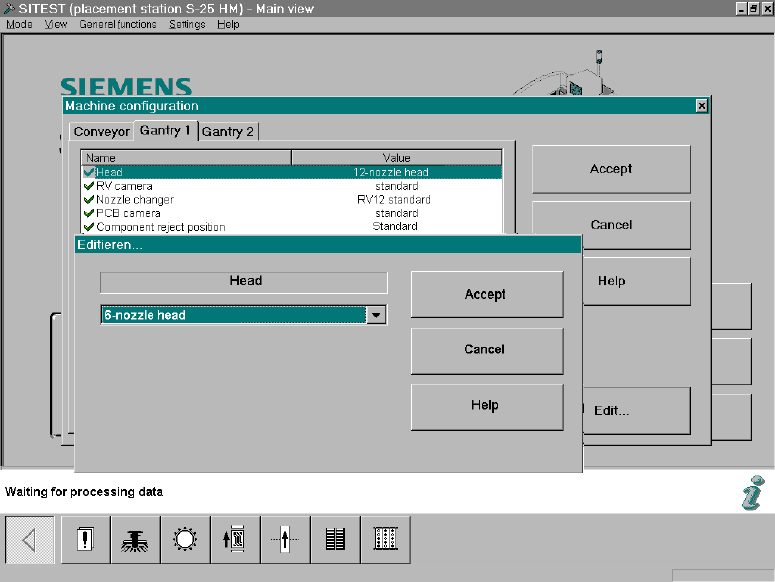
In the SITEST main view select -> "Settings" ->The menu "Machine Configuration" will appear: 2
Fig. 2.10.1 SITEST: Machine Configuration, Selecting the RV Head
Å Select the "Gantry 1/2" (registration card) -> Click on the DLM1, head 6-/12-segment) mounted
on the gantry -> Select "Accept".