presto_en.pdf - 第40页
Page 40 3) Toolbar 4) Currently selected program mer 5) Currently selected device 6) Programmer settings windo w 7) HEX edit or window for code/main memo ry 8) HEX edit or window for data memory 9) Configuration w indow …
Page 39
sn2: 000045566778,210002020304;
sn3: 000056677889,210003020304;
note
sn4: 00006778899A,210004020304;
sn5: 000078899AAB,210005020304;
sn6: 000078899AAB,210006020304;
sn7: 000078899AAB,210007020304;
sn8: code.00013F003F013F023F03,
data.0002'x''4''2';
sn9: prog.00013F003F013F023F03,
e.0002'x''4''3';
5.4.4 Calibration Memory
Support
Some devices contain a calibration memory containing
factory-preset device calibration. The loss of its content
can cause a fault in the device functionality. For this
reason we have tools allowing users to work with the
calibration memory.
Working with Calibration
Memory When Erasing a Device
in UV Eraser
Calibration data should be saved prior to erasing a
device. To do so, choose File ➙ Save calibration
data...
ou can retrieve it back by choosing File ➙ Read
calibration data...
The program contains a function for verifying whether a
device has been erased correctly: Device ➙ Blank
check. When this command is used, the program displays
data from the calibration memory.
Working With Calibration
Memory in Devices With Flash
Memory
When these devices are erased, the content of their
calibration memory is preserved.
If you really need to erase the calibration memory for
some reason, you can do so by choosing Device ➙ Erase
➙ Erase all (including calibration).
Advice
New Flash devices with a calibration memory (such as
PIC12F629) contain so called 'bandgap bits', which form
part of the device calibration. These bits can be found in
the configuration word and are erased too if the
command Device ➙ Erase ➙ Erase all(including
calibration) is executed!
5.5
Program Controls
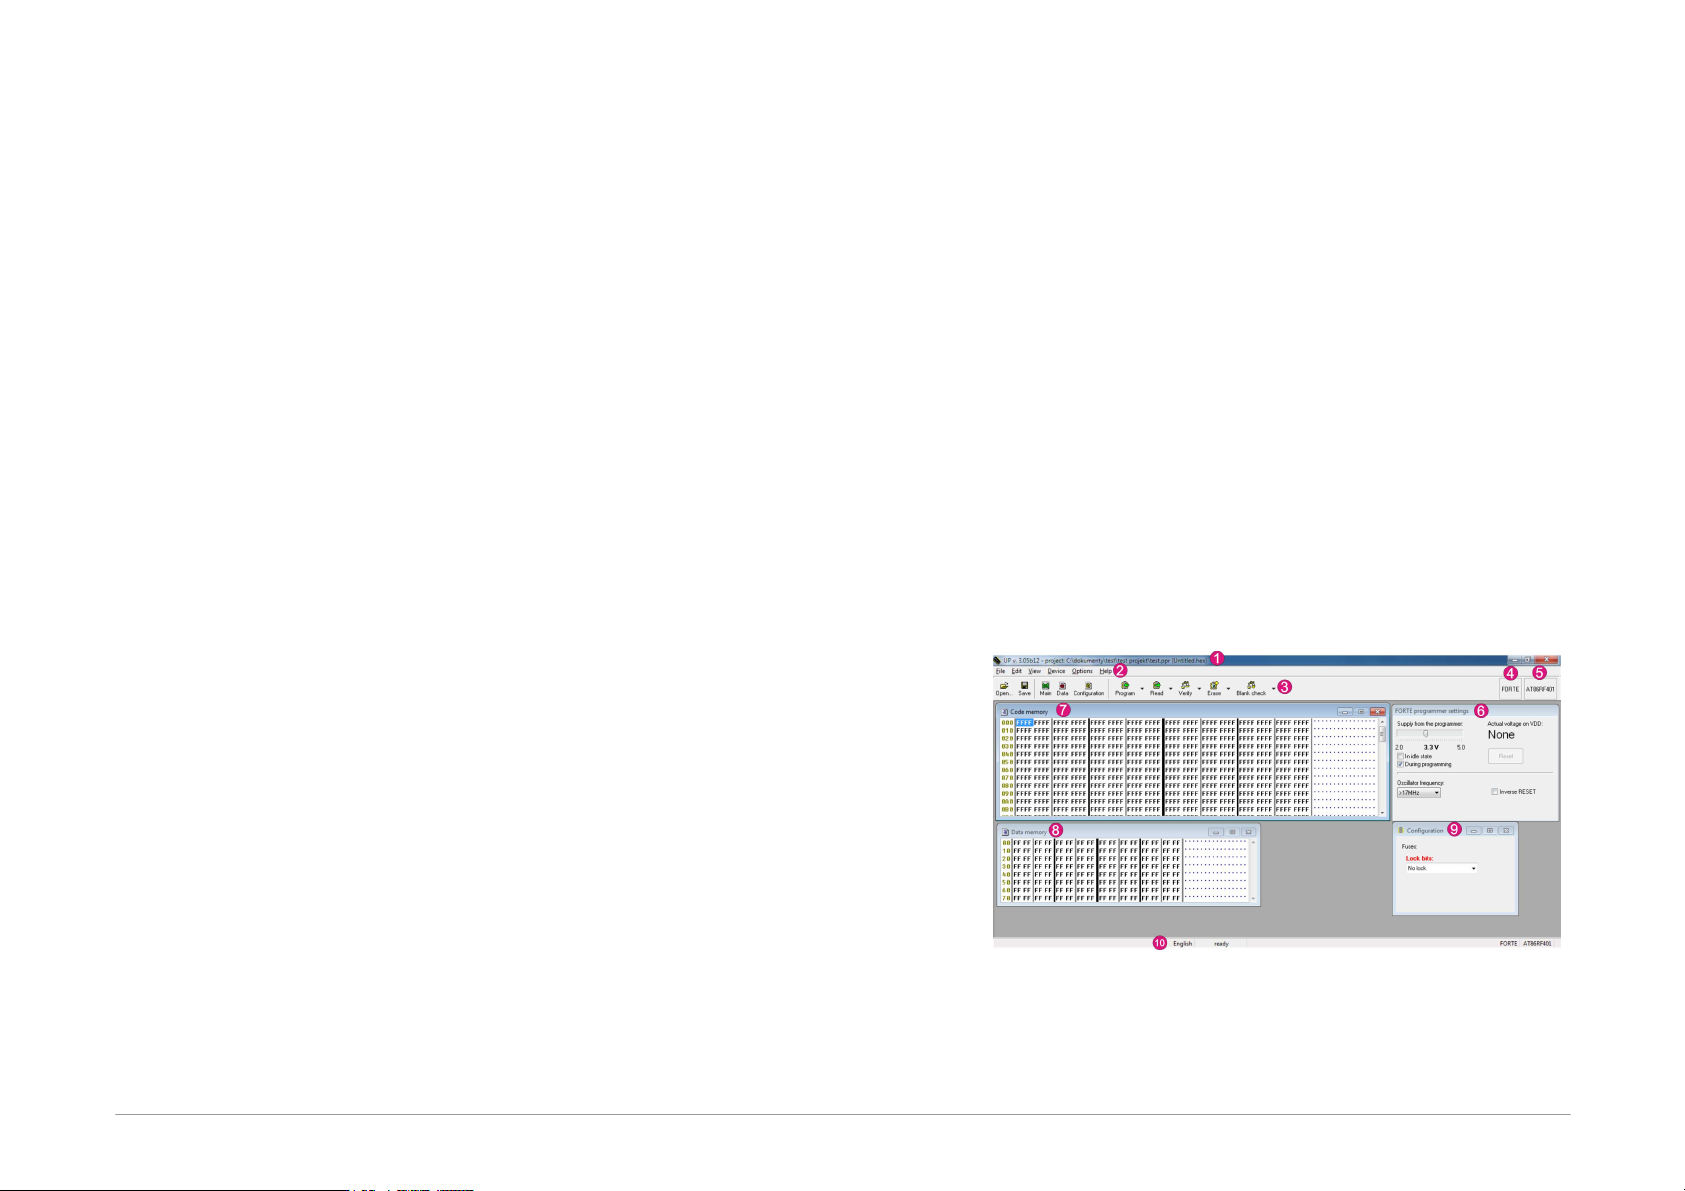
Fig.25: Controls of UP software
1) Title bar with the open project name or file
2) Menu

Page 40
3) Toolbar
4) Currently selected programmer
5) Currently selected device
6) Programmer settings window
7) HEX editor window for code/main memory
8) HEX editor window for data memory
9) Configuration window
10) Status bar
5.5.1 Toolbar
A toolbar is a panel with quick selection buttons located
under the program menu (see
Program Controls).
If you want to remove the toolbar, simply uncheck the
Display icons and descriptions on the toolbar button
options in the Settings menu as described in
Program
settings
.
5.5.2 Status Bar
The status bar is a panel in the bottom part of the window
(see
Program Controls). It presents information on the
programmer, the device, changes to the file since the last
saving, etc.
Individual parts of the status bar react to double-clicking
and to the context menu that opens after right-clicking.
If you want to hide or re-display the status bar, choose
Program settings ➙ Panels ➙ Display the status bar
in the lower part of the window.
5.5.3 Menus
The following texts describe in detail individual items in
the UP software menus.
Menu commands can be triggered with mouse by clicking
on a particular menu item or from the keyboard by
pressing the key together with the shortcut, i.e. the
underlined letter in the menu.
The menu bar consists of the following menus
(categories):
•
File Menu
•
Edit Menu
•
View Menu
•
Device Menu
•
Options Menu
•
Help Menu
File Menu
File ➙ New
Keyboard shortcut: Ctrl+N
The program creates a new empty file. If the currently
open file has not been saved, the program prompts the
user to save it.
File ➙ Open...
Keyboard shortcut: Ctrl+O
The program opens the Windows standard dialog listing
the files saved on the disc. The supported file formats are
described in
Appendix C: Intel-HEX File Format. Files with
extensions .hex or .a43 are loaded as Intel-HEX, others as
binary. There are also filters available making it possible
to open all files as .hex or as .bin.
File ➙ Open next file...
The program imports another .hex or .bin file with an
optional offset. This function is useful if the user needs to
load another file into device's memory. Files with
extensions .hex or .a43 are loaded as Intel-HEX, others as
.bin.
For example, this command provides for merging of
several .hex files (e.g. bootloader + program).

Page 41
When in Open next file dialog the user selects
Autoload next time, the file will be loading after the
main data file automatically. Then the file is listed in the
File ➙ Open next: menu. Using this menu item the
autoload can be disabled again.
This way it is possible to autoload one file.
File ➙ Open next:
When this menu item is enabled, it shows that the
automatic load of next file is enabled. By clicking this
menu item it is possible to disable the automatic file
load.
File ➙ Reload actual file
Keyboard shortcut: Ctrl+R
The program re-opens (i.e. re-reads from the disc) the
currently open file. This command is useful if you know
that the file on the disc has changed and you want to load
these changes into the program.
If you are using Program settings ➙ Files ➙ Do
automatic check for newer versions of actual file,
the program automatically notifies the user of a change in
the currently open file and offers its reloading.
File ➙ Save
Keyboard shortcut: Ctrl+S
The program saves the file on a disc. If you want save
your file under a different name than the current one, use
the Save As... command instead.
The program can skip unused locations of the memory.
See Program settings for details.
File ➙ Save as...
The program saves the open file on a disc under a new
name using the Windows standard dialog.
The program can skip unused locations of the memory
while saving or not to save certain selected locations.
See
Program settings for details.
File ➙ Import data memory from
file...
Using the Windows standard dialog, the program reads
and imports the content of a data (EEPROM) memory
saved in a different file. This allows the user to load a
data memory if this has not been saved in the same file
as the code/main memory (this concerns ATmega8
microcontrollers, for example).
Important warning
Such a file, regardless of its content, is read from the zero
address as if it contained only the data (EEPROM)
memory. This means that a file generated normally by a
compiler cannot be correctly read using this command.
File ➙ Open file with data memory
automatically
With this option selected, the program automatically
loads the file for the data memory alongside with loading
the file for the code/main memory. This option is active
only if a separate file is loaded for the data memory.
File ➙ New project
Keyboard shortcut: Shift+Ctrl+N
This command creates a new project.
It is especially advisable to use project files if you
frequently switch between programming different device
types or if you are using several different programmers. A
project file contains all the corresponding settings and
provides for loading of all of them in one step.
File ➙ Open project...
Keyboard shortcut: Shift+Ctrl+O
Using the Windows standard dialog, the program opens
an already existing project file saved on a disc. If an
additional file had been opened together with the project,