1_NXT Conveyor(1.0)E.pdf - 第4页
Chapter 1 – Repairing & Adjusting the Conveyor 1.1 Conveyor motor pulley installation procedure 1. The following items are required for the procedure: Conveyor motor pulley thickness gauge jig (PM21190) M4 x 6 hollow…

C
C
h
h
a
a
p
p
t
t
e
e
r
r
1
1
R
R
e
e
p
p
a
a
i
i
r
r
i
i
n
n
g
g
&
&
A
A
d
d
j
j
u
u
s
s
t
t
i
i
n
n
g
g
t
t
h
h
e
e
C
C
o
o
n
n
v
v
e
e
y
y
o
o
r
r
NXT Repair Training Textbook
Conveyor Unit
FK-9F98-43-0E
Edition 1.0 2 / 46 FUJI Machine Mfg. Co., Ltd.
Chapter 1 – Repairing & Adjusting the Conveyor
1.1 Conveyor motor pulley installation procedure
1. The following items are required for the procedure:
Conveyor motor pulley thickness gauge jig (PM21190)
M4 x 6 hollow bolt
M4 x 4 hollow bolt
ThreeBond Anaerobic Adhesive and Sealant Primer
(1390E)
ThreeBond Anaerobic Adhesive and Sealant (1373B)
Loctite 222
Cotton bud
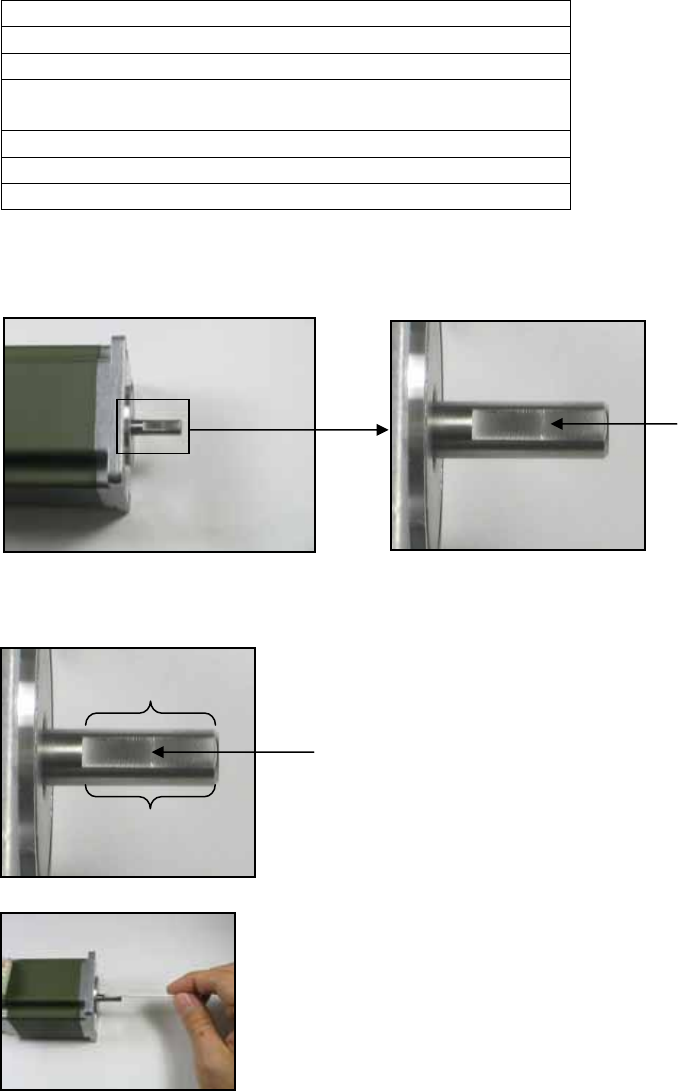
2. Prepare the motor as shown below. Note that the motor shaft is not perfectly round
but has a flat cutout section.
3. Use a cotton bud to apply the primer (1390E) to the motor shaft. Apply the primer
throughout the circumference of the shaft (but do not apply primer to the area left of
the flat cutout section).
Flat
cutout
section
Apply Primer throughout the
circumference of the shaft in the
area indicated by the brackets.
Do not apply primer to the area
left of the brackets.
NXT Repair Training Textbook
Conveyor Unit
FK-9F98-43-0E
Edition 1.0 3 / 46 FUJI Machine Mfg. Co., Ltd.

4. Apply primer to the inside diameter of the pulley as shown:
5. Apply ThreeBond adhesive (1373B) to the inside diameter of the pulley.
6. Place the jig so that the U groove slots onto the motor shaft:
7. Push the pulley onto the motor shaft so that the first (leftmost) tapping hole on the
pulley aligns with the flat cutout section on the shaft:
Jig (PM21190)
First (leftmost)
tapping hole
Second
(rightmost)
tapping
hole
NXT Repair Training Textbook
Conveyor Unit
FK-9F98-43-0E
Edition 1.0 4 / 46 FUJI Machine Mfg. Co., Ltd.