00196602-05_SM_SIPLACE_X-Feeder_EN.pdf - 第39页
6 Repairing the X Feeder modules 6.5 Foil Disposal Service Manual SIPLACE X-Feeder 4 - 88 mm 11/2017 39 ► Lift the right side of the feeder module a little. ► Lift the foil disposal drive slightly and pull it to the left…

6 Repairing the X Feeder modules
6.5 Foil Disposal
38 Service Manual SIPLACE X-Feeder 4 - 88 mm 11/2017
Modules with upgrade kit:
Feeder modules which contain an upgrade kit (marked with a label
on the left), can have the module version -07 foil disposal assem-
bly fitted as a spare part (item no.).
You must also replace the stuffing gear for the rocker opposite with
a module -07 version.
Required tools
●
Phillips screwdriver
●
TORX screwdriver size T8
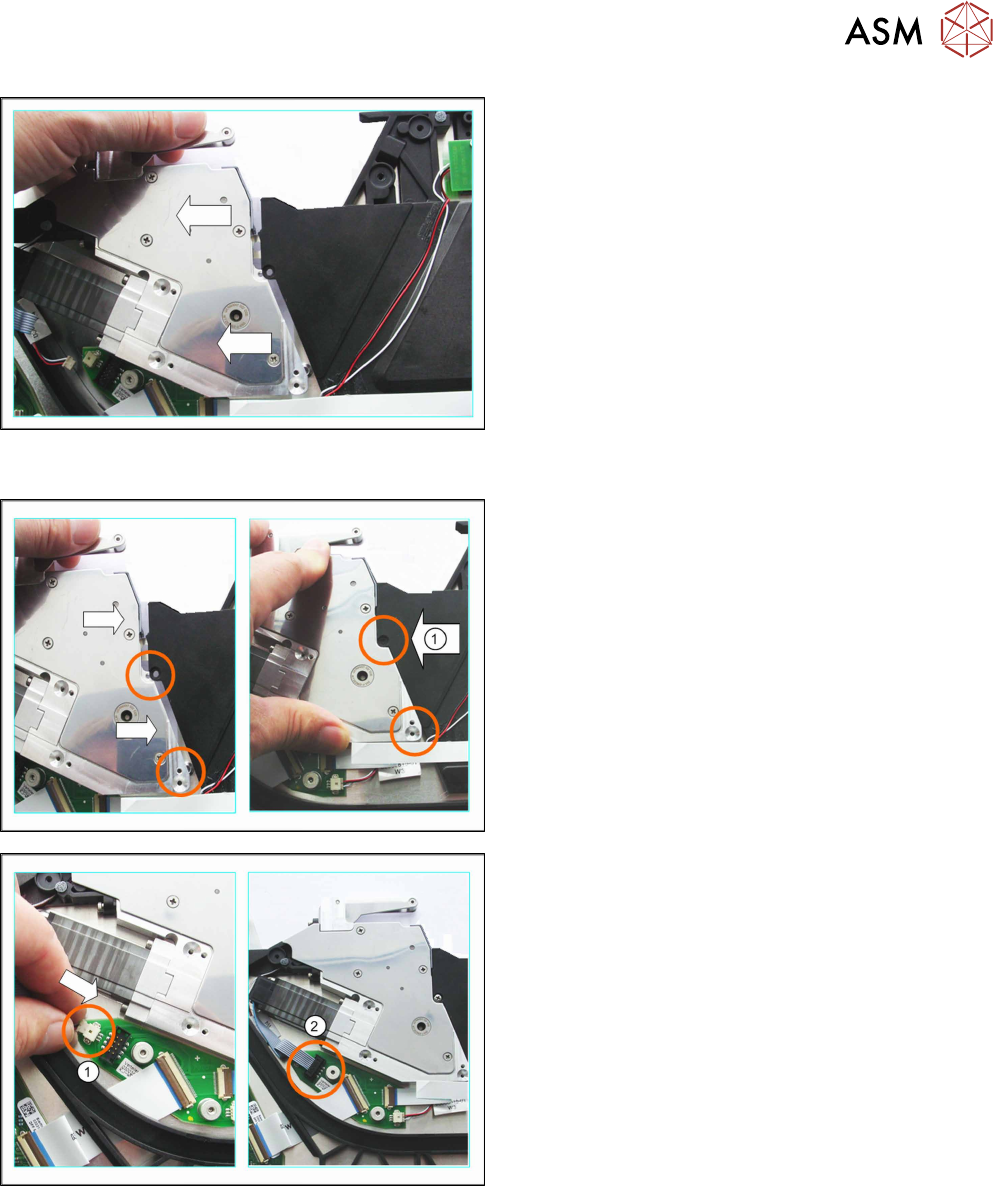
6.5.1.1 Removing the Foil Disposal Drive (4 - 12 mm)
► First remove the rocker (see 6.6.2.1 "Removing
the Rocker (4 - 88 mm)" [}69]).
► Now carefully place the feeder module down on
its left side.
► Remove the screws marked in the diagram.
► Carefully place the feeder module on its right side.
► Remove the left side cover (see 6.3.1 "Removing the Left Side Cover" [}23]).
► (1) Loosen the screw marked in the diagram.
► (2) Pull the connector marked in the diagram out
of its connection.
To loosen the connector, move it carefully from
side to side.
► (3) Pull the other connector marked in the dia-
gram out of its connection.
Pull on the connector and NOT on the cable.
6 Repairing the X Feeder modules
6.5 Foil Disposal
Service Manual SIPLACE X-Feeder 4 - 88 mm 11/2017 39
► Lift the right side of the feeder module a little.
► Lift the foil disposal drive slightly and pull it to the
left (keep it straight) and out of the feeder.
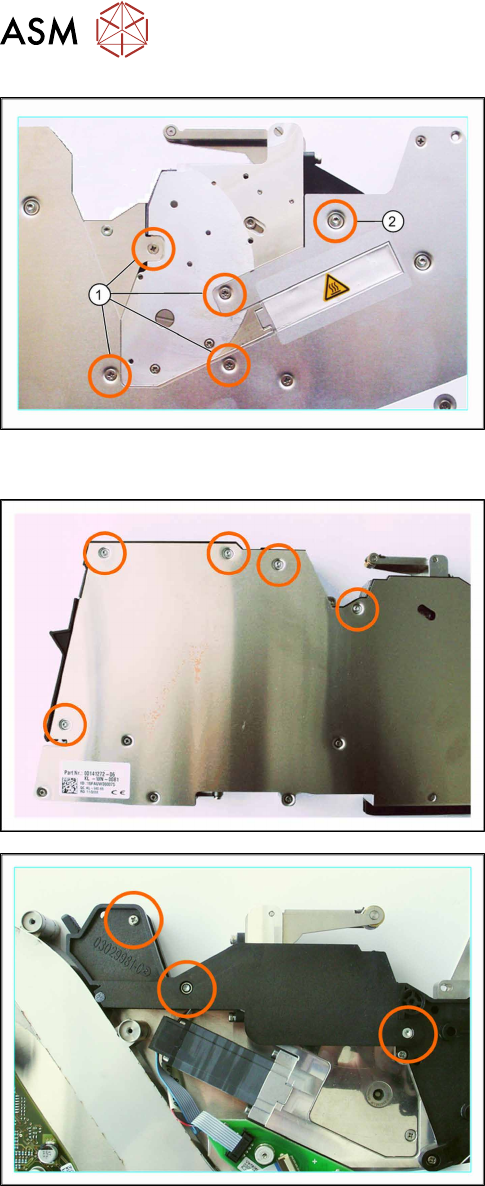
6.5.1.2 Fitting the Foil Disposal Drive (4 - 12 mm)
► Lift the right side of the feeder module a little.
► Push the foil disposal drive into the feeder mod-
ule from the left (keep it straight), as far as the
stop.
Make sure that the foil disposal drive lies against
the feeder module at the circular points marked in
the diagram.
► (1) Fix the foil disposal drive into place with the
screw, at the position marked in the diagram.
► Make sure that the smooth side of the connector
is at the top.
► (1) Carefully push the connector as far as the
end stop into the marked connection on the
board.
Attention:
Do not push the connector with force into the connec-
tion, otherwise individual pins may break off or be dis-
torted.
► (2) Push the other connector as far as the end
stop, into the marked connection on the board.
► Fit the left side cover into place (see section 6.3.2 "Fitting the Left Side Cover" [}24]).
► Fit the rocker (see 6.6.2.2 "Fitting the Rocker (4 - 88 mm)" [}70]).
► Carefully place the feeder module down on its left side.
6 Repairing the X Feeder modules
6.5 Foil Disposal
40 Service Manual SIPLACE X-Feeder 4 - 88 mm 11/2017
► Fix the foil disposal drive into place with the 5
screws marked in the diagram.
Use a TORX screwdriver with a torque of 0.6 Nm for
the (1) countersunk screws M2.5x5mm
.
Use a Phillips screwdriver with a torque of 0.9 Nm for
the (2) mushroom head cutting screw T2.5x6mm.
6.5.1.3 Removing the Foil Disposal Drive (16 mm)
► First remove the rocker (see 6.6.2.1 "Removing
the Rocker (4 - 88 mm)" [}69]).
► Carefully place the feeder module down on its left
side.
► Remove the screws marked in the diagram.
► Carefully place the feeder module on its right
side.
► Remove the left side cover (see 6.3.1 "Removing
the Left Side Cover" [}23]).
► Loosen the screws marked in the diagram.
► Remove the spacer from the feeder module.