00196962-04-BA-SX12-V2-EN.pdf - 第252页
5 Working with the machine User manual SIPLACE SX1/SX2 5.8 Shift changeover From software version SC 706.1 SP1 Version 10/2014 252 5.8 Shif t changeover 5.8.1 Shif t changeover tasks S plice the tapes early . The feede…

User manual SIPLACE SX1/SX2 5 Working with the machine
From software version SC 706.1 SP1 Version 10/2014 5.7 Indicator lamps with horn
251
5.7.2.1 Basics
5
5.7.2.2 Frequency of flashes
5
5
5.7.2.3 Priorities
5
5.7.2.4 Reaction time
Each change to the machine status is shown at the indicator lamps within three seconds.
Status Meaning
Off No warning and no alert
Flashes Warning, the frequency varies depend on the type of warning on/
off in milliseconds.
On Alert
-- The described state does not affect the lamp concerned.
Normal flashing Green indicator lamp: 700 ms off, 700 ms on
White indicator lamp: 500 ms off, 500 ms on
Short flashing 100 ms off, 1000 ms on
Fast flashing 100 ms off, 200 ms on
Type of warning Priority
Definition for fast flashing Top
Definition for normal flashing Medium
Definition for short flashing Lowest

5 Working with the machine User manual SIPLACE SX1/SX2
5.8 Shift changeover From software version SC 706.1 SP1 Version 10/2014
252
5.8 Shift changeover
5.8.1 Shift changeover tasks
Splice the tapes early. The feeder modules do not have to be refilled as soon as the new shift
starts. This minimizes extended down times.
At the shift change, pass important information on to the next operator. This includes, for in-
stance, changes to the placement program. Also read through the list of the descriptions of
the steps to take in section 5.12
, page 275.
Carry out a setup check.
Make sure that the feeder modules are equipped with the correct components, that they are
at the correct locations in the component trolley and that the conveyor increment is set cor-
rectly.
Clean the following line assemblies:
Empty the reject bin and carefully vacuum the area around the reject bin.
Carefully vacuum the nozzle changer, feeder modules and the component trolley.
Empty the waste tape container. Follow the safety instructions given in section 5.8.2, page
253
.
Empty the tray for the machine cover.
User manual SIPLACE SX1/SX2 5 Working with the machine
From software version SC 706.1 SP1 Version 10/2014 5.8 Shift changeover
253
5.8.2 Safety instructions for emptying the waste tape container (SX1/SX2 only)
5
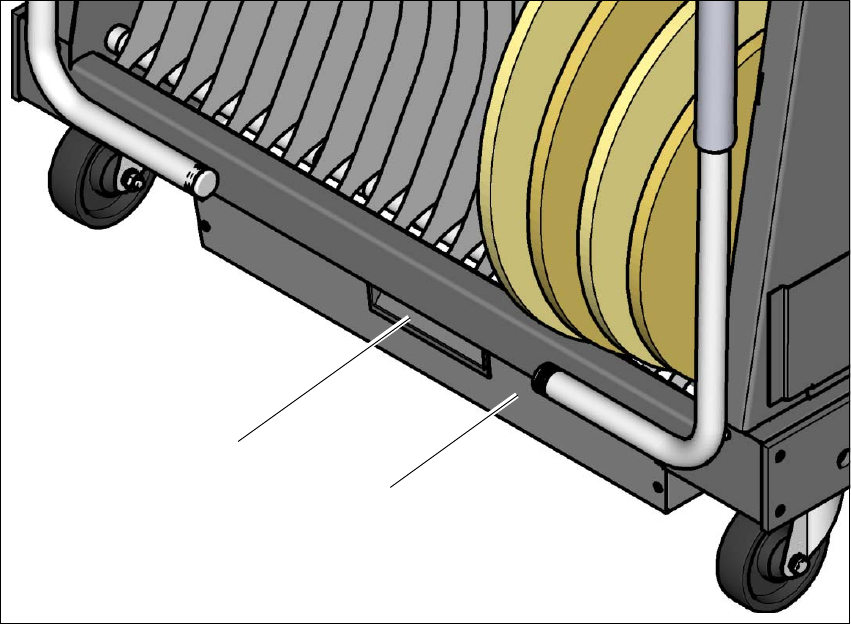
Fig. 5.8 - 1 Safety instructions for emptying the waste tape container
(1) Handle
(2) Waste tape container
The waste tape container must be pulled out of the component trolley for emptying. There is a risk
of catching your fingers as you do so.
To avoid this risk, hold the waste tape container with your fingers in the handle
(item 1).
Do NOT put your fingers in the gap between the tape container and waste tape container as
you could catch your fingers if you do.
(1)
(2)