00197461-01_AI_Portaltausch_X-Serie_S_INTERN_de_en.pdf - 第67页
Installation Final work Gantry Exchange Portaltausch 67 Fitting the side cover ► Fit the side cover. Warning label, if needed ► Attach the warning labels to the new gantry. Clea n the adhesive surfaces first with ethanol…

Installation
Installing the Gantry
66 Gantry Exchange Portaltausch
Fitting the magnets
Fit the magnets. Proceed as follows:
► Keep holding the magnets so long until they have been fixed with the first screw.
► Tighten the remaining screws with a torque wrench. Use a torque of 9.5 Nm.
► Fit the remaining magnets, one after the other, as described in the above mentioned steps.
The magnets attract each other and there is a risk of fingers setting trapped between the magnets.
Fitting the buffer
► Fit the buffer to the X axis.
Fit the pin picker, if required
► Fit the pin picker. Read the assembly instructions "Smart Pin Support - X-Series S" [00197394-xx].
Fitting the placement head
► Fit the placement head. For details, refer to the service manual.
DANGER
Risk of trapped limbs - observe the safety data sheet!
The magnets are very powerful. There is a risk of body limbs being trapped.
► Risk of trapped limbs - observe the safety data sheet 00195600-xx.
DANGER
Risk of trapped limbs - observe the safety instructions!
The magnets are very powerful. There is a risk of body limbs being trapped.
► Please make sure you observe the applicable section "1.1.3 Safety Instructions for Working
with Strong Magnetic Fields (internal)" [ ➙ 42].
► The magnets attract each other and there is a risk of fingers setting trapped between the
magnets.
► Observe the magnet pole direction "N". The magnet pole direction "N" must be on the same
side for all magnets.
► Place the magnet on the machine frame and push the magnet gently into the mounting po-
sition.
► Only ever remove one magnet at a time and place it on its own in suitable packaging.
► Keep a safe distance between the individual magnets.
► Never place the magnets down on a work surface without securing them. When storing the
magnets, always use the prescribed packaging (box lid for magnet 150x64-128 [03105100-
xx]).
► Keep emergency protective equipment ready in case an accident occurs:
Plastic wedge, 65 x 180 mm [03097870-xx]
Copper hammer, 750 g [03097897-xx]
► The copper hammer and wedges are used in case of accidents, to separate the magnets.
► When working with magnets, enlist the help of an additional person.
NOTICE
Installation
► Connect all hoses and cables that lead to the pin picker. Observe how the cables are run.
Replace the cable ties.
► Tighten the three screws fastening the pin picker.
Installation
Final work
Gantry Exchange Portaltausch 67
Fitting the side cover
► Fit the side cover.
Warning label, if needed
► Attach the warning labels to the new gantry. Clean the adhesive surfaces first with ethanol or isopro-
panol (IPA).
3.5
3.5 Final work
Final work
► Switch on the machine
► Move the component trolley into the machine.
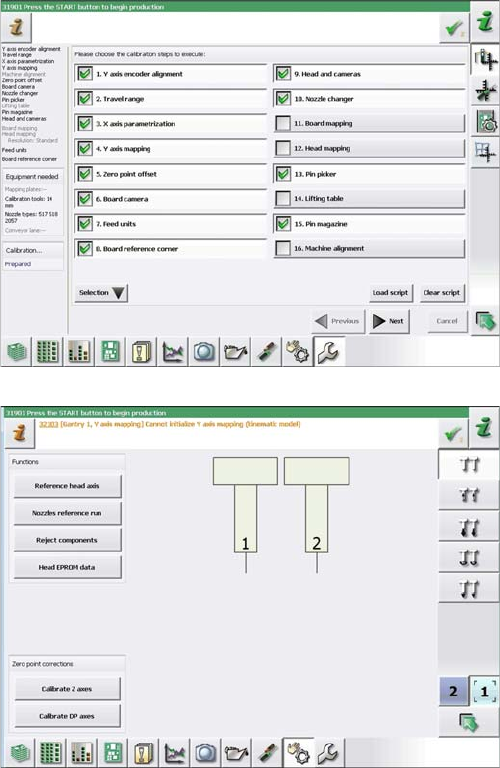
► Perform a complete calibration.
► If a TwinHead is installed, you will need to calibrate
the height of the TwinHead. Select "Calibrate Z ax-
es".
Installation
Final work
68 Gantry Exchange Portaltausch
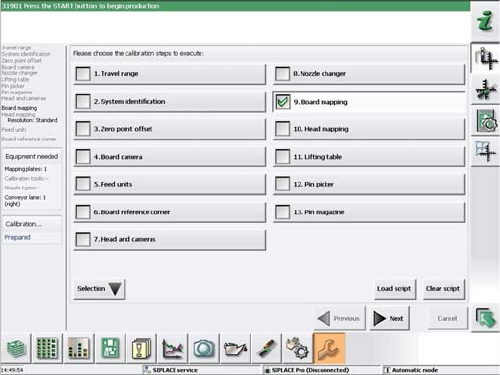
► Perform PCB mapping.