Manual_BSA_II_英文操作说明书.pdf - 第36页
36 BSA II Operating Instructions Operation 8.10 Printing W eighing Result with ID Marking The devic e can be assigned an ID number . T he ID numbers are exported during GLP-c ompliant printing. Requiremen ts − The ID num…
BSA II Operating Instructions 35
Operation
8.8 Setting or Changing an Appli-
cation
Procedure
t In the “APPLIC.“ menu, select an application, e.g.,
“STATIST.“
t Press the [Confirm] button.
t Exit the menu.
8.9 Running Applications
(Examples)
8.9.1 Executing the “Toggle Between
Weight Units” Function
The “Toggle between weight units” function enables to
switch between a maximum of four different units. The
selected basic unit is displayed every time the device
started (see “UNIT“ Chapter 4.6.8, page 25). The
units can be set during the weighing process and the
decimal places can be adjusted.
Requirements
The “Toggle between weight units” function is activated
(see Chapter 4.6.8, page 25).
The weight value must be valid.
Procedure
t To switch the displayed weight unit during weighing
or before an application: Press the [Unit change]
button until the desired unit is displayed.
y The current weight value is displayed in the selected
unit.
8.9.2 Selecting Convertible Units and their
Decimal Places
Procedure
t Press and hold down the [Unit change] button.
t Select one of the parameters “Unit 1“ – “Unit 4“ in
the submenu. To do this, press the [Confirm] button.
t Select the desired unit. To do this, press the [Con-
firm] button.
t Specify the decimal places for the selected unit. To
do this, press the [Confirm] button once again.
t Select the desired number of display digits. To do
this, press the [Confirm] button.
8.9.3 Running the “Statistics” Application
The “Statistics“ application saves up to 99 weight val-
ues and evaluates these statistically.
The following values are saved and exported:
− Number of components
− Mean value
− Standard deviation
− Variation coefficientSum of all values
− Lowest value (minimum)
− Highest value (maximum)
− Spread: Difference between maximum and minimum
Requirements
− A printer or a PC is connected and configured.
− The “STATIST.“ application is selected.
Procedure
t Place a sample on the weighing pan.
t To save the weight value: Press the [Confirm] button.
y The position of the saved value is displayed, e.g., “NO
1“.
y The recording of the statistics starts.
t Remove the sample on the weighing pan.
t To save the next value:
t Place a new sample on the weighing pan and
press the [Confirm] button.
t To switch between the display of the current weight
value, the number of saved components, and the cal-
culated mean in the results display: Press the [Up] or
[Down] button.
t To delete all saved values: Press the [Back] button.
y The evaluation is printed and the active GLP printout
is ended.
t To print and exit the current statistics, and to delete
the saved values: Press the [GLP] button.

36 BSA II Operating Instructions
Operation
8.10 Printing Weighing Result with
ID Marking
The device can be assigned an ID number. The ID
numbers are exported during GLP-compliant printing.
Requirements
− The ID number is specified (see Chapter “4.6.17 “IN-
PUT“ Menu”, page 28).
− The GLP-compliant printout is activated (see Chap-
ter 4.6.7, page 24).
Procedure
t Start the printout. To do this, press the [Print] button.
y The GLP header is printed with the ID number set in
the menu and the current weight value.
y The [GLP] button is displayed in the operating dis-
play.
t Confirm the [PRINT] button.
t To exit the GLP printout: Press the [GLP] button.
y The GLP footer is printed.
BSA II Operating Instructions 37
Cleaning and Maintenance
9 Cleaning and
Maintenance
9.1 Cleaning Device Components
9.1.1 Preparing the Device for Cleaning
Procedure
t Switch off the device.
t Disconnect the power plug from the socket (supply
voltage) at the installation site.
t If accessories are connected to the device: Discon-
nect the accessory from the device (see instructions
for the accessory).
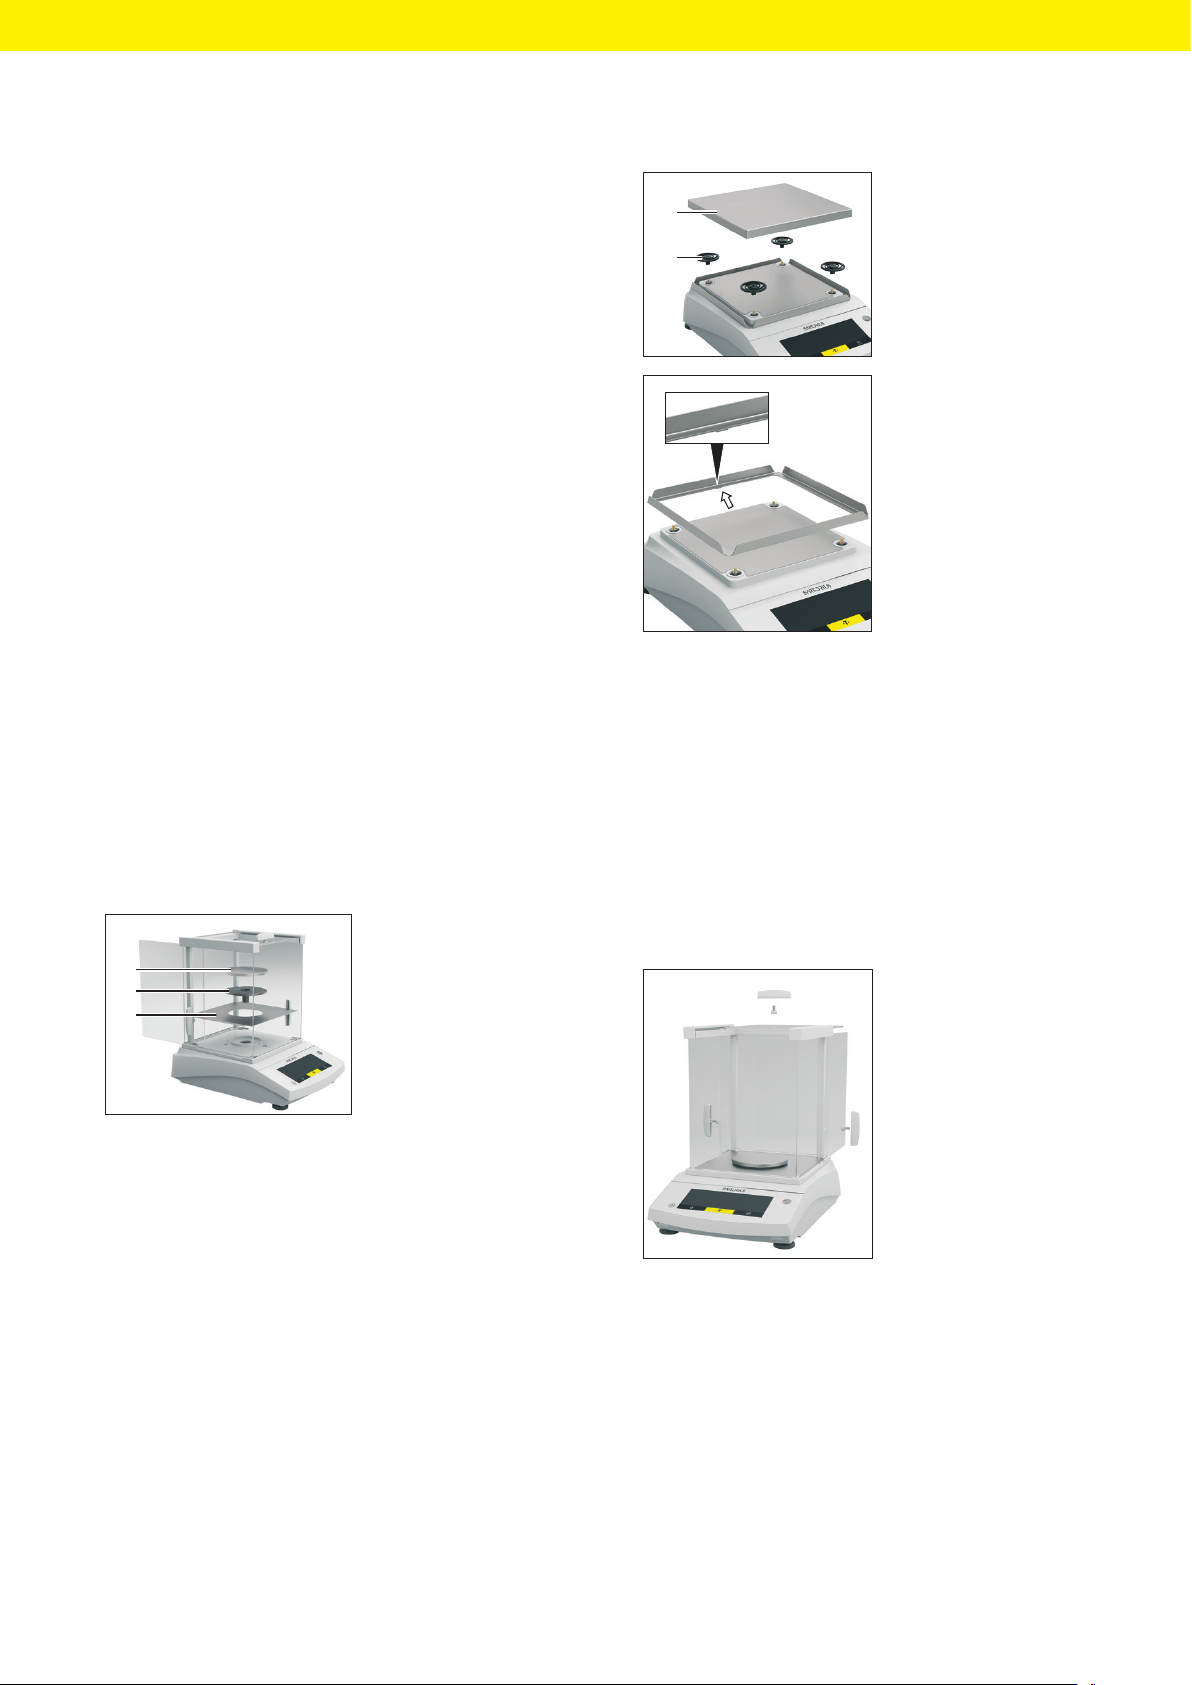
9.1.2 Dismounting the Weighing Pan and
Associated Components
The weighing pan and associated components can be
dismounted for cleaning work.
Procedure
t If this relates to a device with an analytical draft
shield:
1
2
3
t Open one side panel
completely.
t Remove the weigh-
ing pan(3).
t Remove the pan
support (2).
t Remove the base
plate(3).
t If this relates to a device with a frame draft shield:
2
1
t Remove the weighing
pan(1).
t Remove all shock ab-
sorbers(2).
t Remove the frame
draft shield.
t Remove the latch from
the recess.
9.1.3 Dismounting the Analytical Draft
Shield Panels
The panels of the analytical draft shield can be dis-
mounted for cleaning work.
Material: 1 soft support base
Procedure
t Loosen the screws on
the inner side of the
side panels by turning.
This allows the han-
dles on the side panels
and the upper panel
to be removed.
t Slide the side panels and upper panel all the way
back and out of the guide rails.
t Place the side panels and the upper panel on a soft
surface.