Manual_BSA_II_英文操作说明书.pdf - 第38页
38 BSA II Operating Instructions Cleaning and Maintenance 9.1.4 Cleaning the Device, Draft Shield, and Associated C omponents Pr ocedure t Only use suit able cleaning agents and cleaning pro- cedures and observe the pr…
BSA II Operating Instructions 37
Cleaning and Maintenance
9 Cleaning and
Maintenance
9.1 Cleaning Device Components
9.1.1 Preparing the Device for Cleaning
Procedure
t Switch off the device.
t Disconnect the power plug from the socket (supply
voltage) at the installation site.
t If accessories are connected to the device: Discon-
nect the accessory from the device (see instructions
for the accessory).
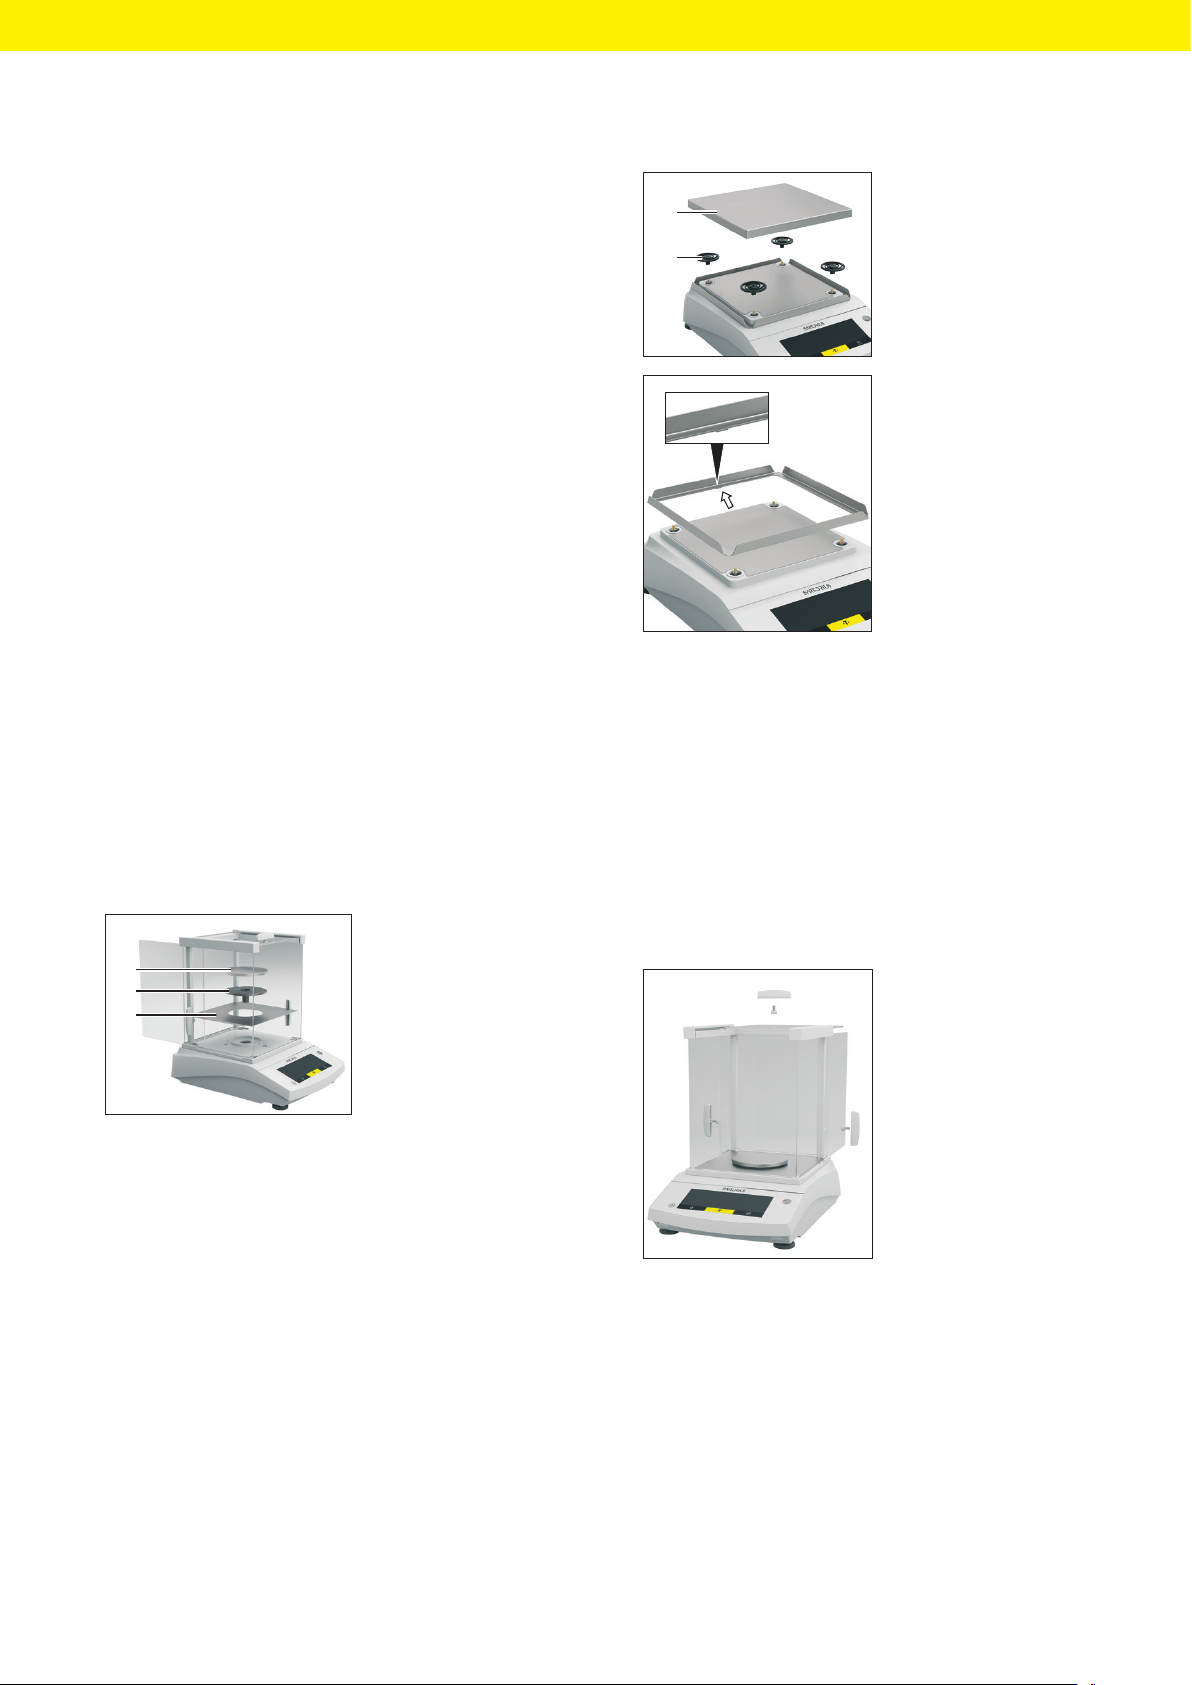
9.1.2 Dismounting the Weighing Pan and
Associated Components
The weighing pan and associated components can be
dismounted for cleaning work.
Procedure
t If this relates to a device with an analytical draft
shield:
1
2
3
t Open one side panel
completely.
t Remove the weigh-
ing pan(3).
t Remove the pan
support (2).
t Remove the base
plate(3).
t If this relates to a device with a frame draft shield:
2
1
t Remove the weighing
pan(1).
t Remove all shock ab-
sorbers(2).
t Remove the frame
draft shield.
t Remove the latch from
the recess.
9.1.3 Dismounting the Analytical Draft
Shield Panels
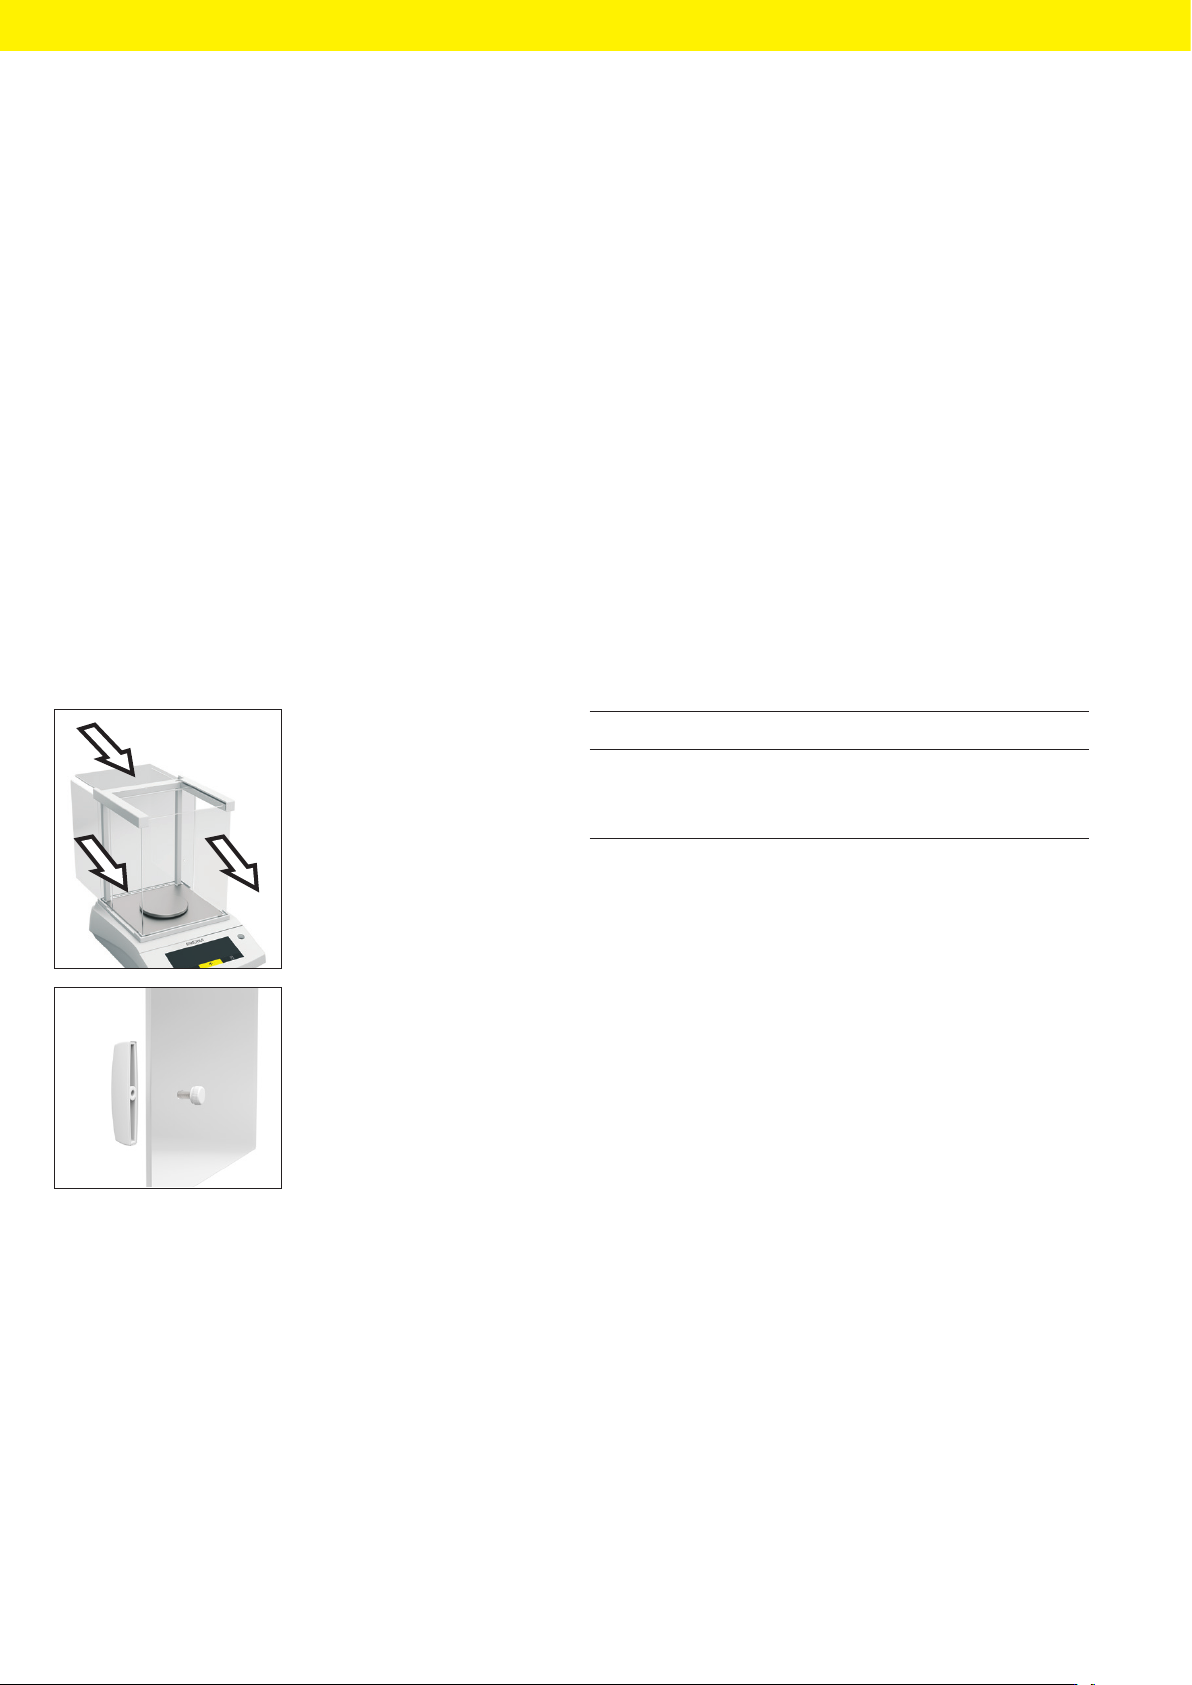
The panels of the analytical draft shield can be dis-
mounted for cleaning work.
Material: 1 soft support base
Procedure
t Loosen the screws on
the inner side of the
side panels by turning.
This allows the han-
dles on the side panels
and the upper panel
to be removed.
t Slide the side panels and upper panel all the way
back and out of the guide rails.
t Place the side panels and the upper panel on a soft
surface.
38 BSA II Operating Instructions
Cleaning and Maintenance
9.1.4 Cleaning the Device, Draft Shield, and
Associated Components
Procedure
t Only use suitable cleaning agents and cleaning pro-
cedures and observe the product information for the
cleaning agent used (see Chapter “15.12 Cleaning
Agents and Cleaning Procedures”, page 50).
t Remove dust and powdery sample residue with a
brush or hand-held vacuum cleaner.
t Only slightly moisten cleaning cloths.
t Wipe the housing and the dismounted components
with a slightly damp cloth.
9.2 Mounting the Analytical Draft
Shield
Procedure
t Slowly slide the side
panels and the upper
panel into the frame
rails.
t Hold the handles on
the side panels or the
upper panel from the
outside and fasten to
the inner side with the
screws provided.
9.3 Mounting the Removed
Device Components
Procedure
t Mount the removed device components, e.g. mount
the weighing pan and associated components (see
Chapter 5.4, page29 and Chapter 5.5,
page30).
9.4 Recommissioning
Procedure
t Connect the device to the power supply (see Chap-
ter 6.2, page31).
9.5 Maintenance Schedule
Interval Component Activity
12 to 24months,
depending on op-
erating conditions
Device Contact Sarto-
rius Service.
9.6 Software Update
For a software update, contact Sartorius Service.
BSA II Operating Instructions 39
Malfunctions
10 Malfunctions
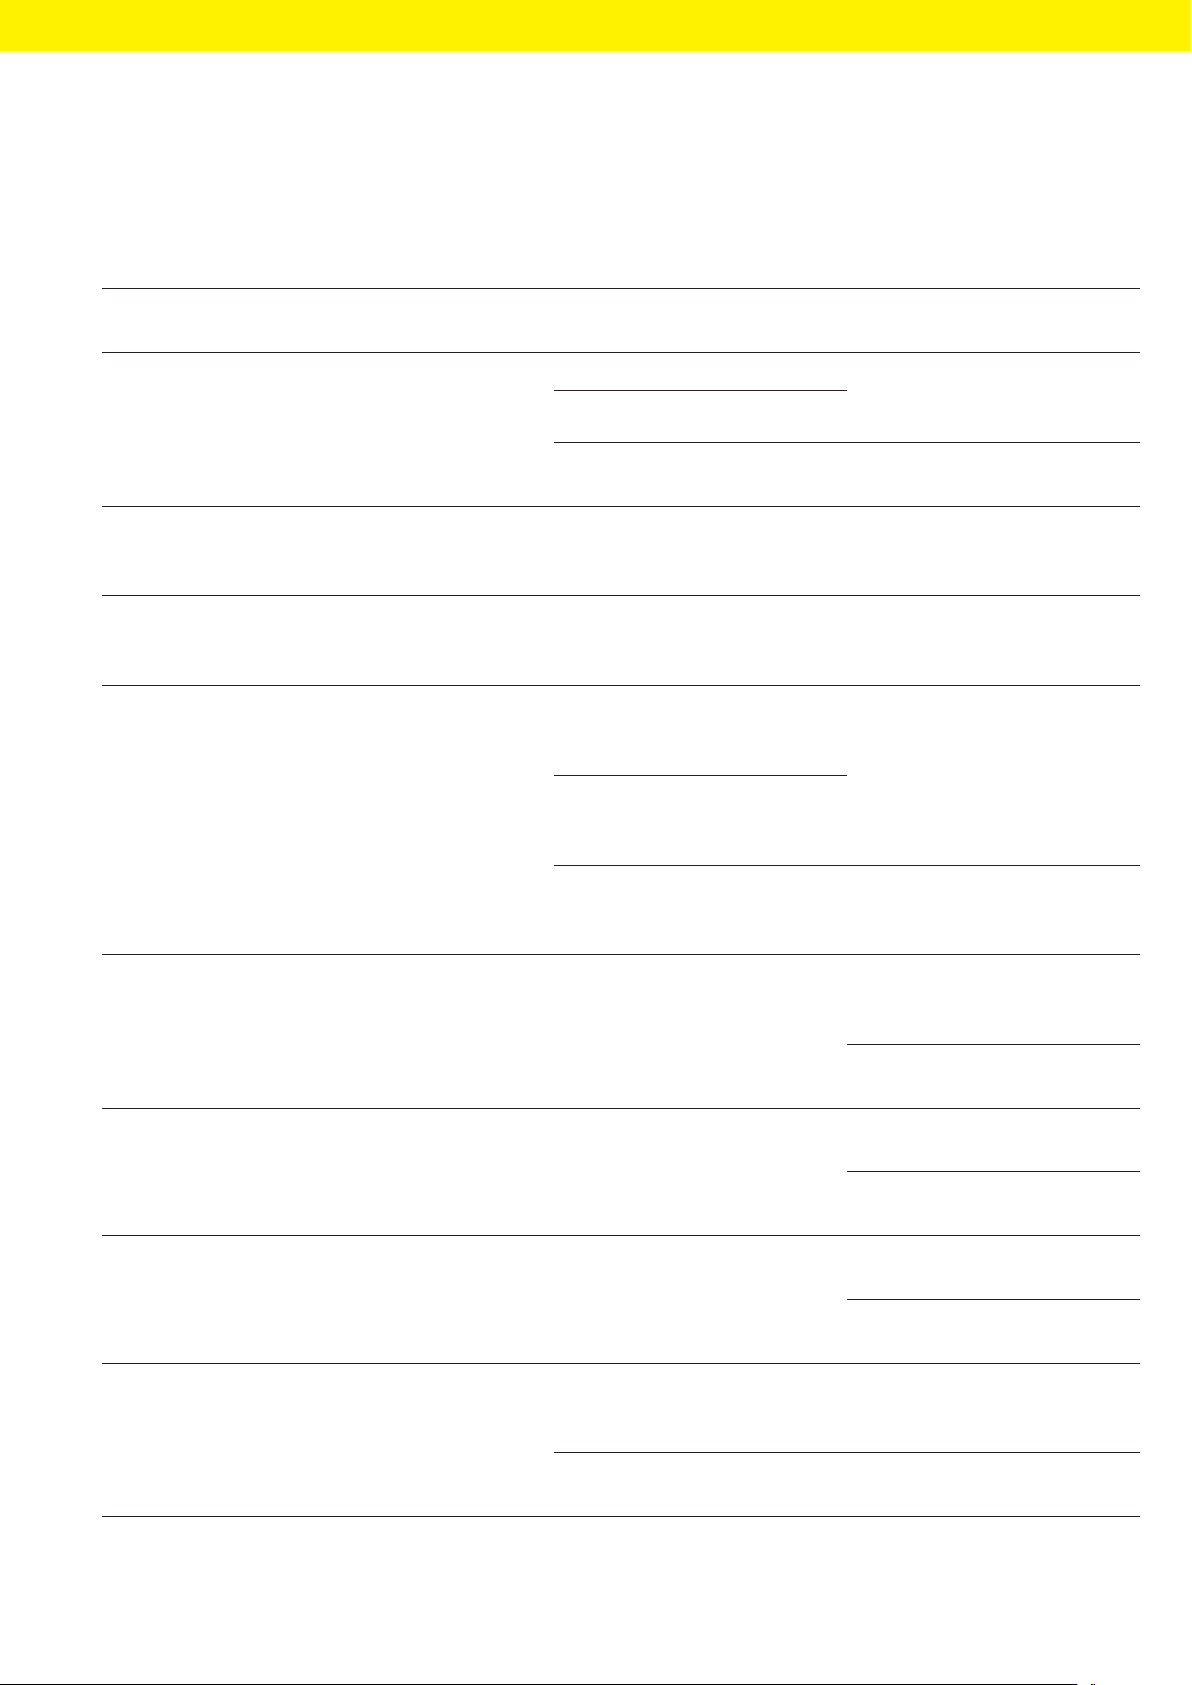
10.1 Warning Messages
Warning mes-
sage
Malfunction Cause Solution
APP.ERR. The device has measured an
invalid weight value.
The applied weight is too low. Increase the applied weight
to more than the minimum
load.
The weight value is negative.
No sample has been placed
on the balance.
Place the sample on the bal-
ance.
DIS.ERR. The value to be output can-
not be shown in the operating
display.
The data to be displayed is
not compatible with the set
display format.
Adjust the display settings in
the menu, e.g. resolution,
unit, decimal places.
HIGH or
ERR55
The device is overloaded. The device’s maximum weigh-
ing capacity has been ex-
ceeded
Reduce the applied weight
to below the device’s maxi-
mum weighing capacity.
LOW or
ERR54
The modulation of the weigh-
ing converter inside the de-
vice is too low.
No weighing pan has been
placed on the balance.
Insert the weighing pan into
the device and switch the
device off and on again.
A previously forgotten weight
was removed after starting
the device.
An error exists in the weighing
system or in the device elec-
tronics.
Contact Sartorius Service.
COMM.ERR. The device is not receiving
any weight values.
No communication exists be-
tween the control unit and
the load cell.
Wait until the control unit re-
stores the communication
with the load cell.
If the problem occurs again:
Contact Sartorius Service.
PRT.ERR. The [Print] key is locked. The data interface for printout
is set to xBPI mode.
Reset the menu to the facto-
ry settings.
If the problem occurs again:
Contact Sartorius Service.
SYS.ERR. The system data is faulty. A memory error exists in the
control unit.
Switch the device off and on
again.
If the problem occurs again:
Contact Sartorius Service.
ERR 02 The device cannot be adjust-
ed when starting the adjust-
ment function due to a zero
point error.
The device was not zeroed
before the adjustment pro-
cess.
Zero the device.
Check the preload and set if
necessary.
The device is loaded. Remove the sample from the
weighing pan.