XP-142E Operator's Guide-TUT-XP142-1.1E.pdf.pdf - 第40页
W ith the necessary checks complete, production can now commence. Either the auto operation or step operation mode must be used to operate the machine and place parts on a panel. Rather than directly entering auto oper- …
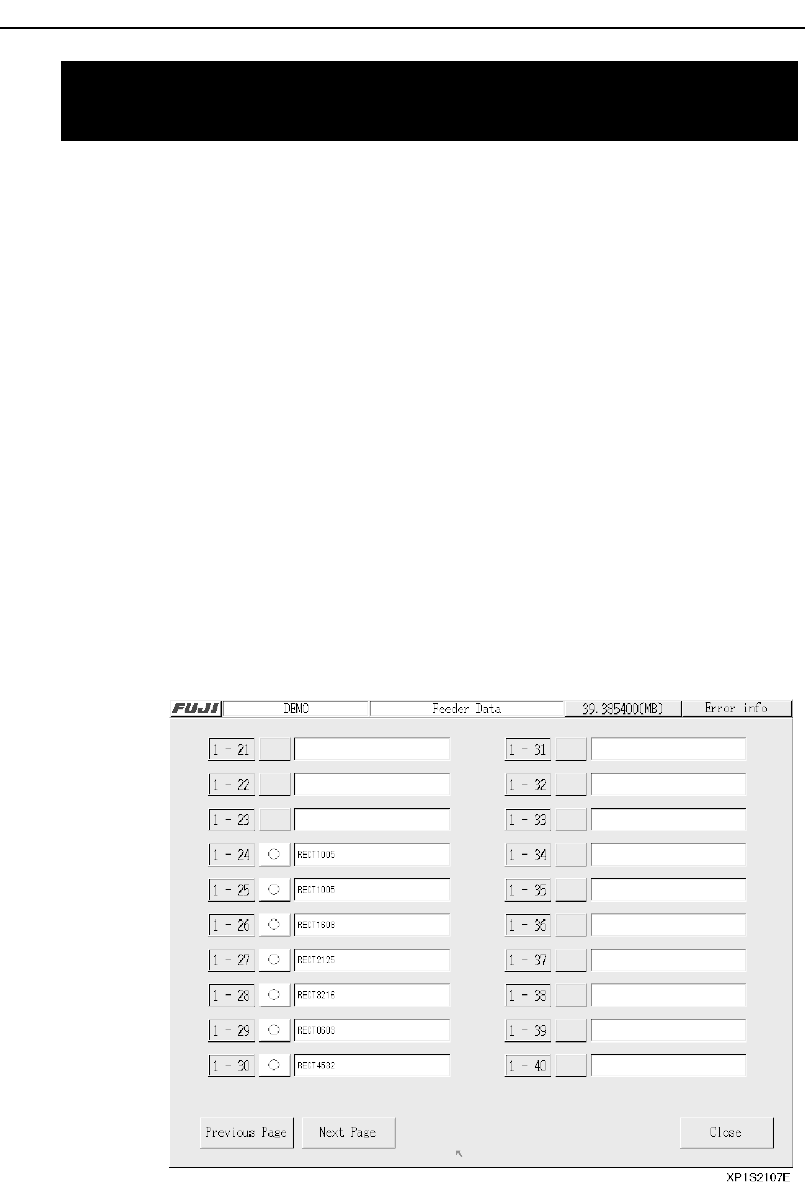
Feeder Information
Feeder information is used to verify the part types and slot positions speci-
fied in the recipe, and to check for “parts-out” errors, etc.
Procedure
1. At the [Main] screen, press [Production] then [Feeder Data] to
display the [Feeder Data] screen.
2. Each screen contains boxes, which indicate the statuses of the
feeders in the 20 slots of the MFU. The numbers to the left of
the boxes indicate the slot numbers, and the “O” marks next to
these numbers indicate an error-free status for those feeders
(“X” marks display if “parts-out” errors, etc., occur). “Part data
comment” information displays in the boxes.
4.1 Measurements and Checks Prior to
Production
Chapter 4: Starting Production
TUT-XP142-1.1E
4-2 XP-142E Operator’s Guide

With the necessary checks complete, production can now commence. Either
the auto operation or step operation mode must be used to operate the
machine and place parts on a panel. Rather than directly entering auto oper-
ation, it is best to use the step operation mode to operate the machine one
cycle at a time for several cycles to check that parts are being placed correct-
ly on the panel. If there are no problems then switch to auto operation at that
time.
Step Operation
Procedure
1. At the [Main] screen, press [Maintenance A] then [Operation
Settings] to display the [Operation Settings] page.
2. Select [Step] at the left of the screen where the [Production
Mode] field is displayed.
3. Press [Close] to return to the [Main] screen.
Automatic Operation
Procedure
1. At the [Main] screen, press [Maintenance A] then [Operation
Settings] to display the [Operation Settings] page.
2. Select [Automatic] at the left of the screen where the
[Production Mode] field is displayed.
3. Press [Close] to return to the [Main] screen.
4.2 Starting Production
Chapter 4: Starting Production
TUT-XP142-1.1E
4-3XP-142E Operator’s Guide
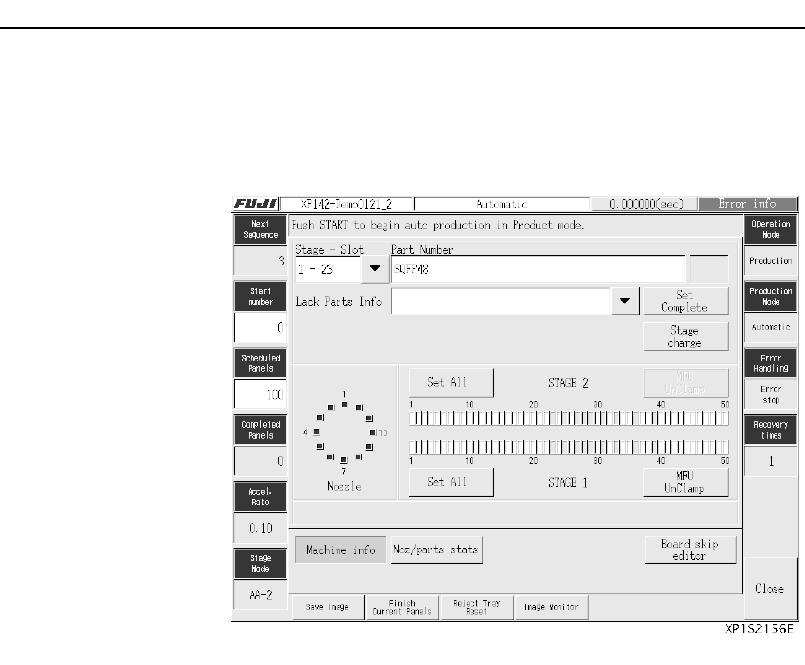
4. At the [Main] screen, press [Production] and select [Automatic]
to enable the START button. Pushing START begins produc-
tion and displays the [Automatic] screen.
Note: The machine information (production quantity, production mode, parts,
nozzle, stage, etc.) explained in Chapter 3 “Preparing for Production”
can be checked and edited at the [Automatic] screen. The display can
be changed to the vision monitor if necessary. The log of recoveries
from emergency stop errors, such as parts out, and statistical informa-
tion for problem nozzles or slots, can also be viewed from the
[Automatic] screen.
Chapter 4: Starting Production
TUT-XP142-1.1E
4-4 XP-142E Operator’s Guide