00196062-03_SM_LDU-X_EN.pdf - 第29页
4 Service Work 4.2 Replacing Spare Parts Service Manual SIPLACE LDU-X Linear Dipping Unit 11/2017 29 Removal ► Place the LDU-X down on a stable, clean and even surface. ► Loosen the 4 screws marked in the dia- gram (1) …

4 Service Work
4.2 Replacing Spare Parts
28 Service Manual SIPLACE LDU-X Linear Dipping Unit 11/2017
Installation
► Now fasten the new stop pin with an M4
screw
► Fit the left side cover into place (see section 4.2.29.10 "Fitting the Side Covers" [}65]).
4.2.9 Replacing the supports
NOTICE
Retrofit kit LDU-X robustness
The support blocks are part of the retrofit kit "LDU-X robustness V2 kit [03134341-01]". If
the LDU-X still has the plastic version of the slide bearing [03003994-xx] fitted, you will
need to replace all the parts included in this retrofit kit: rear slide bearing, front slide bear-
ing, stop pin and both support blocks (see TI2016-07D05). The retrofit kit is factory-fitted
from the version "Linear Dipping Unit X [03063461-04]". All older versions of the LDU-X can
be updated with this retrofit kit.
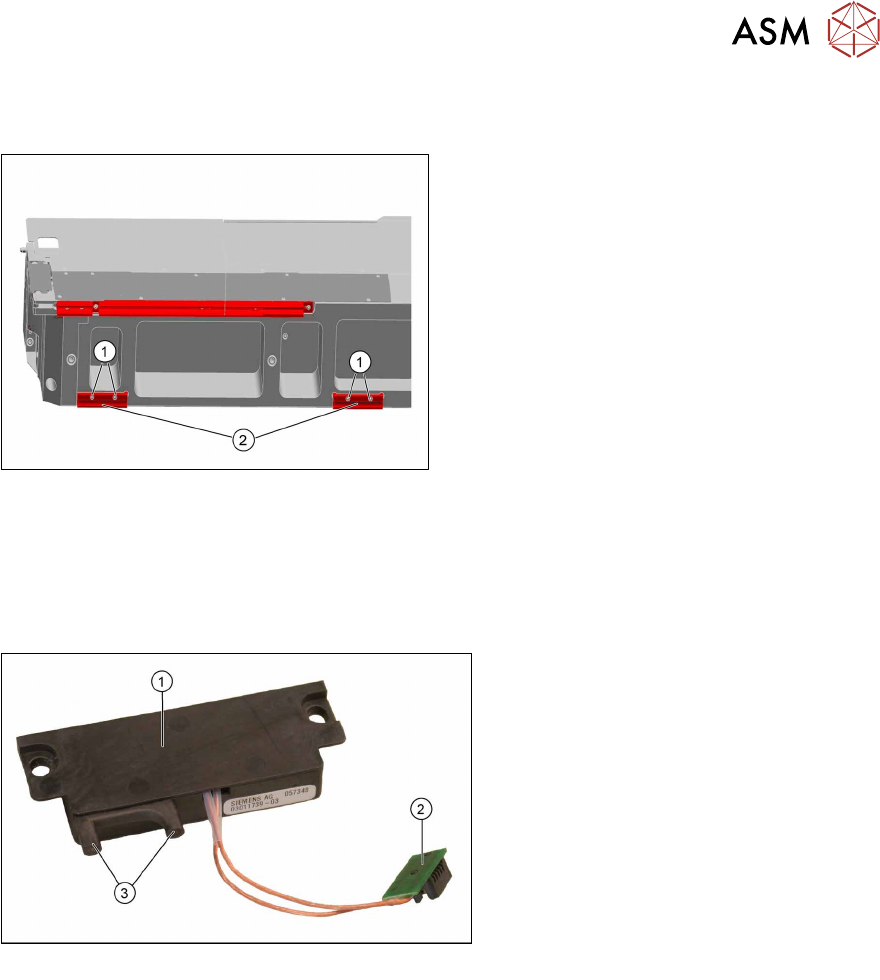
Overview
Support X16-88, metal version [03128482-xx]
Equipment required
●
Phillips screwdriver
●
Spare parts:
– Support block X16-88, metal version [03128482-xx] (2x)
– Screws ISO 10642 - M2.5x10-A2-70 [03113951-xx] (4x)
4 Service Work
4.2 Replacing Spare Parts
Service Manual SIPLACE LDU-X Linear Dipping Unit 11/2017 29
Removal
► Place the LDU-X down on a stable, clean and even surface.
► Loosen the 4 screws marked in the dia-
gram(1) and remove the old support
blocks(2).
Installation
► Installation is performed by following the above instructions in the reverse order.
4.2.10 Replacing the energy and data interface (EDIF)
Overview
Energy and data interface [03011739-xx]
1. Energy and data interface (EDIF)
2. Connection to control board for X ad-
apter
3. Fiber optic cable
Equipment required
●
Standard tools
●
Spare parts:
– Energy and data interface [03011739-xx]
– Pressure spring D-027 [03012683-xx]
– Collar screw D4x3.15 M3 [03050957-xx]
4 Service Work
4.2 Replacing Spare Parts
30 Service Manual SIPLACE LDU-X Linear Dipping Unit 11/2017
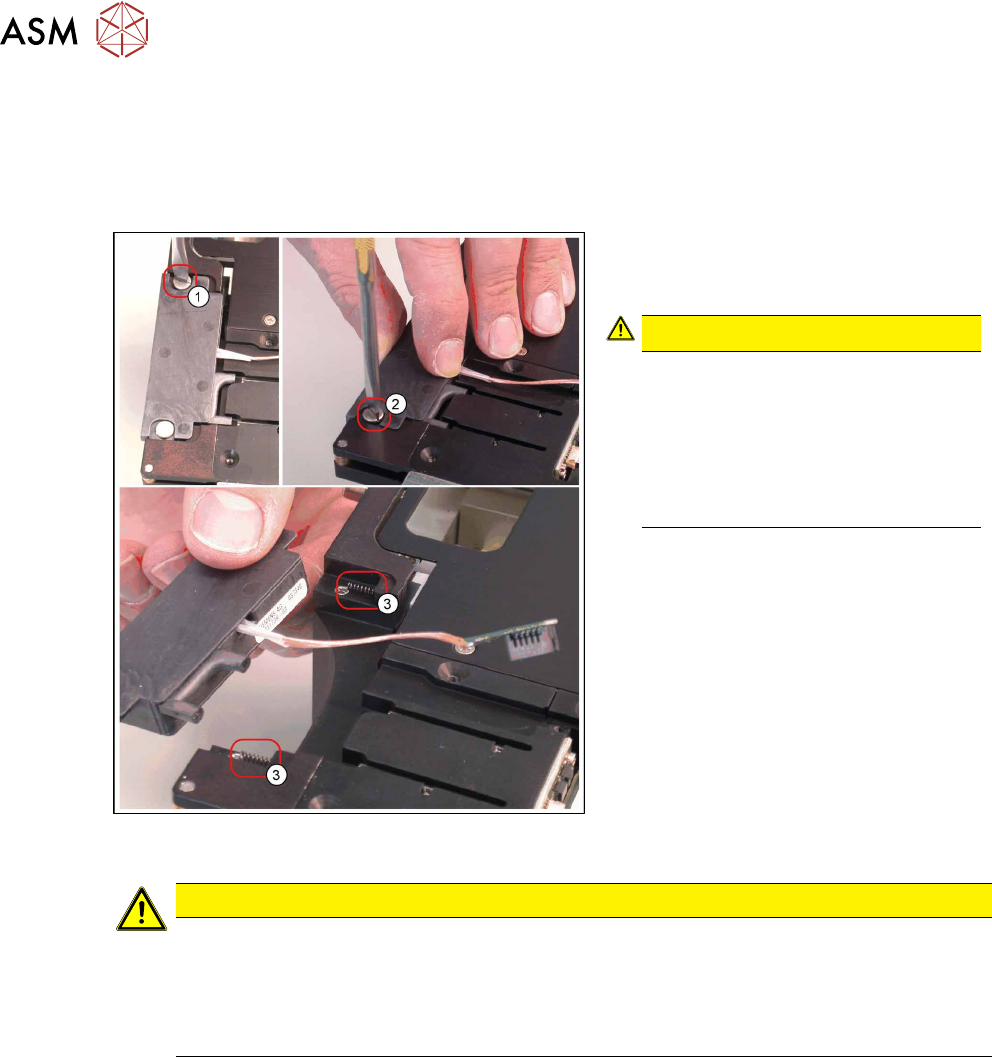
Removal
► Remove the cover on the X adapter controller. (See 4.2.29.11 "Removing the Controller
Cover" [}65])
► Loosen the cable clamp and unplug the connector to the EDIF unit. (See 4.2.29.12 "Removing
the EDIF Unit" [}66])
► Loosen the two slotted screws(1)
und(2). Use a screwdriver with a thin
tip.
CAUTION!
Springs
The EDIF unit has 2 springs(3).
When removing the EDIF unit, hold it
tight, to prevent it suddenly jumping
out.
Make sure that the springs are not
lost!
.
► Carefully remove the EDIF unit.
Installation
CAUTION
Important installation instructions
► The EDIF unit is flexibly mounted with 2 collar screws. Take care not to overtighten
these screws.
► When connecting the cable to the EDIF unit, make sure that the cable has enough
play between the cable clamp and the EDIF unit.
► Installation is performed by following the above instructions in the reverse order.
See also
2 4.2.5 "Replacing the X Adapter controller" [}21]
2 4.2.29.13 "Fitting the EDIF Unit" [}66]
2 4.2.29.14 "Fitting the Controller Cover" [}67]