00196062-03_SM_LDU-X_EN.pdf - 第40页
4 Service Work 4.2 Replacing Spare Parts 40 Service Manual SIPLACE LDU-X Linear Dipping Unit 11/2017 Installation ► Carefully push the couplings off the shafts (3) . ► Before assembly, align the shafts (3) and the coup…

4 Service Work
4.2 Replacing Spare Parts
Service Manual SIPLACE LDU-X Linear Dipping Unit 11/2017 39
4.2.17 Replacing the Coupler
Overview
Coupling [03059486-xx]
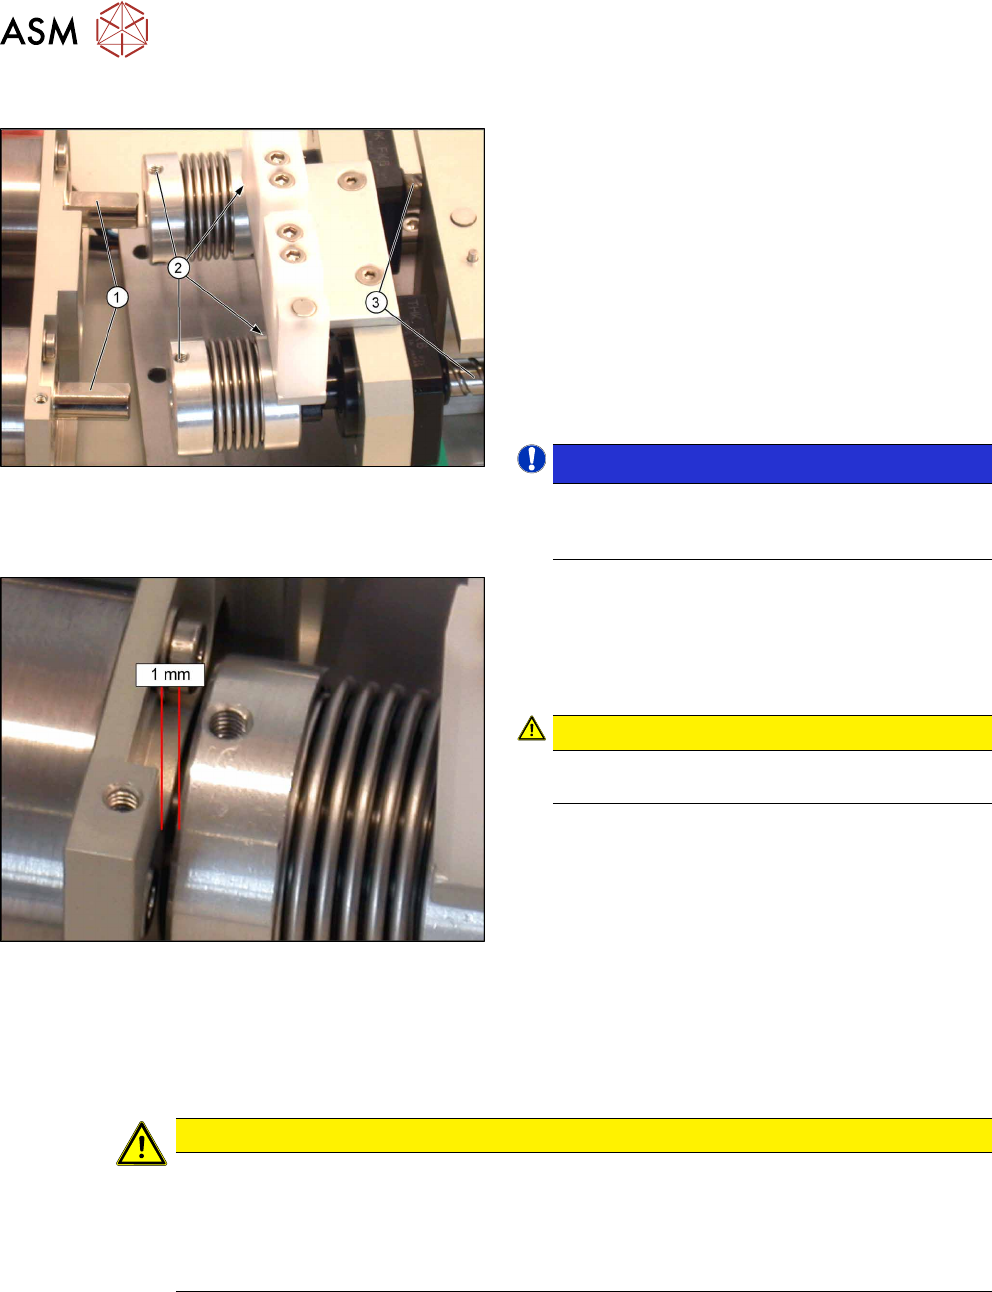
1. Coupling
2. Holes drilled for grub screws
Equipment required
●
Standard tools
●
Allen key sizes 5, 3, 2 and 1.5
●
Spare part: coupling [03059486-xx]
Removal
► Remove the side covers (see 4.2.29.1 "Removing the Side Covers" [}57]).
► Remove and dismantle the base unit, separating it into top and bottom sections and unplug all
press-fit connections to the LDU-X control board (see 4.2.29.3 "Removing and Dismantling the
LDU Basis" [}58]).
► Dismantle the base plate of the upper section of the base unit (see 4.2.29.4 "Removing the
Base Plate" [}60]).
► Dismantle the motor mounting plate (see 4.2.29.5 "Removing the Motor Mount" [}60]).
► Loosen the 8 grub screws on the
couplings(2) (2 screws for each coup-
ling side).
► Carefully pull out the motors with the
motor shafts(1).
► Follow the same procedure for the
other side of the couplings and pull
the couplings off the shafts(3).
4 Service Work
4.2 Replacing Spare Parts
40 Service Manual SIPLACE LDU-X Linear Dipping Unit 11/2017
Installation
► Carefully push the couplings off the shafts(3).
► Before assembly, align the shafts(3) and the
couplings so that the flattened sides of the
shafts(3) and the corresponding grub screw(2)
on the coupling point in the same direction.
► Fix the coupling onto the shafts(3), by tightening
the corresponding grub screws.
► Carefully push the motors and motor shafts(1)
together into the couplings. Make sure that the
flattened sides of the motor shafts and the cor-
responding grub screw (2) on the coupling point
in the same direction.
NOTICE!
A reliable connection is only formed if one of the
grub screws touches the flattened side of the
motor shaft!
.
► Align the motors and couplings so that there is a
gap of around 1 mm between the coupling and
the motor mount.
► Tighten the grub screws. Make sure that the set
gap does not change during tightening.
CAUTION!
Make sure that the coupling does not grate
against the sides!
.
► Refit the motor fixing plate (see4.2.29.6 "Fitting the Motor Mount" [}61]).
► Refit the base plate (see 4.2.29.7 "Fitting the Base Plate" [}61]).
► Restore the press-fit connections for the LDU-X control board, reassemble and refit the LDU
base (see 4.2.29.9 "Assembling and Fitting the LDU Basis" [}63]).
► Fit the side covers (see 4.2.29.10 "Fitting the Side Covers" [}65]).
CAUTION
Important installation instructions
► Whenever you loosen the couplings, you will need to remeasure the positions of the
axes.
► Whenever you dismantle the base unit, you will need to level the LDU-X out again on
the machine (see operating instructions)!
See also
2 4.2.19 "Replacing the Motor with Gearing and Encoder" [}41]
4 Service Work
4.2 Replacing Spare Parts
Service Manual SIPLACE LDU-X Linear Dipping Unit 11/2017 41
4.2.18 Replacing the Drip Tray
Overview
Dip tray [03059241-xx]
Equipment required
●
Standard tools
●
Spare part: dip tray [03059241-xx]
Removal
► Unlock the downholder and swing it up.
► Remove the flux tank, dip plate, park plate and dip tray.
Installation
► Installation is performed by following the above instructions in the reverse order.
4.2.19 Replacing the Motor with Gearing and Encoder
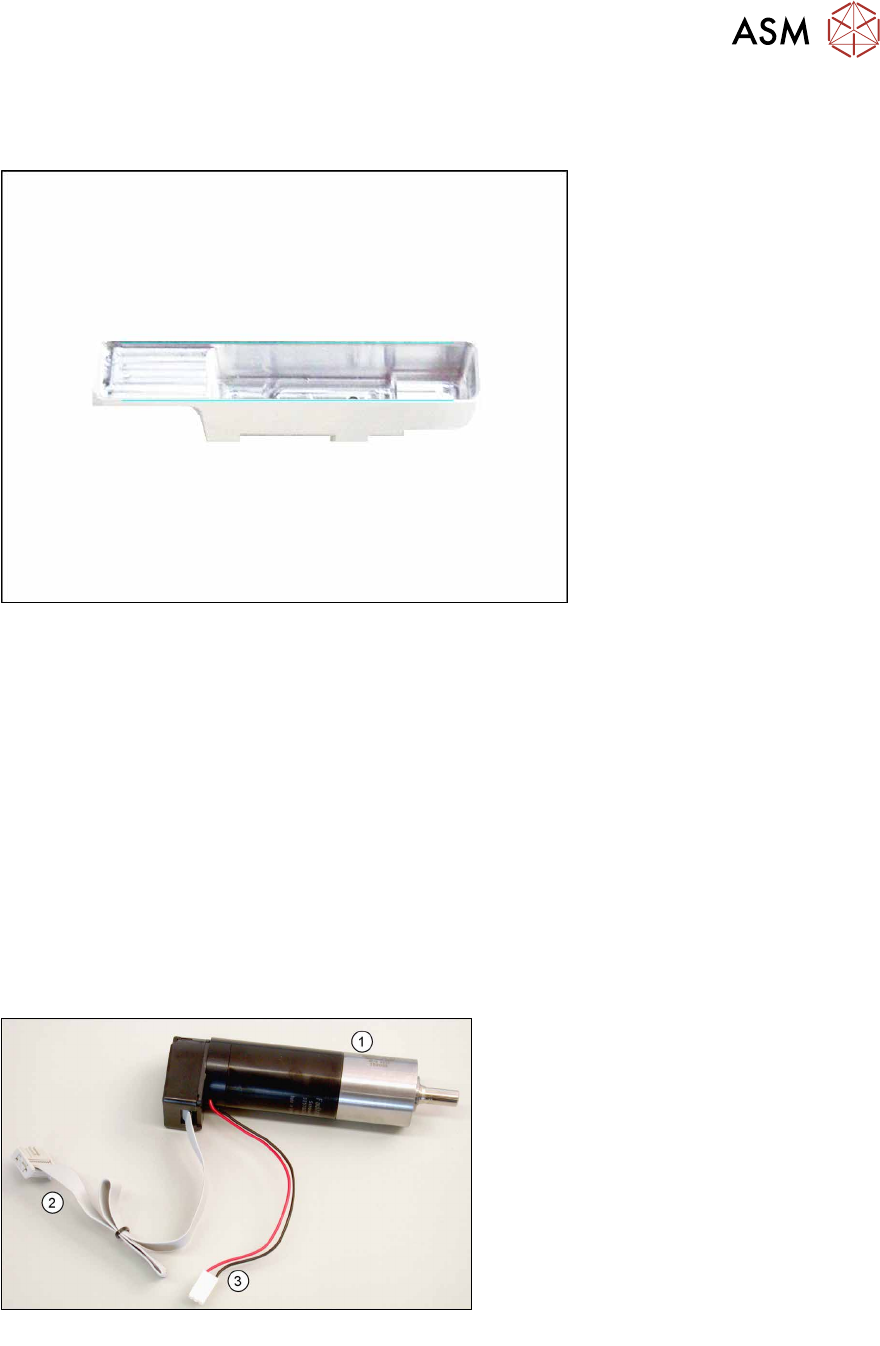
Overview
Motor with gearing and encoder [03059479-xx]
1. Motor
2. Encoder cable
3. Motor cable
Equipment required
●
Standard tools
●
Allen key, sizes 5, 3 , 2 and 1.5
●
Spare part: motor with gearing and encoder [03059479-xx] (incl. encoder and motor cable)