00196062-03_SM_LDU-X_EN.pdf - 第72页
4 Service Work 4.4 Importing the LDU-X Firmware 72 Service Manual SIPLACE LDU-X Linear Dipping Unit 11/2017 Preparing the LDU-X NOTICE The LDU-X can be programmed either on a changeover table in the placement machine (as…
4 Service Work
4.4 Importing the LDU-X Firmware
Service Manual SIPLACE LDU-X Linear Dipping Unit 11/2017 71
General settings
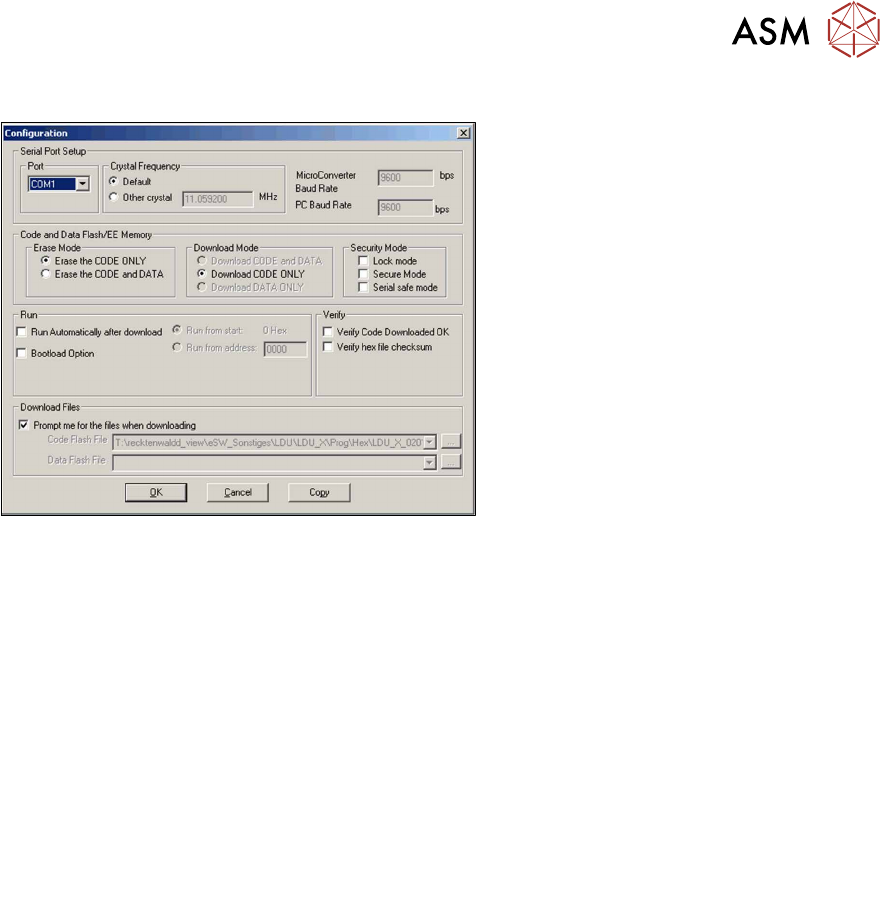
► In the WSD, click on the Configura-
tionbutton .
► The adjacent menu will be shown.
Set the following values as described below.
Port Com1
Crystal Frequency 11.059200 MHz
Micro Converter Baud
Rate
9600 bps
PC Baud Rate 9600 bps
Erase Mode Erase the CODE ONLY
Attention:
Select this setting, otherwise all user settings will be deleted.
Download Mode Download CODE ONLY
Security Mode none
Run Run from start
COM port setting
The COM port can be set in the configuration menu. This defines the serial connection to your PC,
which you want to use for transferring data to the LDU-X. If you want to use a different COM port,
select it from the list.
If your PC does not have a serial port, you can use a USB serial adapter. The number of the COM
port for the USB port is shown in the Windows devices manager.
4 Service Work
4.4 Importing the LDU-X Firmware
72 Service Manual SIPLACE LDU-X Linear Dipping Unit 11/2017
Preparing the LDU-X
NOTICE
The LDU-X can be programmed either on a changeover table in the placement machine (as
described below) or with the help of a Single Slot EDIF outside the placement machine.
► Remove the flux tank, the dip plate
and the park plate.
► Unlock the LDU-X from the
changeover table. This disconnects
the LDU-X from the voltage supply.
The service cable is already installed in the
LDU-X.
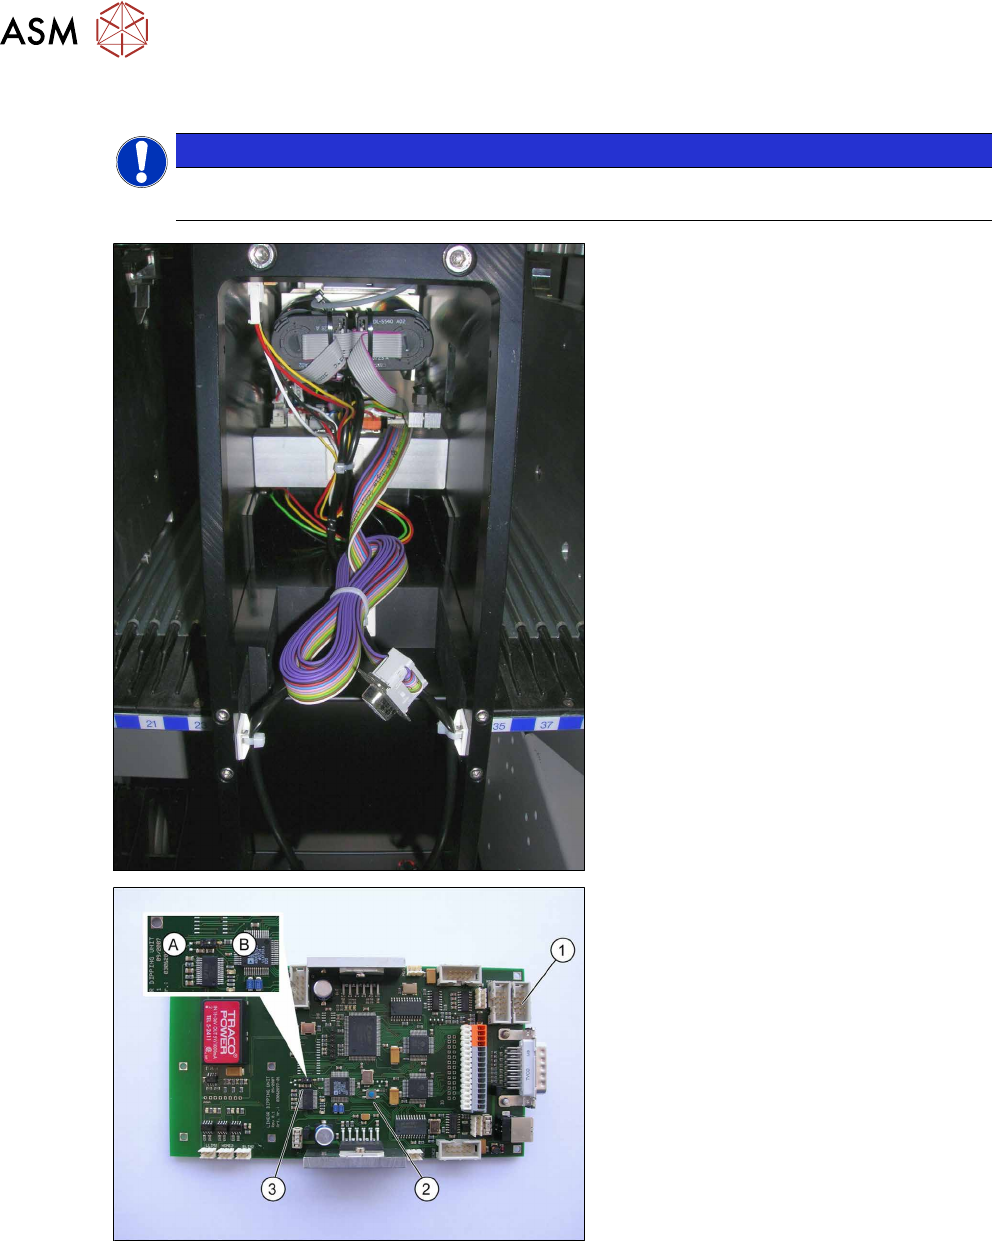
► Open the back flap on the LDU-X.
You may need to cut the cable tie on
the cable reel.
Control board
1. Connector strip, 10 pin (RS232)
2. RESET button (RST)
3. Programming switch (PRO)
A = programming mode
B = operating mode
To transfer the new firmware to the control
board, you need to adjust the programming
switch to set the microprocessor to pro-
gramming mode. This switch is located on
the control board. When installed, the
switch can be accessed through a hole in
the intermediate metal sheet.
4 Service Work
4.4 Importing the LDU-X Firmware
Service Manual SIPLACE LDU-X Linear Dipping Unit 11/2017 73
Only for function state 1 and 2. You do not
need to adjust the switch in function state
3.
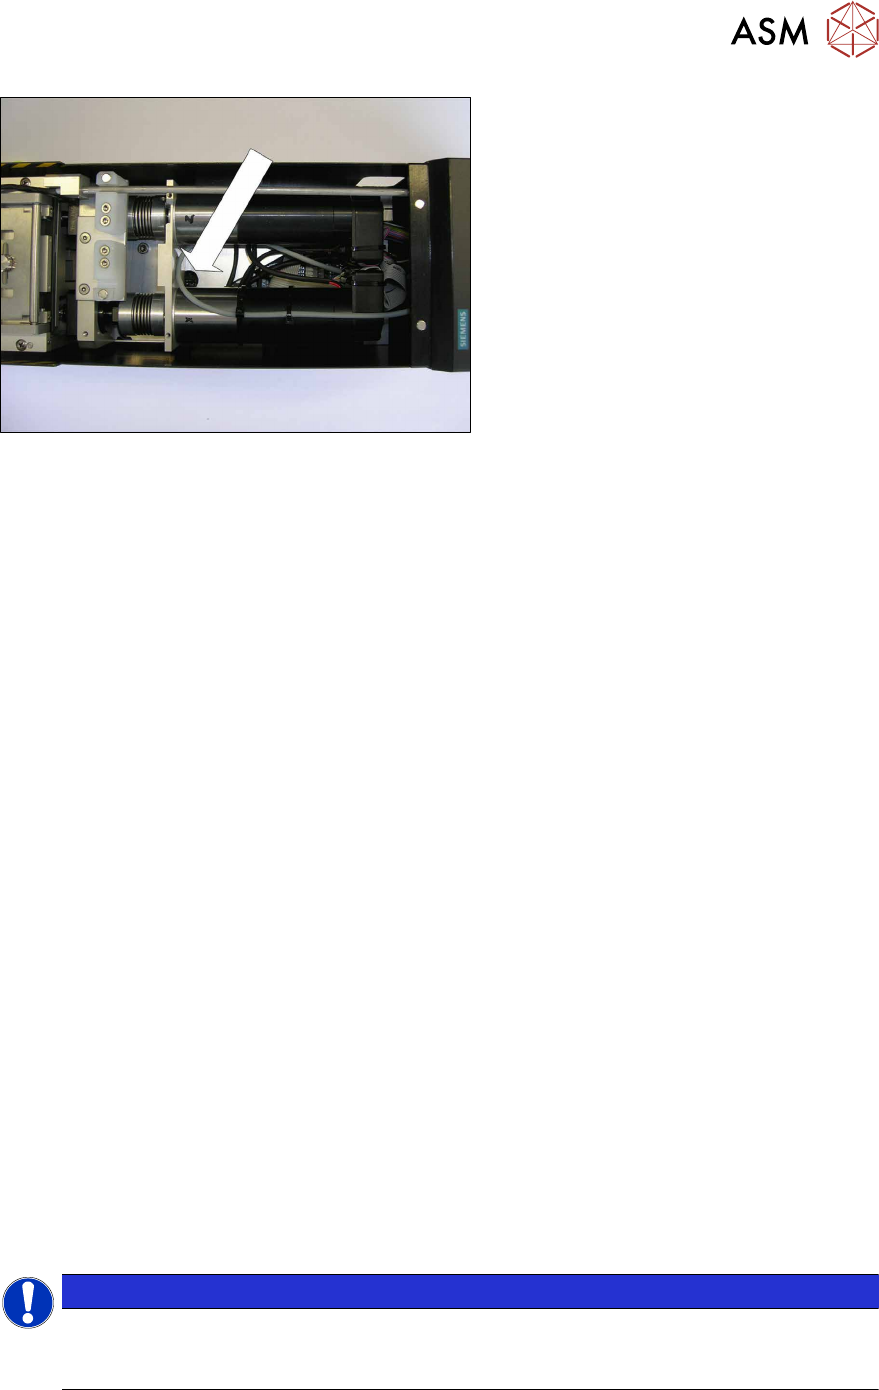
► Remove the upper covers from the
LDU-X.
► You may need to remove the interme-
diate panel.
► Use a long, pointed object (screw-
driver) to adjust the switch. You may
find a flashlight helpful for locating it.
Transferring the LDU-X firmware
► Unlock the LDU-X from the changeover table if not done yet. This disconnects the LDU-X
from the voltage supply.
► For function status 1 and 2 only: Set the programming switch to position A (programming
mode)
► Connect the LDU-X service cable with the COM port of your PC.
► Start the WSD program.
► Push the LDU-X into the changeover table and lock into place.
The display will light up but no image will be shown at this stage.
If you are shown an image, this indicates that the programming switch has not switched over
properly.
► Click on the RESET button on the WSD user interface.
The - RESET OK message will be shown in the text box.
► Click on theDownload button on the WSD user interface.The data selection window will open.
► Navigate to the folder with the HEX file.
► Mark the HEX file.
► Click on the Open button.
Transfer of the LDU-X firmware will begin automatically. A progress bar will be shown. Wait
until the bar reaches the end and the process has finished.
The new LDU-X firmware has now been transferred.
► Unlock the LDU-X from the changeover table. This disconnects the LDU-X from the voltage
supply.
► Remove the service cable for the LDU-X from the COM port of your PC.
► For function status 1 and 2 only: Set the programming switch to position B (operating mode)
► Push the LDU-X onto the changeover table.
The display will light up and text will be shown.
► After switching on, initialization begins. The display shows the LDU-X firmware version. Check
whether the new version number is shown.
(Service menu / SYST INFORMATION / <VALUE -> / SOFTWARE: Vxxxxxxxxx)
NOTICE
Calibration of the LDU-X and adjustment of the production parameters is only required if the
Erase Mode is set to CODE AND DATA.
If the Erase Mode is set to CODE ONLY, the following steps are not required.
Calibrating the LDU-X