COU2000 PRO计数器英文说明书 Operaton Manual-en(1).pdf - 第12页
VERSION: .1.01 E 12 / 52 2mm; 4mm; 8mm; 12mm; 16 mm; 20mm; 24mm; 28mm; 32mm; 36 mm; 40mm; 44mm; 48mm;52mm;56mm; Press the PITC H key continuously to set the correct pitch value When lo ng pressing PITC H, the pitch will …

VERSION: .1.01 E
11 / 52
MODE2 Transparent Tape Mode:“MODE 2 Transparent Tape”
*In each setting interface, if it remains still for 3 seconds, the screen will flash once and
return to the main interface
*When in MODE1 interface,keep still for 3 seconds to save as “Transparent Tape” status
and return to the main interface
At this time, the words’TT’and' speed S' alternate for three seconds to display
*When in MODE 2 interface,Keep still for 3 seconds to save as "Pocket Check" status and
jump back to the below screen:
At this time, the words' PC 'and' speed S' alternate for three seconds to display
Note:
if you are using the COUP2000ADV Pro model, please don’t set the mode to PC mode,
otherwise it will affect the motor rotation.
PRINT :Print the quantity and corresponding time, and if connected to a barcode reader,
the product specification barcode can also be printed on the label. After selecting the label
printing function option and barcode copying function option, this function is effective for
the COUP2000ADV Pro and COUP2000EX Pro。
Note : printing is still valid when DATA is a non positive number.
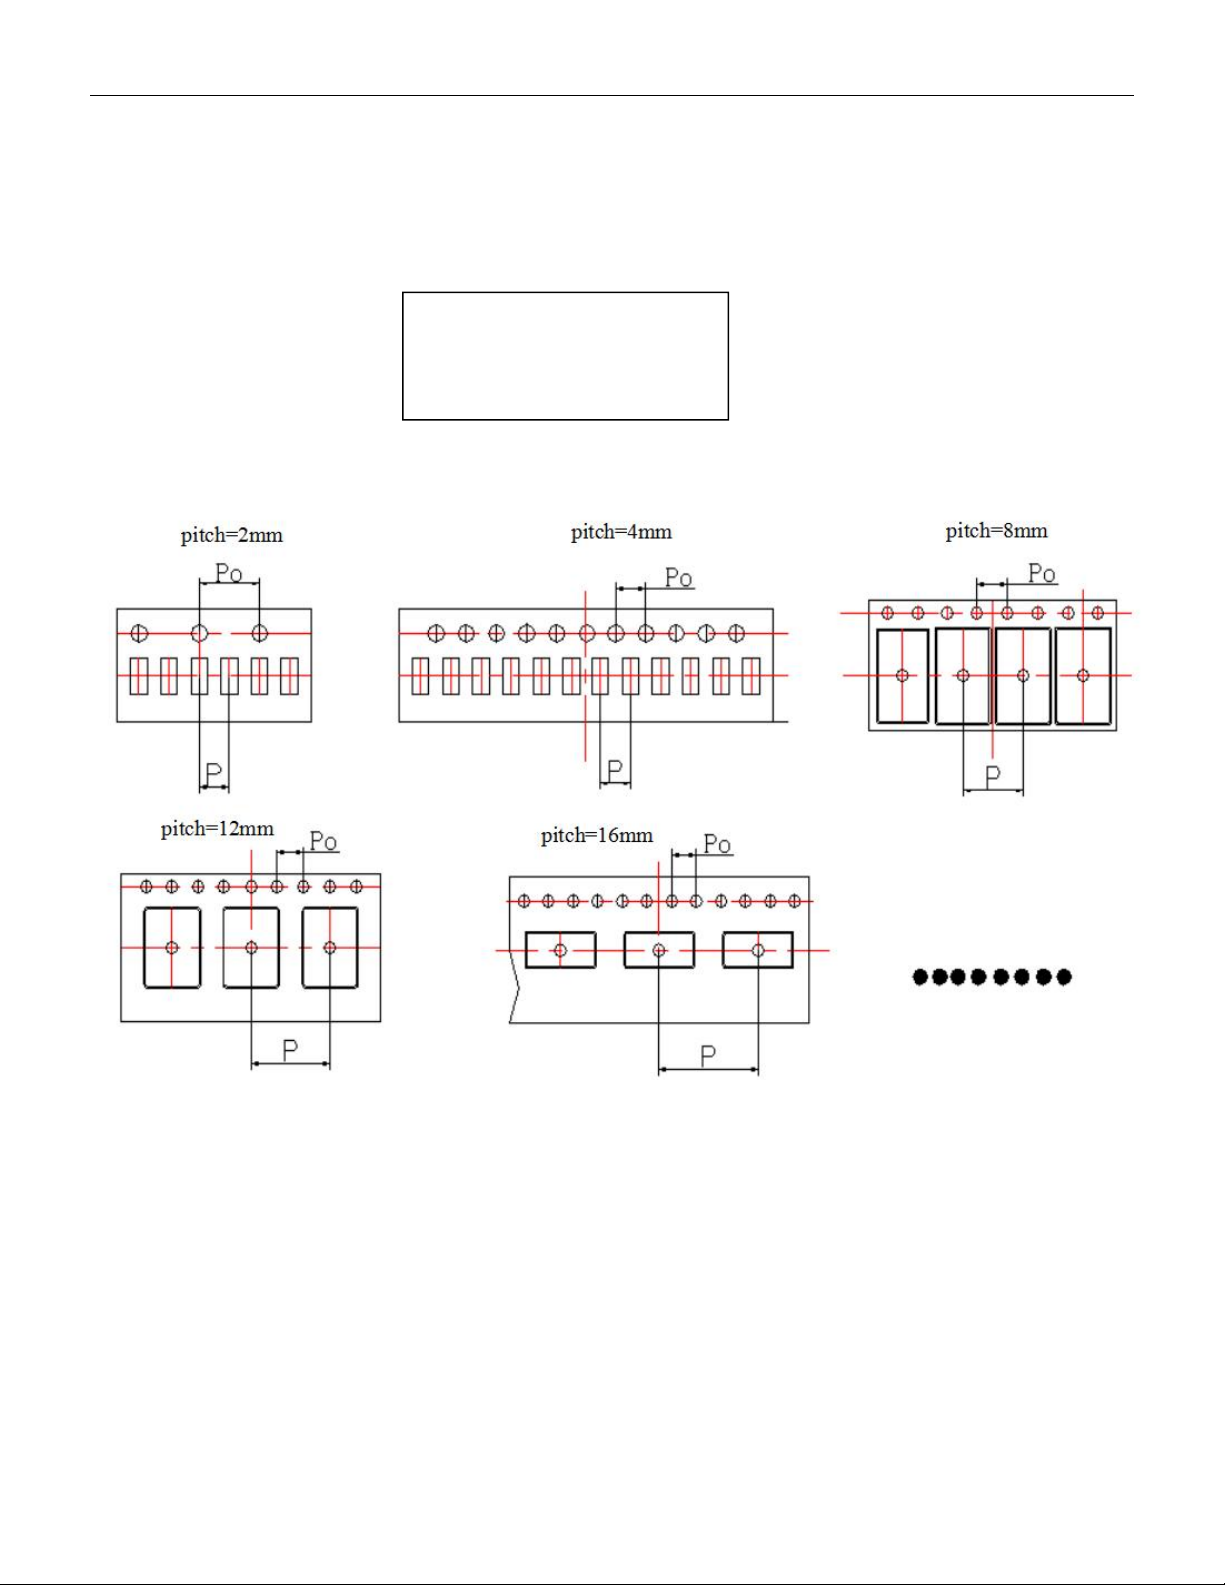
PITCH :According to the EIA-481 standard, the P-value of the spacing component pitch in
a reel is always:
MODE 2
Transparent Tape
PC DATA PITCH PRESET
000000 04mm
VERSION: .1.01 E
12 / 52
2mm;4mm;8mm;12mm;16mm;20mm;24mm;28mm;32mm;36mm;40mm;44mm;
48mm;52mm;56mm;
Press the PITCH key continuously to set the correct pitch value
When long pressing PITCH, the pitch will flash, and you can quickly modify the pitch value
as shown in the following figure
The value of pitch is equal to P, which is the distance between adjacent components on the
carrier tape, and the value of P. (EIA-481 has standardized that the P0 of all material strips is
4mm)
When the pitch value is greater than 4mm and it is inconvenient to confirm, counting gear
can be used to assist in confirming the material spacing: adjust the pitch value to 4mm, let
the arrow on the guide pulley randomly point to the center point of a material, press the
"reset" button, and then manually pull to the center point of an adjacent material. At this
S2 DATA PITCH PRESET
000000 **mm

VERSION: .1.01 E
13 / 52
time, multiply the "DATA" count value by 4 to obtain the material spacing. For example, if
the count value of two adjacent materials is 3, then the material spacing is: 3 * 4mm=12mm.
PRESET:When it is expected to count a certain number of parts, we use the preset function
After pressing the PRESET key and entering the value, the machine will stop at the
corresponding position, and only minor adjustments are needed to obtain the required
quantity; Press the PRESET key again to clear the set value, and the pre stop function will be
disabled.
Note:
1. Due to the limitation of the counting range, preset values above 999999 are invalid;
2. Negative numbers can be preset.When setting a negatiive value, press "0" first, then press
other numbers。
CLEAR:When starting counting, be sure to reset it to zero first, otherwise the counting will
be inaccurate。
START :Press START key,the right motor starts to rotate clockwise, the left motor is driven,
and the count value increases. The reel strip gradually rolls into the temporary reel from the
original reel of the parts
STOP:Press STOP key to stop the motor rotation。
REWIND:The left motor starts to rotate counterclockwise, the right motor is driven, and the
count value decreases. The material strip is gradually rolled back to the original part reel
from the temporary reel. Note that when the count value decreases to zero, the machine
will automatically stop. At this time, the material strip should return to the starting point,
and the accuracy of the count can be confirmed again. Press the REWIND key again, and the
material strip will continue to rewind until it completely returns from the temporary reel to
the original part reel
4.1.4 Adjust the arm for reel in different size
Rotate the locking knob counterclockwise to adjust the arm: When using a 7-inch/180cm
DATA PITCH PRESET
000000 4mm ******