COU2000 PRO计数器英文说明书 Operaton Manual-en(1).pdf - 第9页
VERSION: .1.01 E 9 / 52 4. Operatio n guide 4.1 Basic operation 4.1.1 Pow er on : select a workbench which clo ses to th e po wer supply , co nnect th e po wer supply , and position the cabinet o nto the workbench,and m …
VERSION: .1.01 E
8 / 52
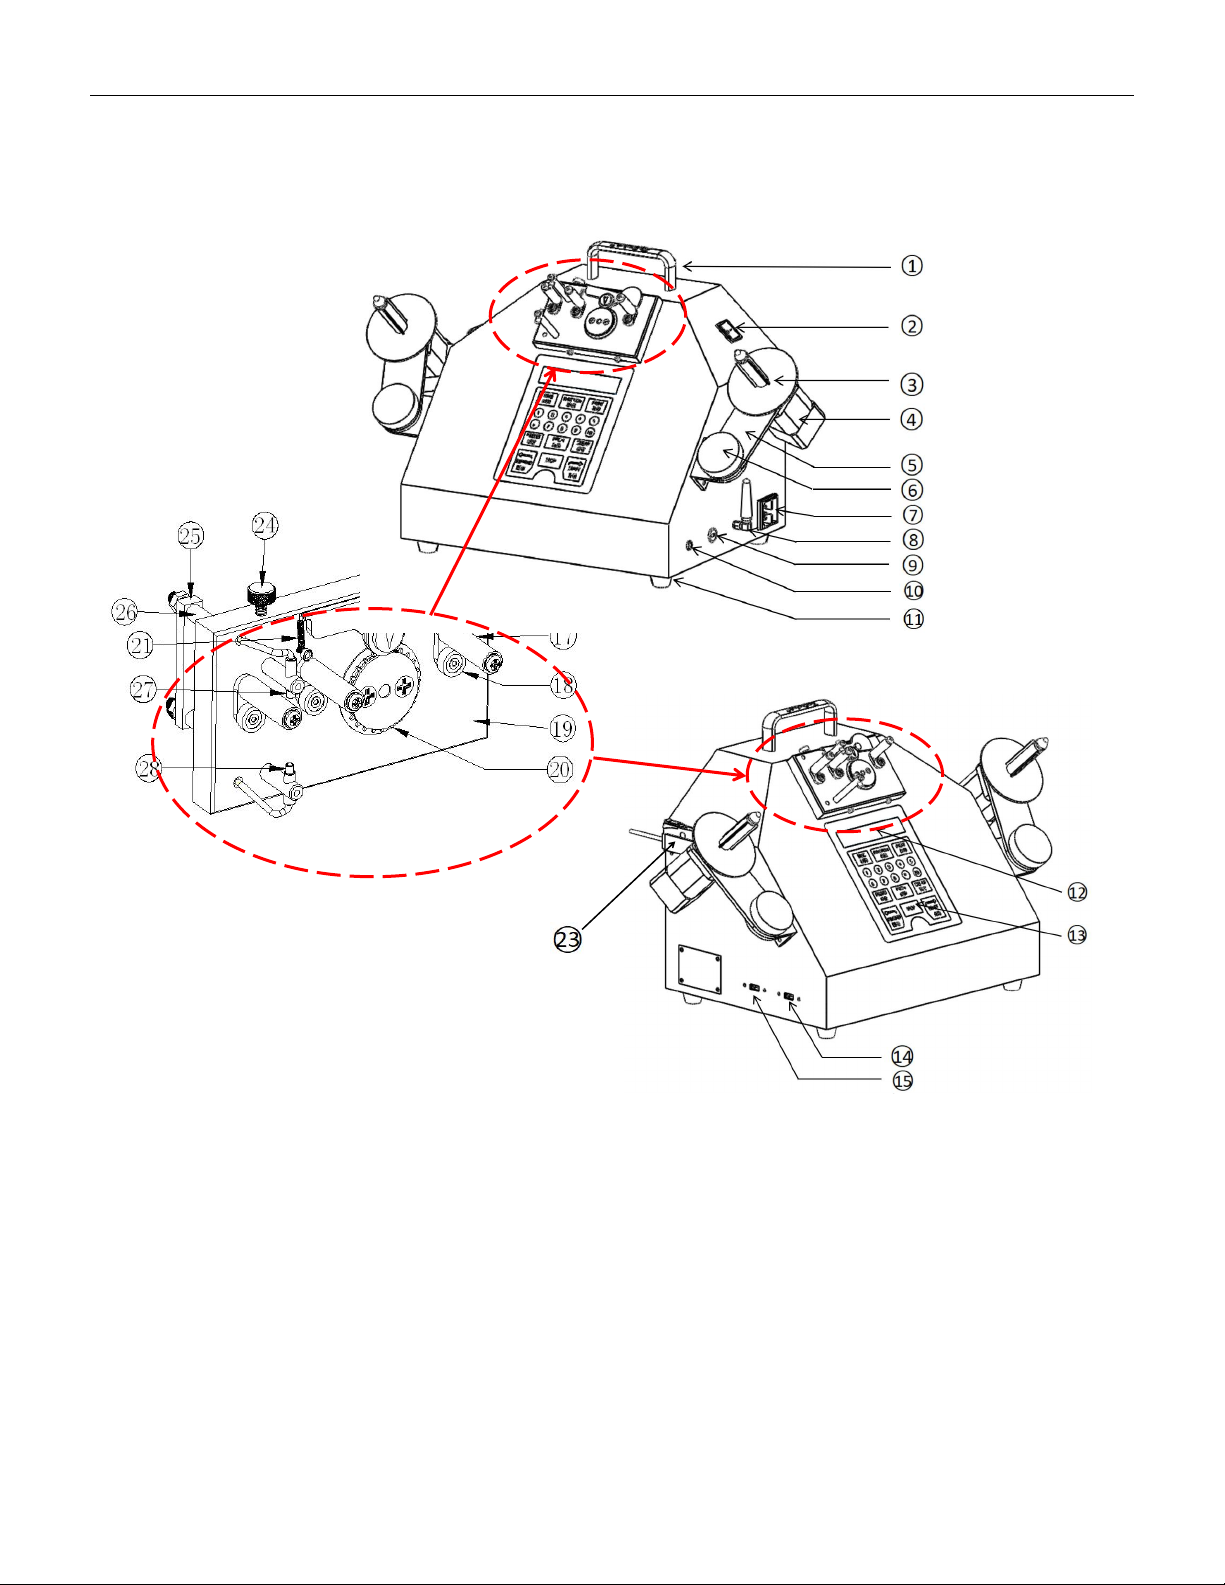
3.2 EX Pro
1)Handle 11)Foot pad
2)Power switch 12)LCD
3)Reeling shaft 13)Conttrol panel 21)Guide spring
4)Motor 14)Lable printer port 22)Guide pulley
5)Adjustable arm 15)Barcode reader port 23)Amplifier
6)Locking knob 16)Guide pulley 24)Adjust screw
7)Power supply 17)Upper guiding Pole 25)Guide rod fixing block
8)2.4G Antenna 18)Lower guiding Pole 26)Fiber optic tube fixing rod
9)Type-C port 19)Counter box 27)Fiber optic transmitter
10)Enclosure grounding point 20)Counter gear 28)Fiber optic receiver

VERSION: .1.01 E
9 / 52
4. Operation guide
4.1 Basic operation
4.1.1 Power on: select a workbench which closes to the power supply, connect the power
supply, and position the cabinet onto the workbench,and make sure grounding properly.
4.1.2 Self check: press on power switch, and there will be the following
display on the LCD:
Then the display will be changed to the following
.
indicating that the device has finished self check.
4.1.3 Usage of operation panel:
TIME :used to manage the time of the device; press the key to display the current time
inside the device; press this key for ten seconds to enter the time setting display:
Key in the corresponding year, month, date and time, press the TIME key,
and the display will automatically return back to:
SMD CHIP COUNTER
COU2000 SERIES
YY MM DD HH :MM
2099 01 01 00 :00
S2 DATA PITCH PRESET
000000 04mm
YY MM DD HH : MM
20**-**-**-** : **

VERSION: .1.01 E
10 / 52
DATA PITCH PRESET
000000 4mm
Pocket Check(PC) :Only applicable to the COUP2000EX Pro model, used to detect missing
parts in tape reel
There are‘Speed Adjustment’function and 3 work modes for COU2000ex pro,the setting
method is as below:
Press and hold the Function key for 3 seconds to enter the function settings screen. At this
time, press and hold the Function key briefly to enter the next screen, which is as follows:
Speed Adjustment
Mode 0
Mode 1
Mode 2
Speed Adjustment Interface:
The "Speed Adjustment" method is as follows:
Press "START" or "REWIND" to select S1/S2/S3 speeds. When held still for 3 seconds, the
screen will flash once and return to the main interface
Mode setting:
MODE0 Standard counting mode:“MODE 0 Standard”
MODE1 Pocket Check mode:“MODE 1 Pocket Check”
SPEED ADJUSTMENT
S1 S2 S3
MODE 1
Pocket Check
MODE 0
Standard