YRM20_Mainte_E.pdf - 第100页
3. 3-month maintenance items 3-33 Chapter 3 Periodic maintenance items 3.4 Base section T he YRM20 is equipped 4 upper fan filter (exhaust) at the upper surface of machine co ver , 4 air intake filter , each 2 for the fr…

3. 3-month maintenance items
3-32
Chapter 3 Periodic maintenance items
5
Apply new grease by hand uniformly
over the lead of ball screw.
6
Spread grease.
1. Close the machine safety cover, attach the
feeder exchange carriage and release the
emergency stop.
2. Press the [Push up] button to lower the push
up unit.
3. Raise the push up unit as the same
procedure of Step 3.
4. Repeat up/down for some times to spread
grease. The push up unit should stay its
upmost position after lubrication.
e
7
Remove excess grease by hand.
1. Press the emergency stop button, detach the
feeder exchange carriage and open the
machine safety cover.
2. Remove excess grease by hand.
Applying grease
Step 5
Ball screw
Grease
53342-KMX-00
3. 3-month maintenance items
3-33
Chapter 3 Periodic maintenance items
3.4 Base section
The YRM20 is equipped 4 upper fan filter (exhaust) at the upper surface of machine cover, 4 air intake filter,
each 2 for the front and rear side of machine, to cool down the axes and 1 air intake filter on the machine
rear side to protect the control unit. Neglecting to clean the filters can cause filter clogging and a
temperature rise in the machine.
Clean each filter to maintain machine performance and ensure a long service life.
n
NOTE
Power off the machine to perform these cleaning as the dust gathered by filter may be intaken into the machine.
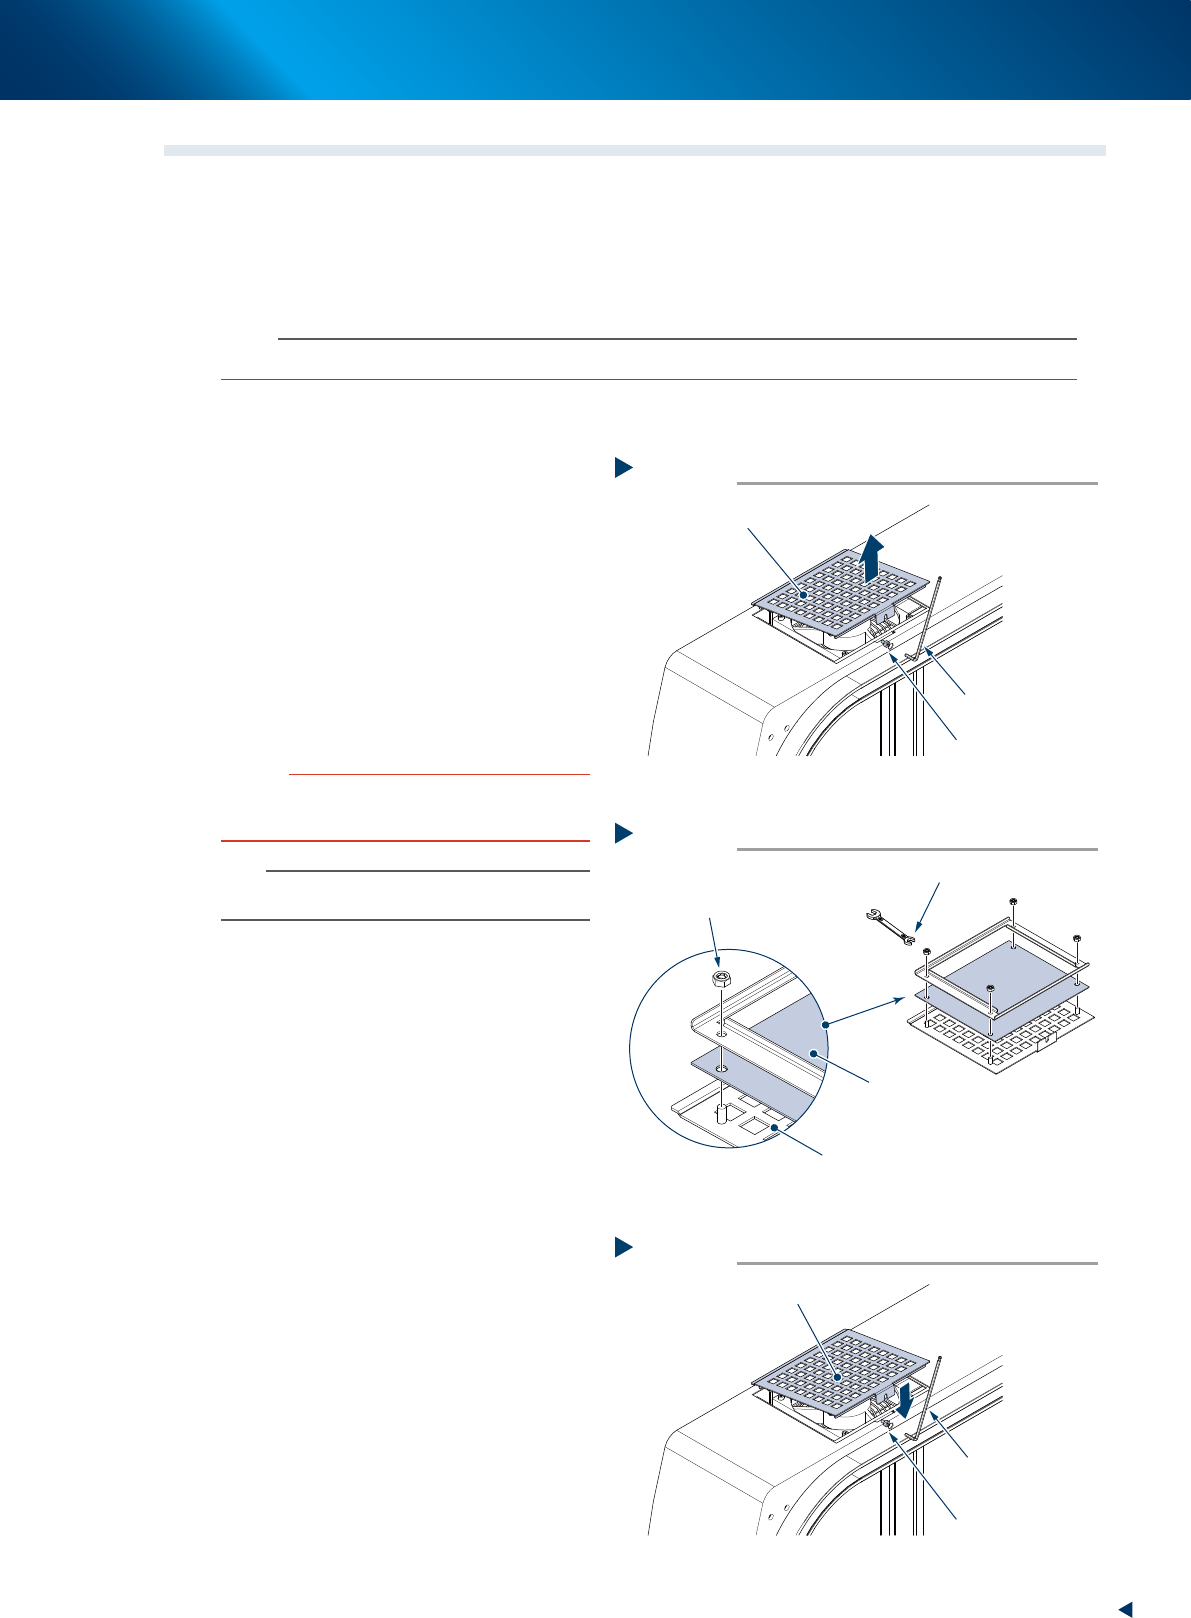
3.4.1 Cleaning the upper fan filters
e
1
Power off the machine after exiting the
software.
2
Detach the filter cover.
1. Loosen the mounting bolt of filter cover using
a hexagon wrench (3mm).
2. Pull out the filter cover upward.
3
Clean both side of the detached filter
using a vacuum cleaner or a vacuum
assembly to remove the dust.
c
CAUTION
The filters can be enough cleaned with vacuum cleaner.
The wet filters may lead clogging because the moisturized
dust make mass. Do not use water for cleaning.
n
NOTE
If the dust cannot be removed or the filter has worn out,
replace the filter with a new one.
►
Replacement of the upper fan filter
4
Replace the filter.
1. Reverse the filter cover and remove 4
mounting nuts using a spanner (7mm),
shown in the figure right.
2. Replace the filter with a new one.
3. Attach the new filter with 4 mounting nuts.
5
Return the filter.
1. Push in the filter cover to its mounting
position, shown in the figure right.
2. Tighten the mounting bolt of filter cover
using a hexagon wrench (3mm).
Detaching filter
Step 2
Filter cover (with filter)
Mounting bolt
Hexagon wrench
(3mm)
53343-KMX-00
Replacing filter
Step 4
Filter cover
Filter
Mounting nut
Spanner (7mm)
53344-KMX-00
Attaching new filter
Step 5
Filter cover (with filter)
Mounting bolt
Hexagon wrench
(3mm)
53345-KMX-00
3. 3-month maintenance items
3-34
Chapter 3 Periodic maintenance items
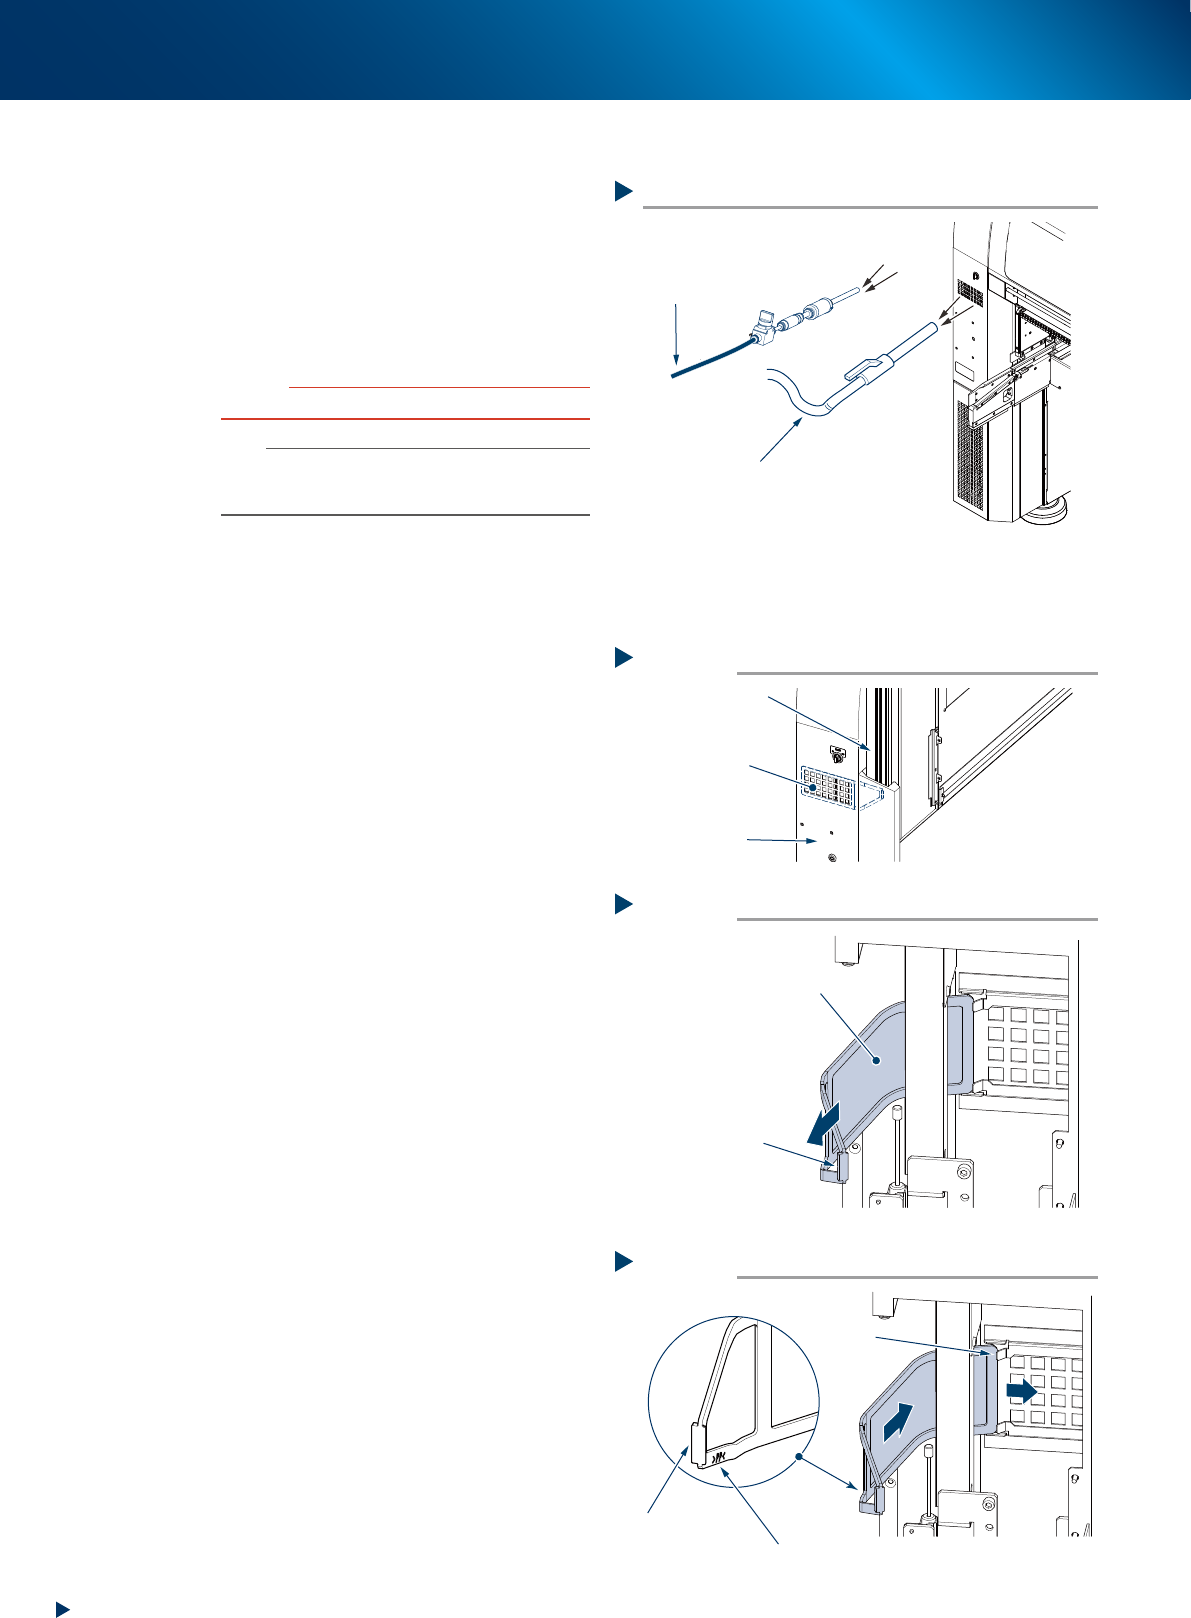
3.4.2 Cleaning the air intake filter
Usually, the air intake filters at the front and rear
side of machine can be cleaned by suctioning out
dust and dirt through the filter cover using a
vacuum assembly or a vacuum cleaner, shown in
the figure right.
If the dust cannot be removed completely, replace
the filter with a new one.
c
CAUTION
Do not clean the filter during automatic operation.
n
NOTE
When the filter is cleaned by vacuum assembly, the feeder
exchange carriage is required to set to machine, as the
air joint of feeder exchange carriage is used for cleaning.
█
Replacement of the air intake filter
The air intake filter can be replaced without tools.
1
Open the machine safety cover.
The air intake filter is retracted in the gap
between the frame and cover as shown in the
figure right.
2
Pull out the air intake filter to the arrow
direction by holding the knob of the
filter.
3
Attach a new air intake filter.
Insert a new filter as shown in the figure right,
passing along the beneath of guide, be aware
the direction of it.
On the front and rear cover
Vacuum cleaner
Connected to the air joint of
feeder exchange carriage
Vacuum assembly (option)
53358-KMX-00
Attaching air intake filter
Step 3
Guide
Direction of filter
Inside:
side with “PP” stamp
Outside:
side with larger knob
53361-KMX-00
Pulling out the air intake filter
Step 2
Air intake filter
Pull out by holding
this knob
53360-KMX-00
Air intake filter
Step 1
Air intake filter
Frame
Cover
53359-KMX-00