YRM20_Mainte_E.pdf - 第99页
3. 3-month maintenance items 3-32 Chapter 3 Periodic maintenance items 5 Apply ne w grease b y hand u niformly o ver the l ead of bal l screw . 6 Spread g rease. 1. Close the m achine s afety cover , attach the feeder e …
3. 3-month maintenance items
3-31
Chapter 3 Periodic maintenance items
3.3 PU-axis
PU-axis (push up axis) takes an essential role which prevents board warpage upon clamping a board and
board sinking upon transferring.
Moreover, PU-axis functions as preventing mounting accuracy offset caused by the board sinking upon
transferring. So the periodical inspecting/cleaning should be performed to maintain its function.
c
CAUTION
When the PU-axis related trouble occurs, then contact your sales representative. Disassembly and cleaning of the PU-axis
by the user will void the warranty.
3.3.1 Cleaning/lubricating PU-axis ball screw
1
Prepare for work.
1. Remove all items sensitive to magnetic fields
such as wristwatches and magnetic ID cards.
2. Read any board data.
TIP
Moving the push up unit of both stage 1 and stage 2 are
available by reading board data.
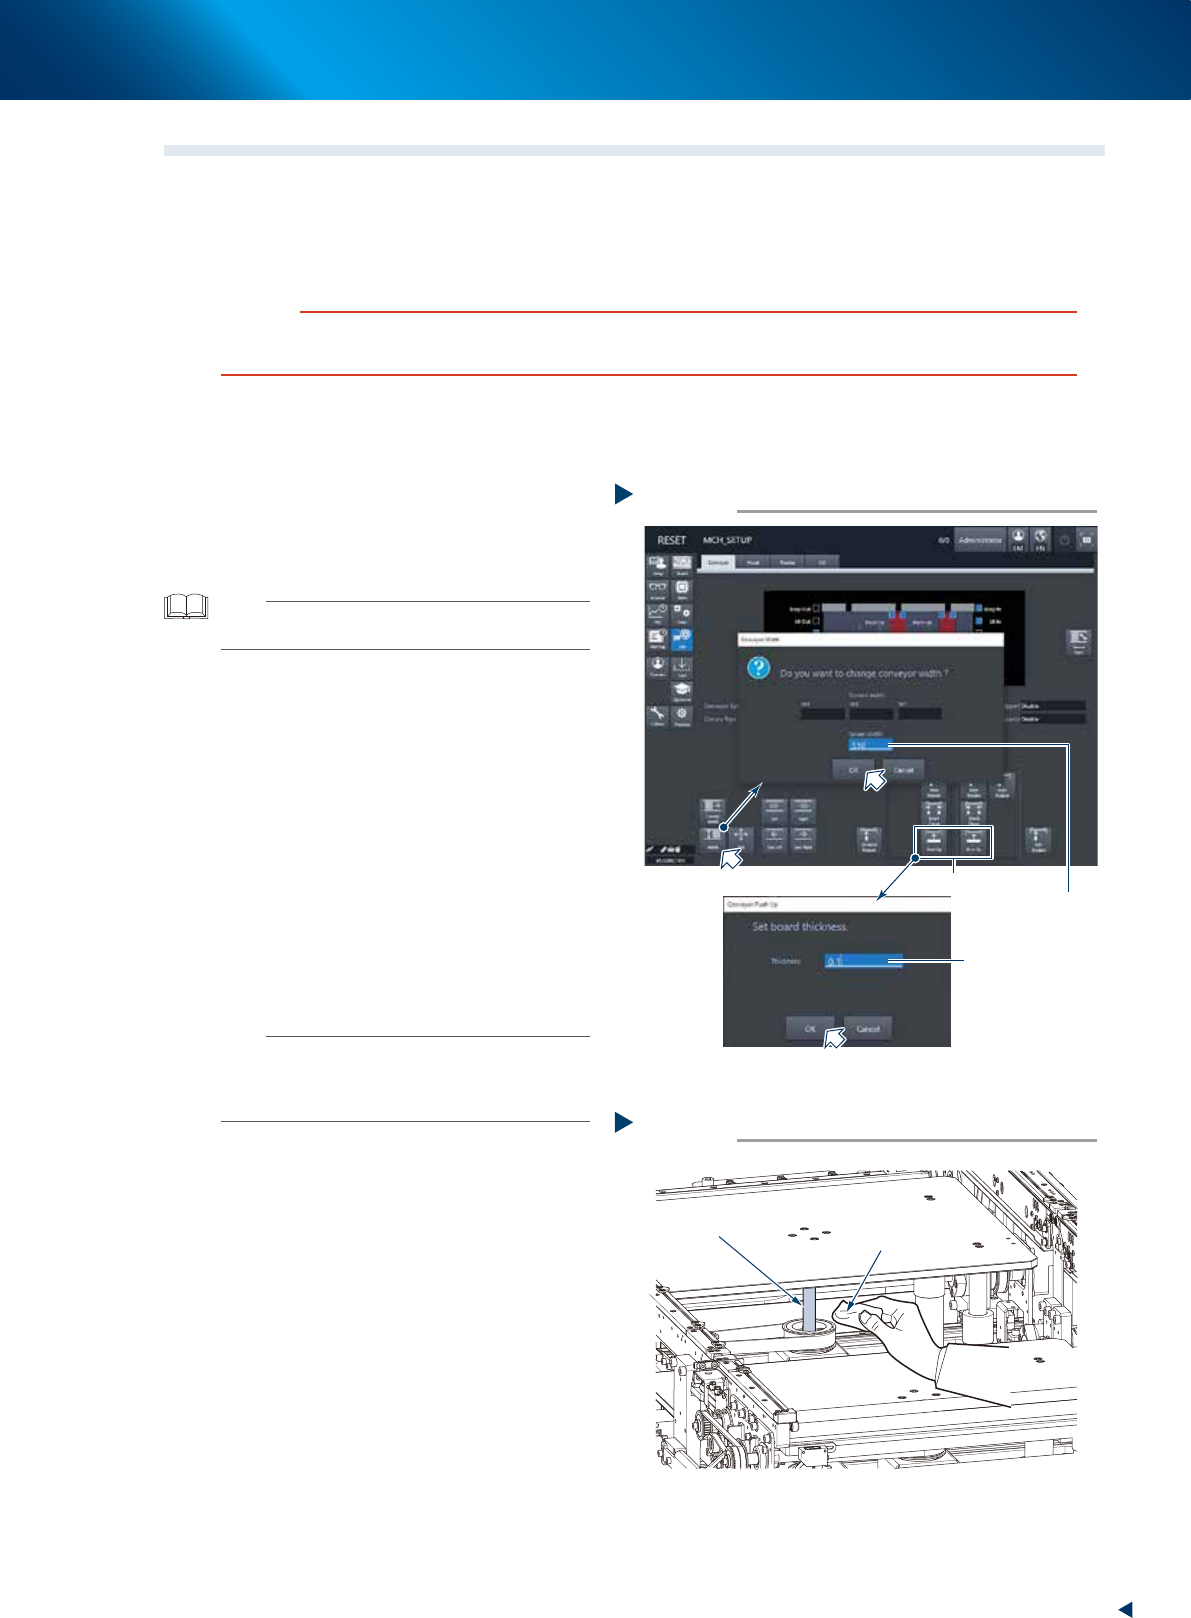
2
Maximize the conveyor width.
1. Press the [Width] button on the [Unit] -
[Conveyor] screen to display the [Conveyor
Width] screen.
2. Input the maximum width (510mm) of your
machine in the "Target Width" field and
press the [OK] button. Then the conveyor
width is changed to the specified.
3
Raise the push up unit.
1. Press the [Push up] button of the target stage
to display the "Conveyor Pushup" screen.
2. Input "0.1mm" in the "Board thickness" field
and press the [OK] button. Then the push up
unit raises.
n
NOTE
When the board size X of the board data selected at Step
1 excesses 380mm, the [Push up] button of upstream side
is grayed-out. The upstream push up unit raises engaging
with the raise of downstream push up unit.
e
4
Remove old grease.
1. Press the emergency stop button and detach
the feeder exchange carriage, then open the
machine safety cover.
2. Wipe away old grease completely from 2
ball screws using a lint-free cloth.
Step 2,3
2
3
Changing the conveyor width
Input 510mm
Input 0.1mm
54302-KMX-00
Cleaning ball screw
Step 4
Lint-free cloth
Ball screw
53341-KMX-00

3. 3-month maintenance items
3-32
Chapter 3 Periodic maintenance items
5
Apply new grease by hand uniformly
over the lead of ball screw.
6
Spread grease.
1. Close the machine safety cover, attach the
feeder exchange carriage and release the
emergency stop.
2. Press the [Push up] button to lower the push
up unit.
3. Raise the push up unit as the same
procedure of Step 3.
4. Repeat up/down for some times to spread
grease. The push up unit should stay its
upmost position after lubrication.
e
7
Remove excess grease by hand.
1. Press the emergency stop button, detach the
feeder exchange carriage and open the
machine safety cover.
2. Remove excess grease by hand.
Applying grease
Step 5
Ball screw
Grease
53342-KMX-00
3. 3-month maintenance items
3-33
Chapter 3 Periodic maintenance items
3.4 Base section
The YRM20 is equipped 4 upper fan filter (exhaust) at the upper surface of machine cover, 4 air intake filter,
each 2 for the front and rear side of machine, to cool down the axes and 1 air intake filter on the machine
rear side to protect the control unit. Neglecting to clean the filters can cause filter clogging and a
temperature rise in the machine.
Clean each filter to maintain machine performance and ensure a long service life.
n
NOTE
Power off the machine to perform these cleaning as the dust gathered by filter may be intaken into the machine.
3.4.1 Cleaning the upper fan filters
e
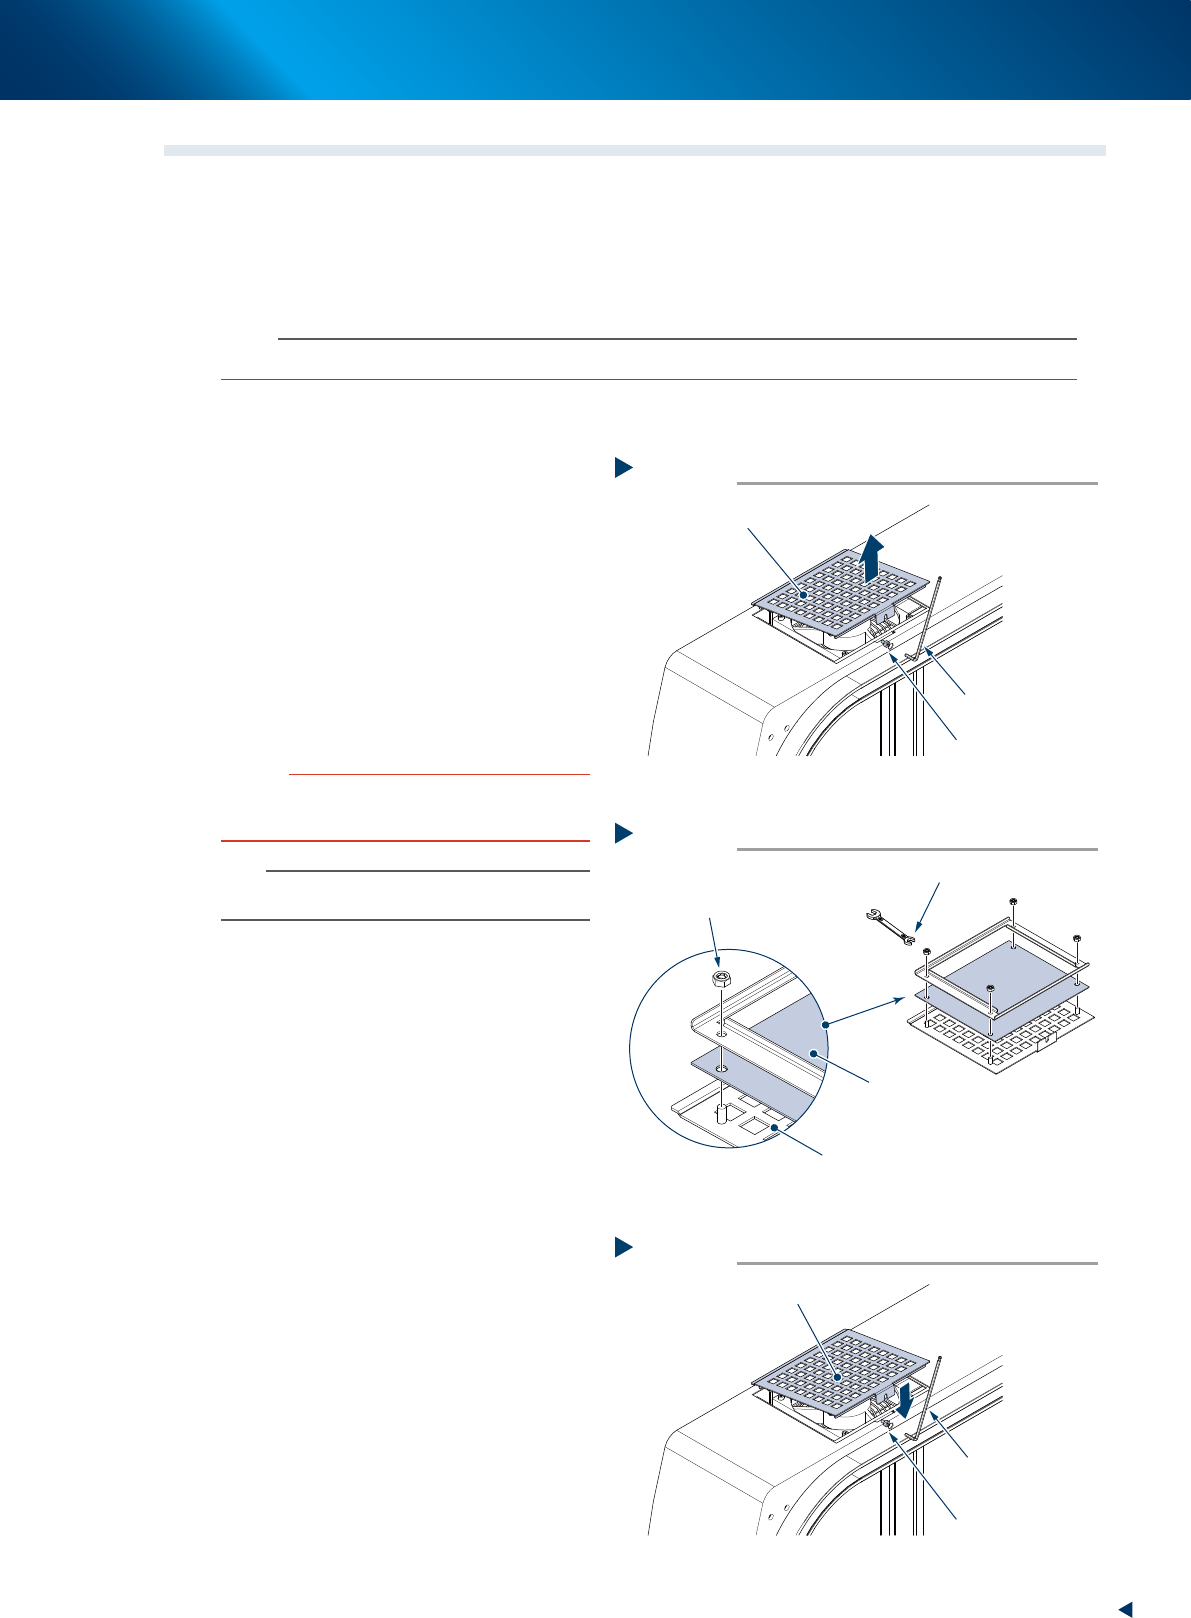
1
Power off the machine after exiting the
software.
2
Detach the filter cover.
1. Loosen the mounting bolt of filter cover using
a hexagon wrench (3mm).
2. Pull out the filter cover upward.
3
Clean both side of the detached filter
using a vacuum cleaner or a vacuum
assembly to remove the dust.
c
CAUTION
The filters can be enough cleaned with vacuum cleaner.
The wet filters may lead clogging because the moisturized
dust make mass. Do not use water for cleaning.
n
NOTE
If the dust cannot be removed or the filter has worn out,
replace the filter with a new one.
►
Replacement of the upper fan filter
4
Replace the filter.
1. Reverse the filter cover and remove 4
mounting nuts using a spanner (7mm),
shown in the figure right.
2. Replace the filter with a new one.
3. Attach the new filter with 4 mounting nuts.
5
Return the filter.
1. Push in the filter cover to its mounting
position, shown in the figure right.
2. Tighten the mounting bolt of filter cover
using a hexagon wrench (3mm).
Detaching filter
Step 2
Filter cover (with filter)
Mounting bolt
Hexagon wrench
(3mm)
53343-KMX-00
Replacing filter
Step 4
Filter cover
Filter
Mounting nut
Spanner (7mm)
53344-KMX-00
Attaching new filter
Step 5
Filter cover (with filter)
Mounting bolt
Hexagon wrench
(3mm)
53345-KMX-00