YRM20_Mainte_E.pdf - 第70页
1. Weekly maintenance 3-3 Chapter 3 Periodic maintenance items █ Nozzle holder (removable) The nozzle station for YRM20 (optional) is consisted of the base unit and nozzle holder (hereinafter referred to as holder) illus…
1. Weekly maintenance
3-2
Chapter 3 Periodic maintenance items
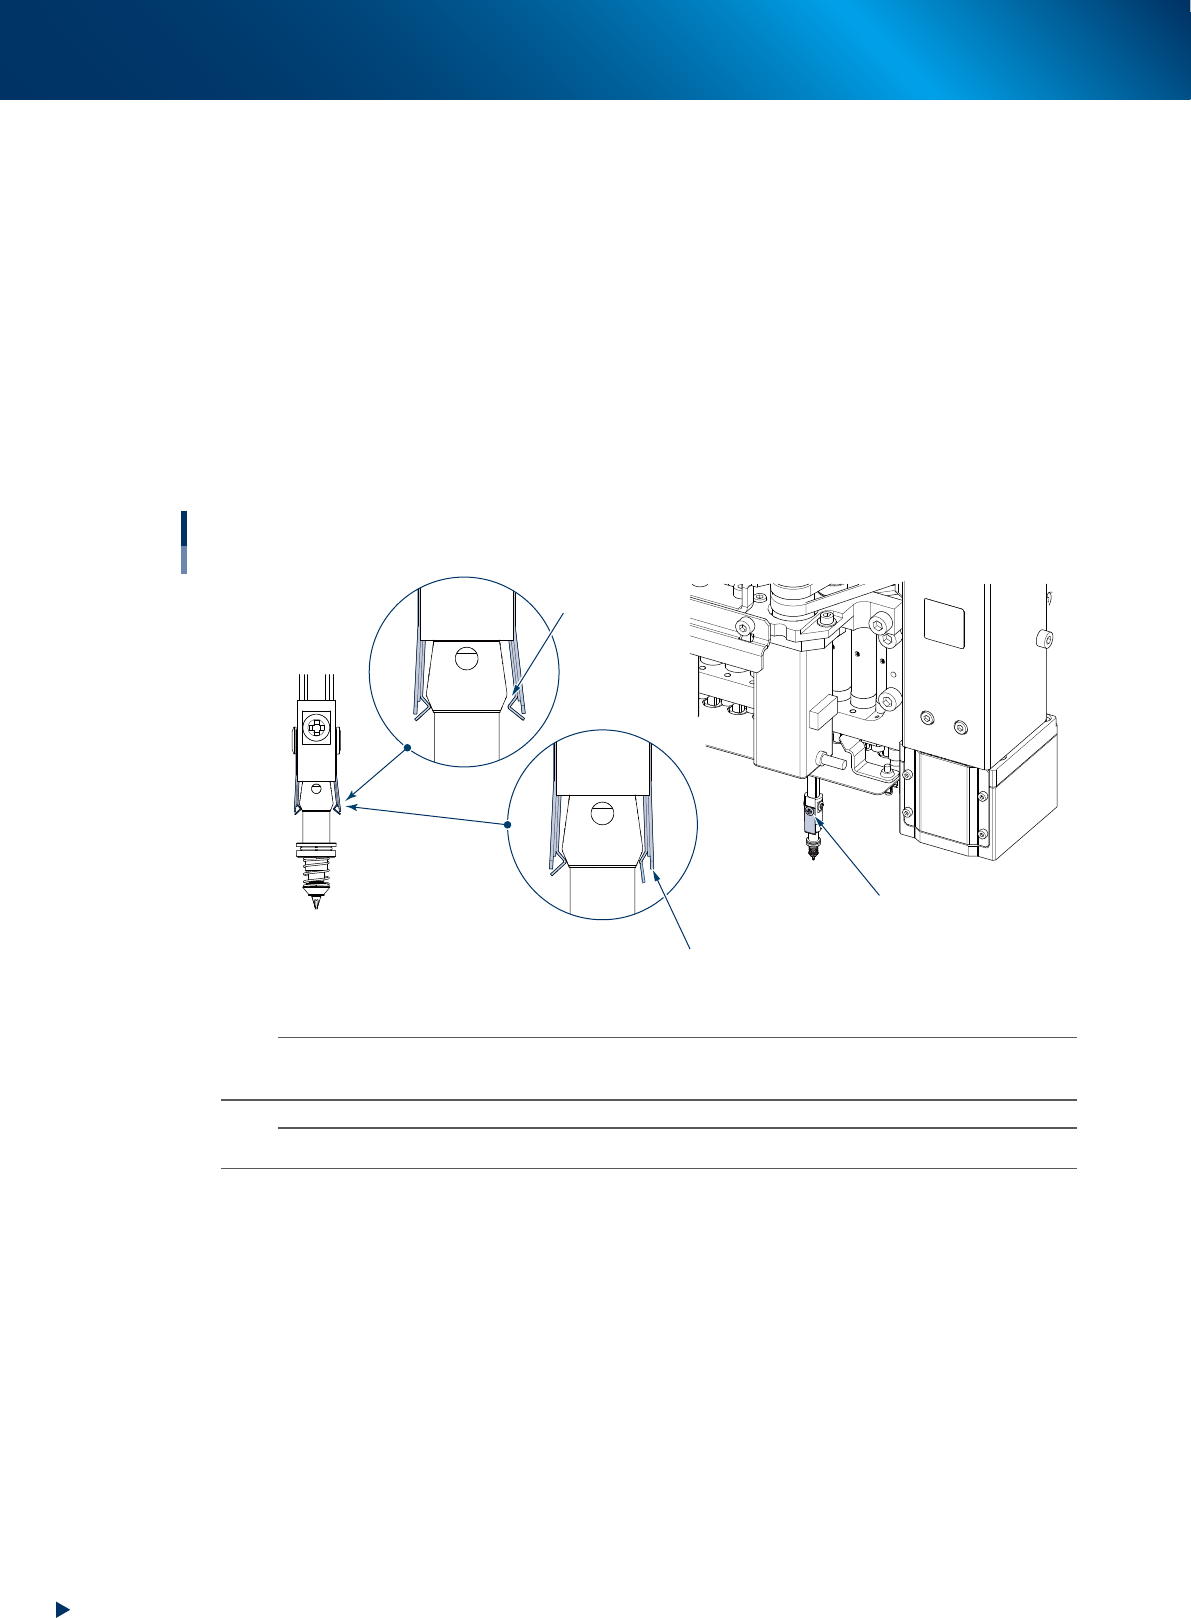
1.1.2 Check the condition of nozzle leaf spring
Inspect the nozzle holding condition of head periodically. When the holding ability of nozzle leaf spring
(hereinafter referred to as leaf spring) is not stable, it creates adverse effect to all the picking up, recognition,
and mounting.
►
Inspetion items for leaf spring
Attach/detach the nozzle from nozzle station and check the following items.
• Has enough nozzle holding ability
• No clearance between the leaf spring and nozzle
• No deformation, or wearing at the contact point with nozzle
• No looseness at mounting screw of leaf spring
Inspection items for leaf spring
No looseness at mounting screw
No gap
No deformation or wearing
53301-KMK-00
n
NOTE
When some items above have problem, see Chapter 5 "2.1 HM head: Replacing nozzle leaf springs"and replace the
leaf spring. Even when one side of leaf spring deteriorates, essentially the both of one pair should be replaced.
n
NOTE
When the nozzles are removed from head or nozzle station, they should be returned to their original position.
1. Weekly maintenance
3-3
Chapter 3 Periodic maintenance items
█
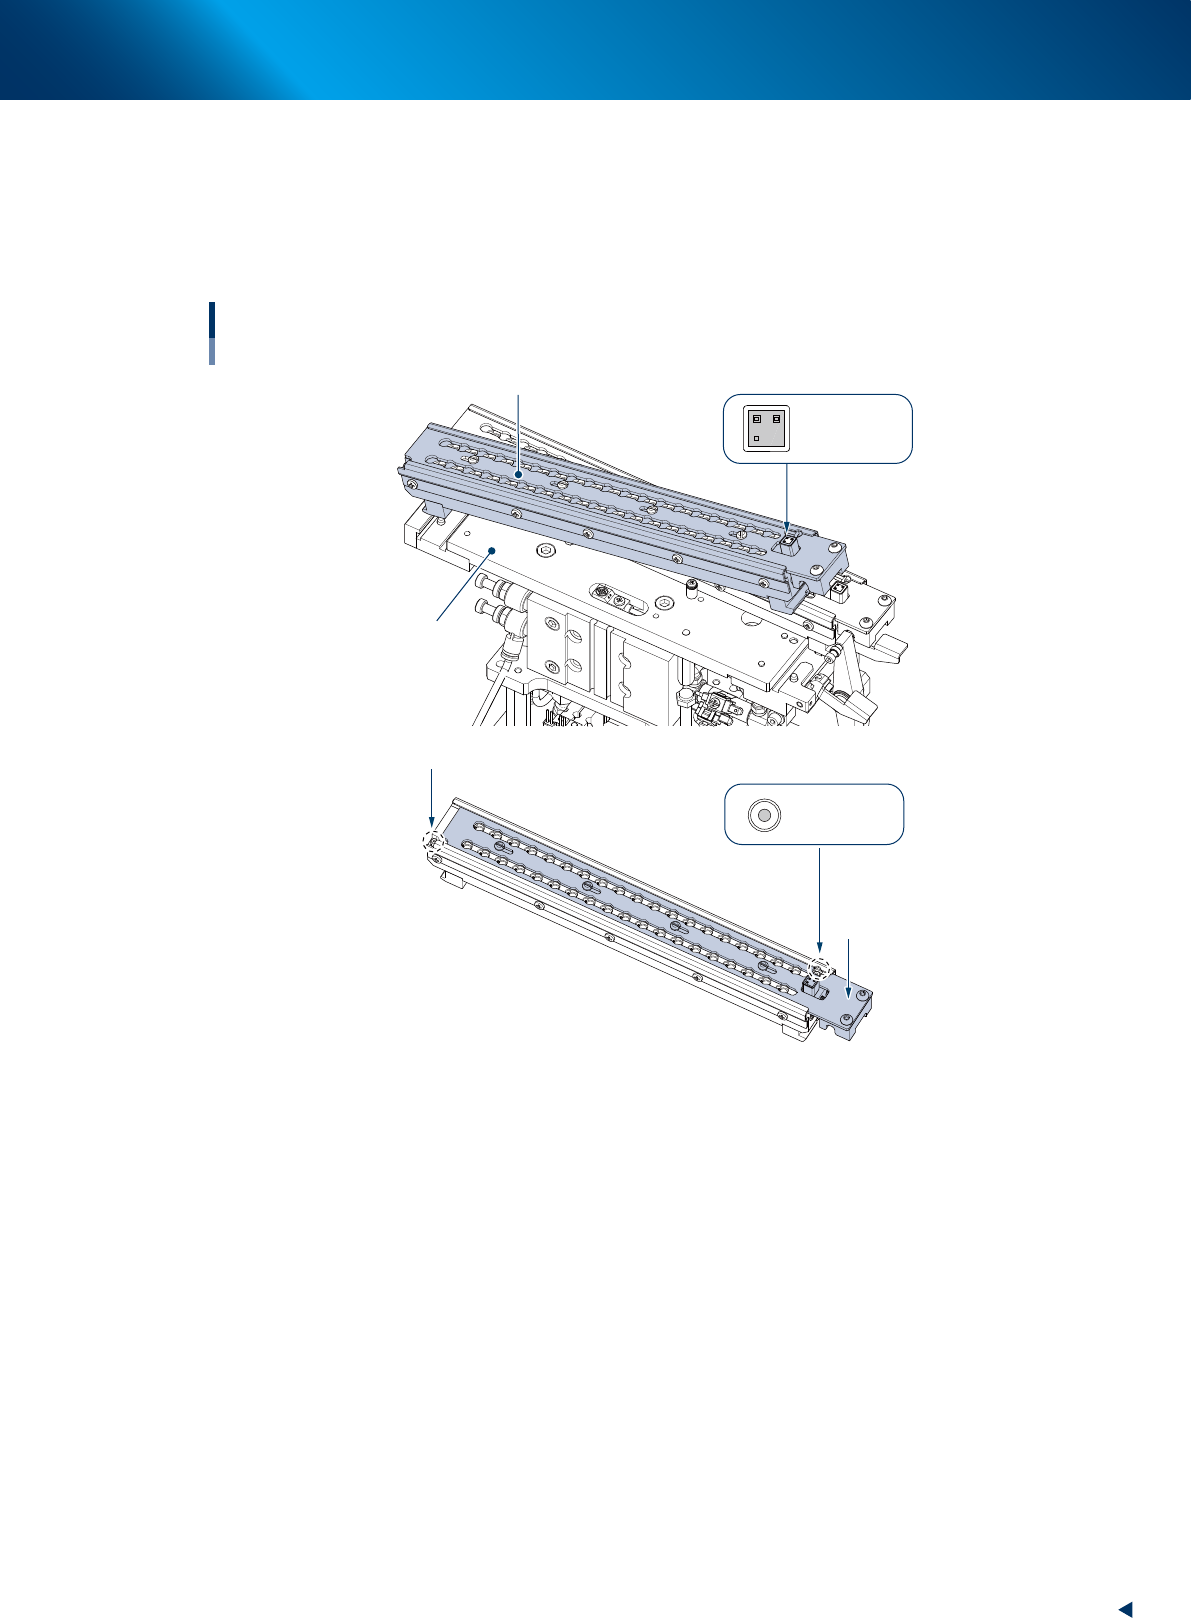
Nozzle holder (removable)
The nozzle station for YRM20 (optional) is consisted of the base unit and nozzle holder (hereinafter
referred to as holder) illustrated below, so that the nozzles can be removed by whole holder installed.
Detach the whole holder when all the nozzles are required to be removed for maintenance work or so,
or when the offline setup is required.
Nozzle holder detached
Base unit
Shutter
ANC MACS
ANC MACS
Nozzle station
Nozzle holder (removable)
Nozzle holder (removable)
QR code label
53310-KMK-10
►
Precaution for using removable holder
• Avoid soiling or scratching the QR label and ANC mark upon attaching/detaching the holder.
• The shutter should be closed upon attaching/detaching the holder.
• Confirm there is no chip or dirt in the holder upon storing nozzles.
• Confirm there is no chip or dirt at base section upon attaching the holder.
1. Weekly maintenance
3-4
Chapter 3 Periodic maintenance items
█
Attaching/dataching nozzle holder
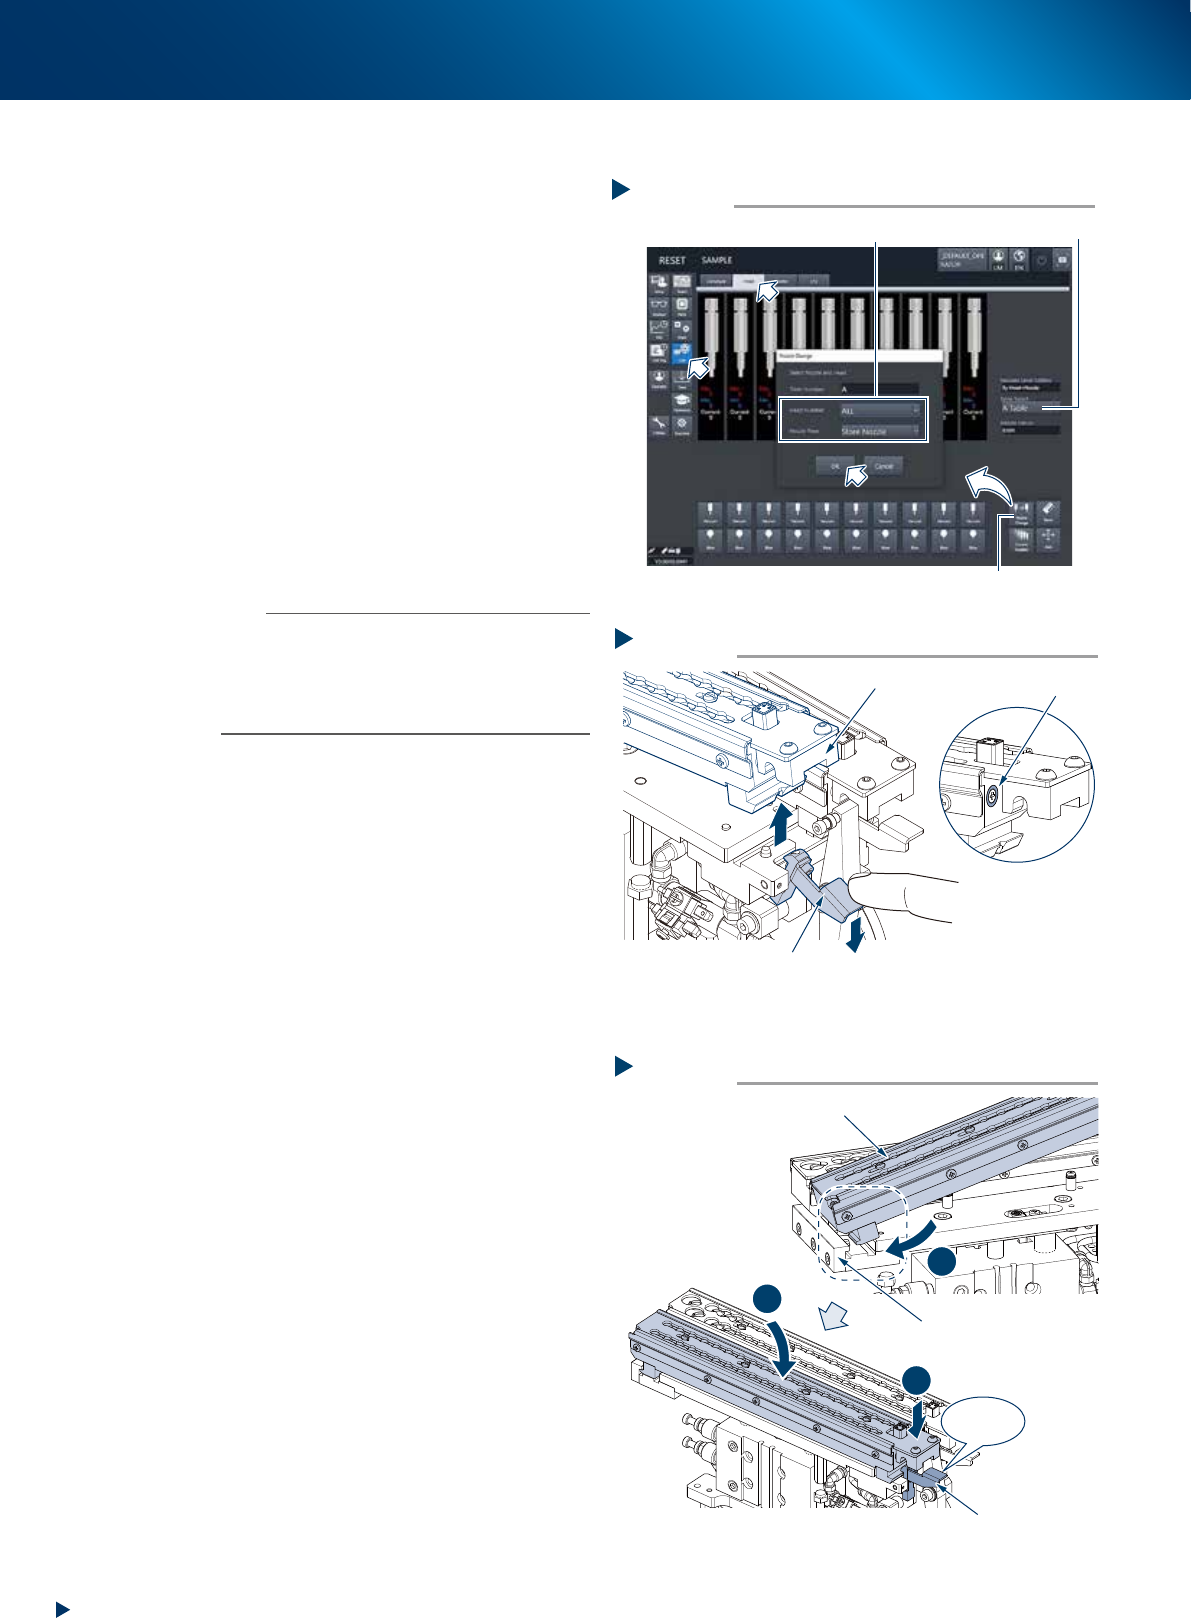
►
Detaching
1
Store all the nozzles.
1. Open [Unit] - [Head] screen.
2. Select the table where the holder is to be
detached for "Table Select".
3. Press the [Nozzle Change] button. Select
"ALL" for "Head Number" and select" Store
Nozzle" for "Nozzle Type" on the" Nozzle
Change" screen.
4. Press the [OK] button to return all nozzles to
the nozzle station.
e
2
Press the emergency stop button and
open the safety cover.
3
Pull down the holder retaining lever and
detach the nozzle holder upward.
n
NOTE
The nozzle holder shutter is equipped with magnet and it
is closed after detaching the nozzle holder.
The nozzle can be detached while shifting the shutter by
hand.
Moreover, do not make upside down the nozzle holder
with opening the shutter as the nozzles may drop off.
►
Attaching
1
Check that there are no dirt or foreign
matter on the base unit.
2
Return the holder to base unit.
1. insert the nozzle holder likely to hook it into
the attaching block section of base unit.
2. Press down the holder to the holder retaining
lever side while using the attaching block
side as supporting point.
3. Then push down the nozzle holder until it
clicks.
Step 3
Magnet
Detaching holder
Holder
Holder retaining lever
5331A-KMX-10
Step 2
Click!
1
2
3
Attaching holder
Holder retaining lever
Holder
Mounting block
5331B-KMX-00
Step 1
Select “ALL” for Head Number, “Store Nozzle” for Nozzle Type
[Nozzle Change] button
Table Select
Storing nozzles
54300-KMX-00