YRM20_Mainte_E.pdf - 第121页
5. 1-year maintenance 3-54 Chapter 3 Periodic maintenance items 5.5 Base section 5.5.1 Replacing the air and mist filter element and cleaning the cup An air filter and an oil mist filter are installed in YRM20 to prevent…
5. 1-year maintenance
3-53
Chapter 3 Periodic maintenance items
5
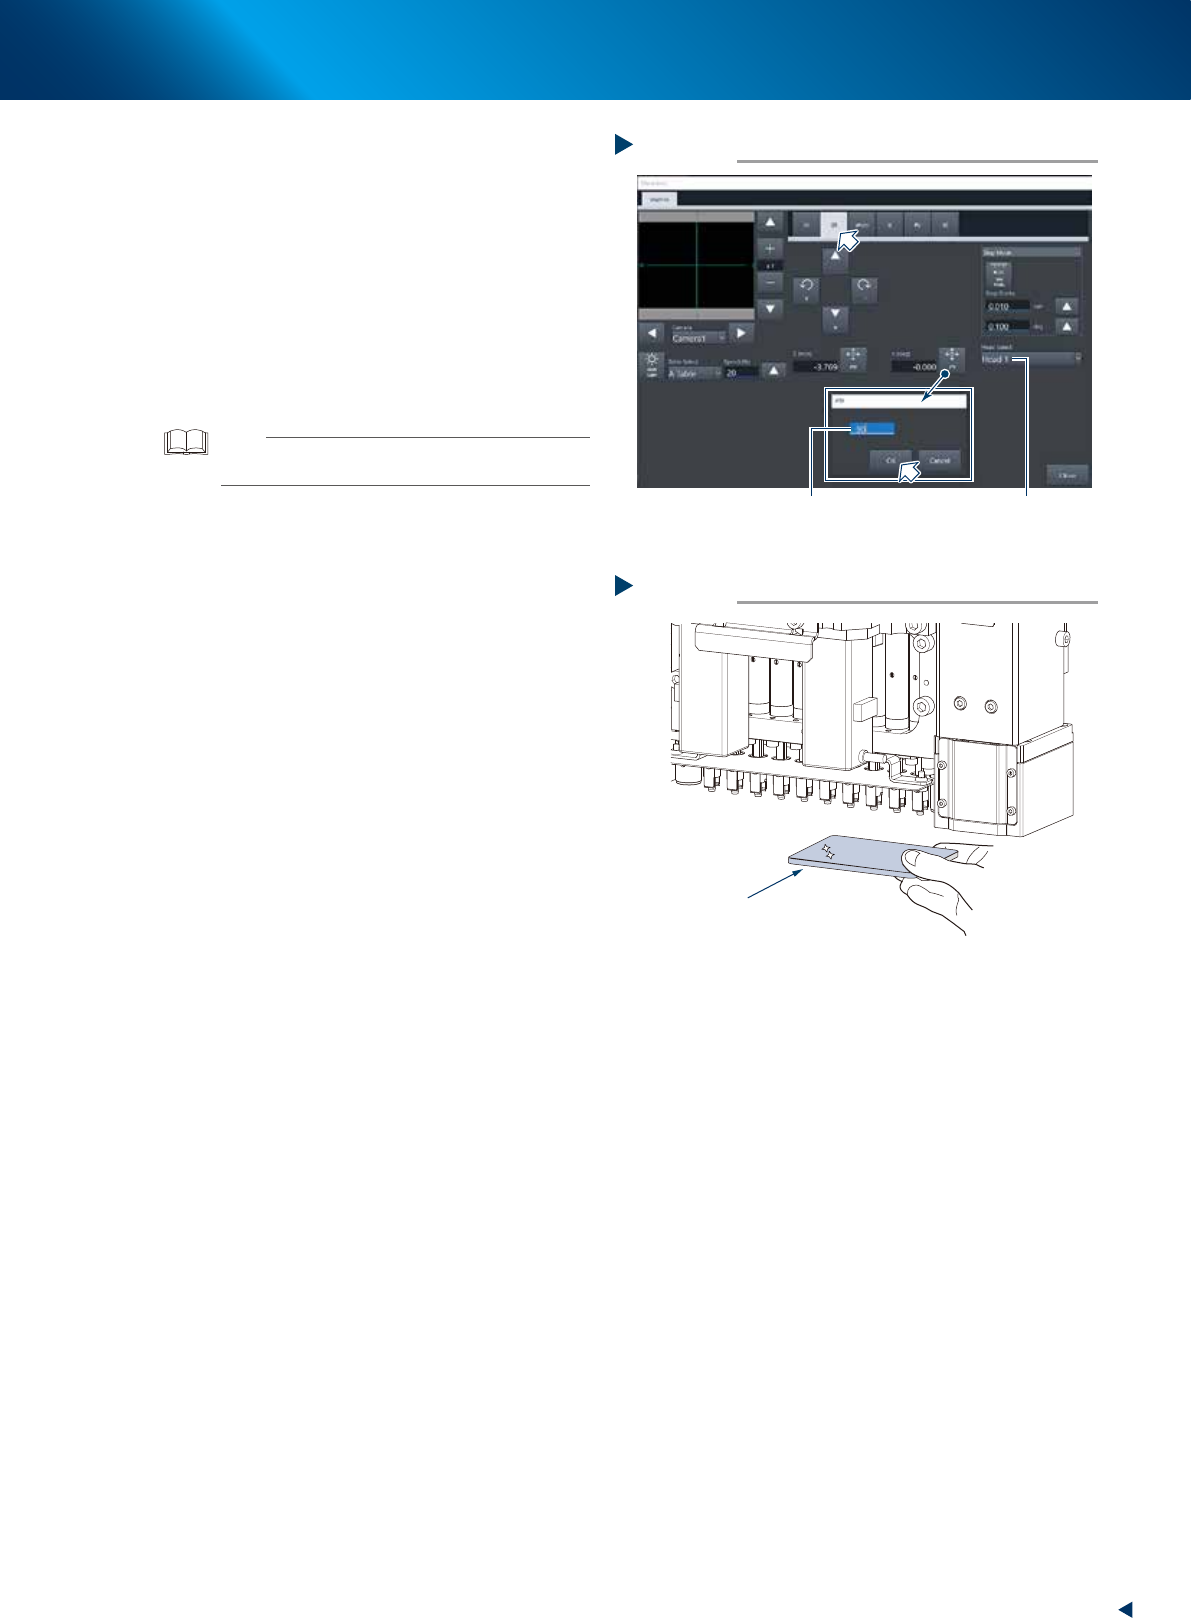
Turn the head unit minus 90-degree.
1. Close the machine safety cover and attach
the feeder exchange carriage. Then release
the emergency stop.
2. Change the head unit direction to minus
90-degree by the same procedure of Step 3.
e
3. Press the emergency button and detach the
feeder exchange carriage. Then open the
machine safety cover.
6
Clean other shaft tip (at reverse side) as
the same procedure of Step 4.
TIP
When the cleaning has some trouble, push down the
Z-axis joint block by hand to clean well.
7
Check that the shaft tips are completely
cleaned using a hand mirror or similar.
8
When the nozzles are detached by hand,
return each nozzle to the head which it
was detached
Turning the head unit
Step 5
Input -90 degree Select head
54319-KMX-00
Checking the shaft tips
Step 7
Check all the head
Hand mirror
533A0-KMX-00
5. 1-year maintenance
3-54
Chapter 3 Periodic maintenance items
5.5 Base section
5.5.1 Replacing the air and mist filter element and cleaning the cup
An air filter and an oil mist filter are installed in YRM20 to prevent oil, water, and impurities in the air
compressor from entering the machine.
This section describes the procedure for inspecting and cleaning these filters and also for replacing the filter
media (filter elements). Detach the air coupler from the air supply fitting to ensure worker safety.
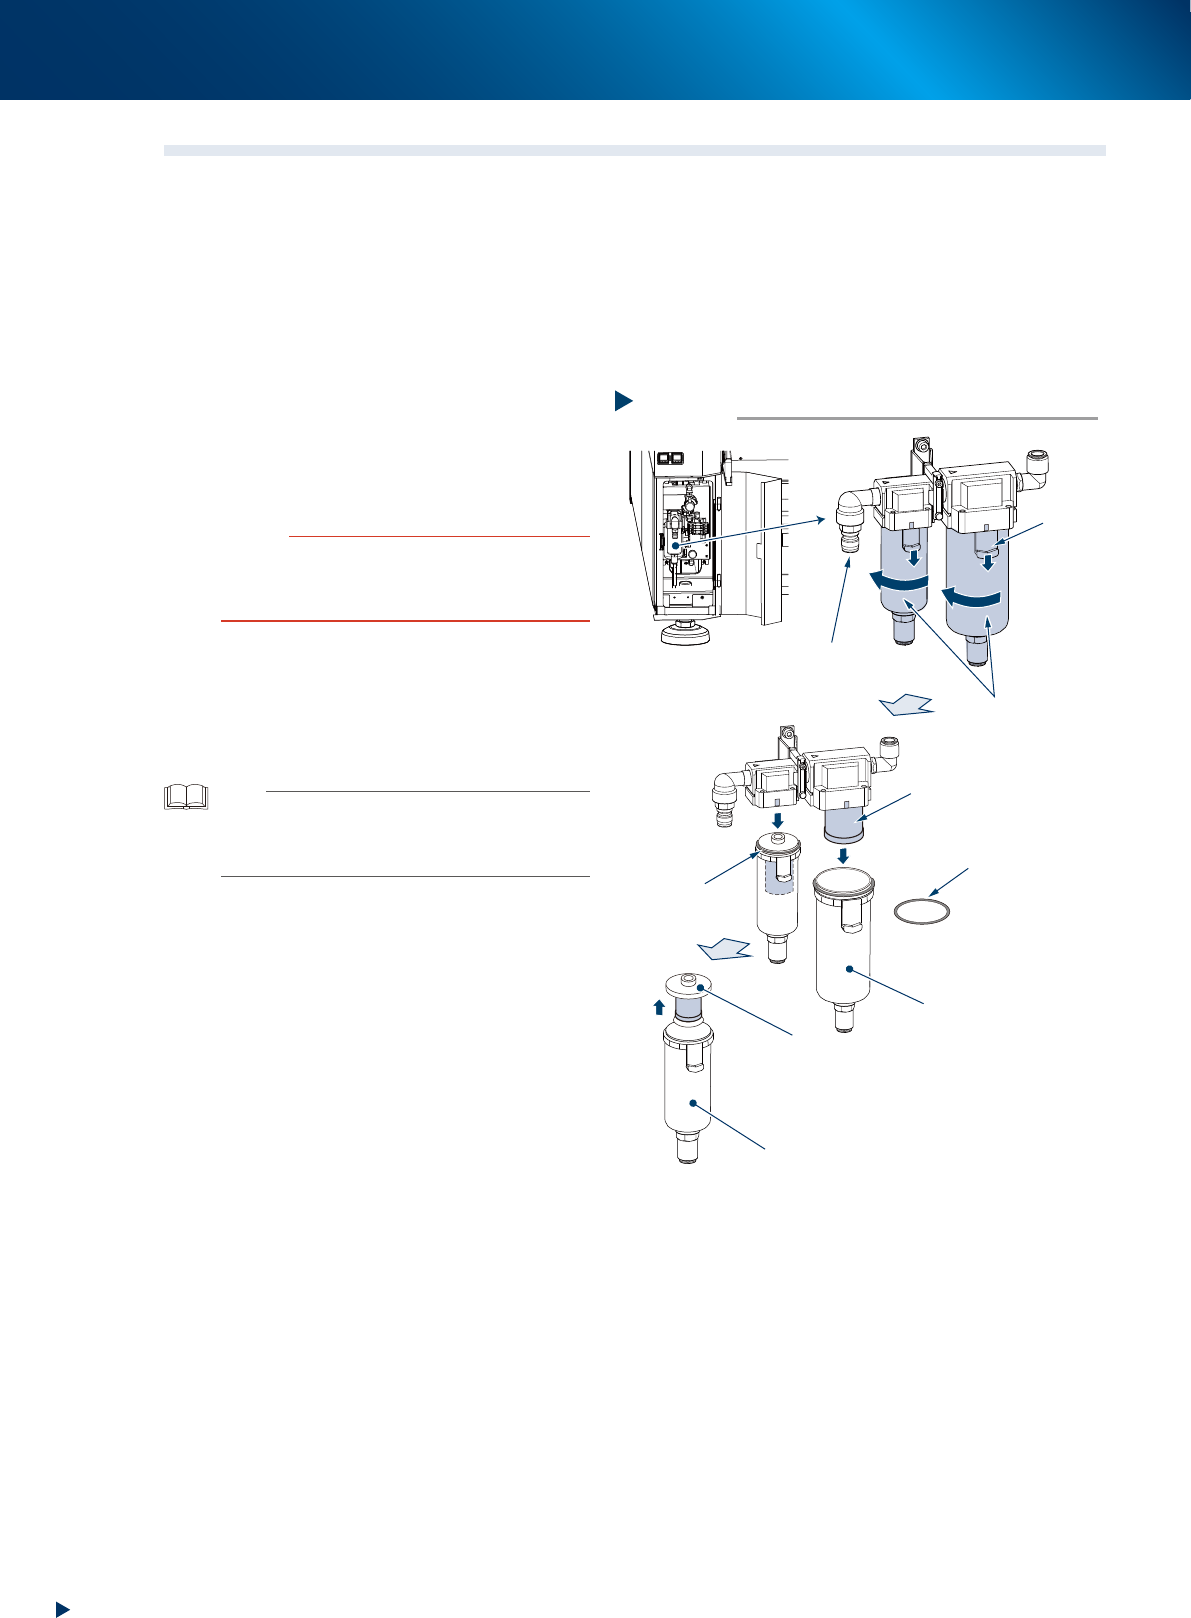
1
Detach the air coupler of air supply.
1. Rotate the "Air supply/exhaust" switch to
left (EXH) to shut down the air supply.
2. Detach the air coupler from the air supply
fitting.
c
CAUTION
When disconnecting the air coupler from the air supply
fitting, be aware that a loud air exhaust sound occurs.
Also be aware of oil, water, and impurities that may spray
out.
2
Check the inside of the filer cup visually
for oil or water deposits in the filter
cup.
If the window is dirty, follow the procedure of
Step 3 to Step 6 to clean the filter cup.
TIP
The drain cock at the bottom of the filter cup is an
auto-drain type. It automatically drains the oil or water
when deposited in the cup. We recommend connecting a
hose to this drain cock.
3
Detach the filter cup.
Oil mist filter:
Push down the cup's button, and turn the cup
45-degree counterclockwise. Then pull
downward to detach it.
Air filter:
1. Push down the cup's button, and turn the
cup 45-degree clockwise. Then pull
downward to detach it.
2. Pull out the internal filter upward.
Step 3
Detaching the air coupler
Internal filter
Detaching the filter cup
Filter cup
Air filter
Oil mist filter
Button
O-ring for cup
O-ring for cup
Oil mist filter element
53383-KMX-10
5. 1-year maintenance
3-55
Chapter 3 Periodic maintenance items
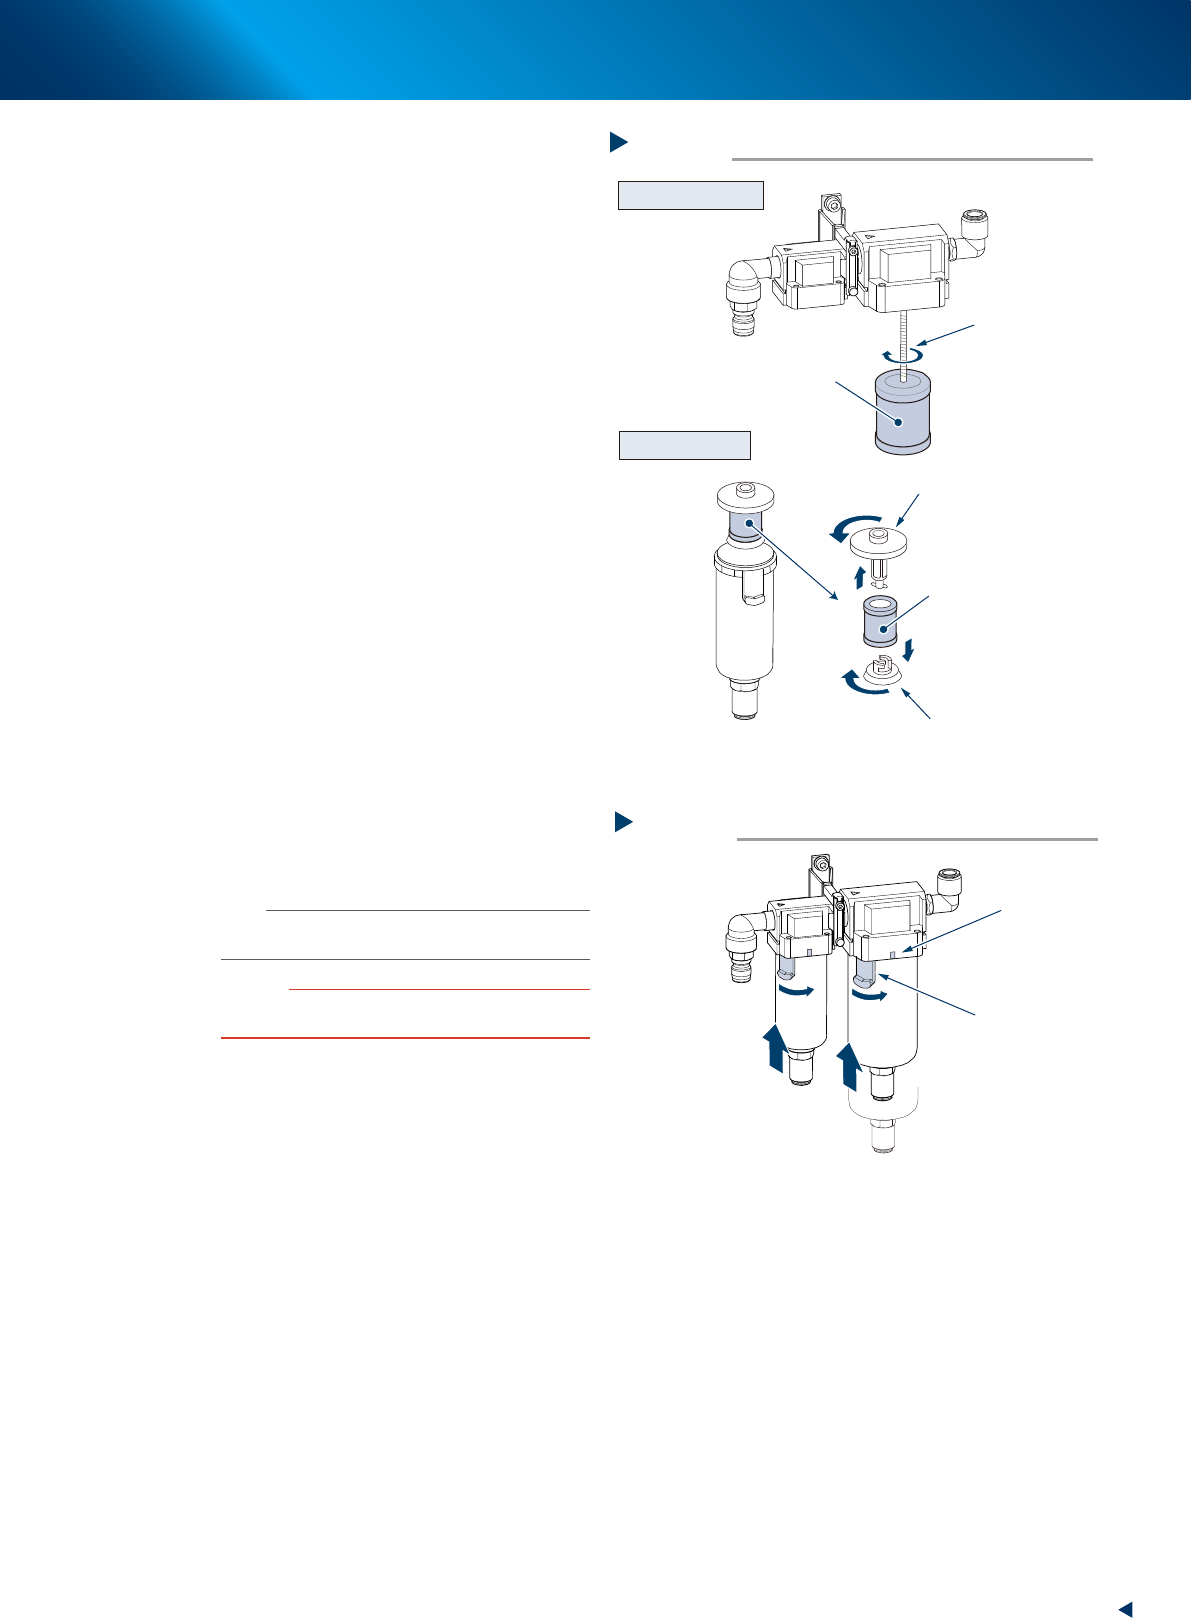
4
Detach the filter element.
Oil mist filter element:
The mist filter element is attached to the screw
protruded from the filter housing. Detach the
mist filter element by rotating.
Air filter element:
The filter element is set in the cup between the
upper and lower adapters. Pull out upward with
adapters and detach the filter element by
rotating the adapters.
5
Check the filter element for soiling and
clogging. If soiled, replace it with new
one prescribed in the Consumable Parts
List.
6
Clean the inside of filter cup.
1. Lightly clean the filter cup with water.
2. Pour water-diluted neutral detergent into the
filter cup and clean the inside while shaking
it.
3. Air blow the filter cup and wipe away any
moisture with clean cloth or paper.
7
Attach the filter element and cup.
1. Attach the filter element by the reverse
procedure of detaching.
2. Set the cup's button to the pulling out
position (45-degree to left) and push the cup
upward.
3. Turn the filter cup to right until it aligns with
the marking of the filter housing.
n
NOTE
The filter cup clicks when it is rotated to the marked
position.
c
CAUTION
Make sure not to drop off the O-ring for cup upon
attaching.
8
Reconnect the air coupler.
1. Reconnect the air coupler and check that no
air is leaking.
2. Turn the "Air supply/exhaust" switch to right
(SUP) to resume the air supply.
Mist filter element
Detaching filter element
Step 4
Filter element
Attached by screw
Adopter
Adopter
Oil mist filter
Air filter
53384-KMX-00
Attaching the cup
Step 7
Marking
Button
53385-KMX-00