YRM20_Mainte_E.pdf - 第153页
2. Nozzle leaf springs 5-4 Chapter 5 How to replace consumable parts █ Upon using the leaf spring installation tool (option) The optional purchase part "leaf spring installation tool (KGS-M8810-00X)" is provide…
2. Nozzle leaf springs
5-3
Chapter 5 How to replace consumable parts
2. Nozzle leaf springs
When a problem is found after checking the nozzle leaf springs as described in "1.1.2 Check
the condition of nozzle leaf spring" in Chapter 3, the nozzle leaf springs must be replaced. Here
describes the replacement procedure of nozzle leaf spring (hereinafter referred to as leaf spring).
c
CAUTION
As a rule, be sure to replace a pair of components even when only the nozzle leaf spring on one side deteriorates.
2.1 HM head
:
Replacing nozzle leaf springs
The following describes how to replace the nozzle leaf spring (hereafter "leaf spring"). If the leaf spring
attachment tool is provided, see "Upon using the leaf spring installation tool (option)" described later on.
e
1
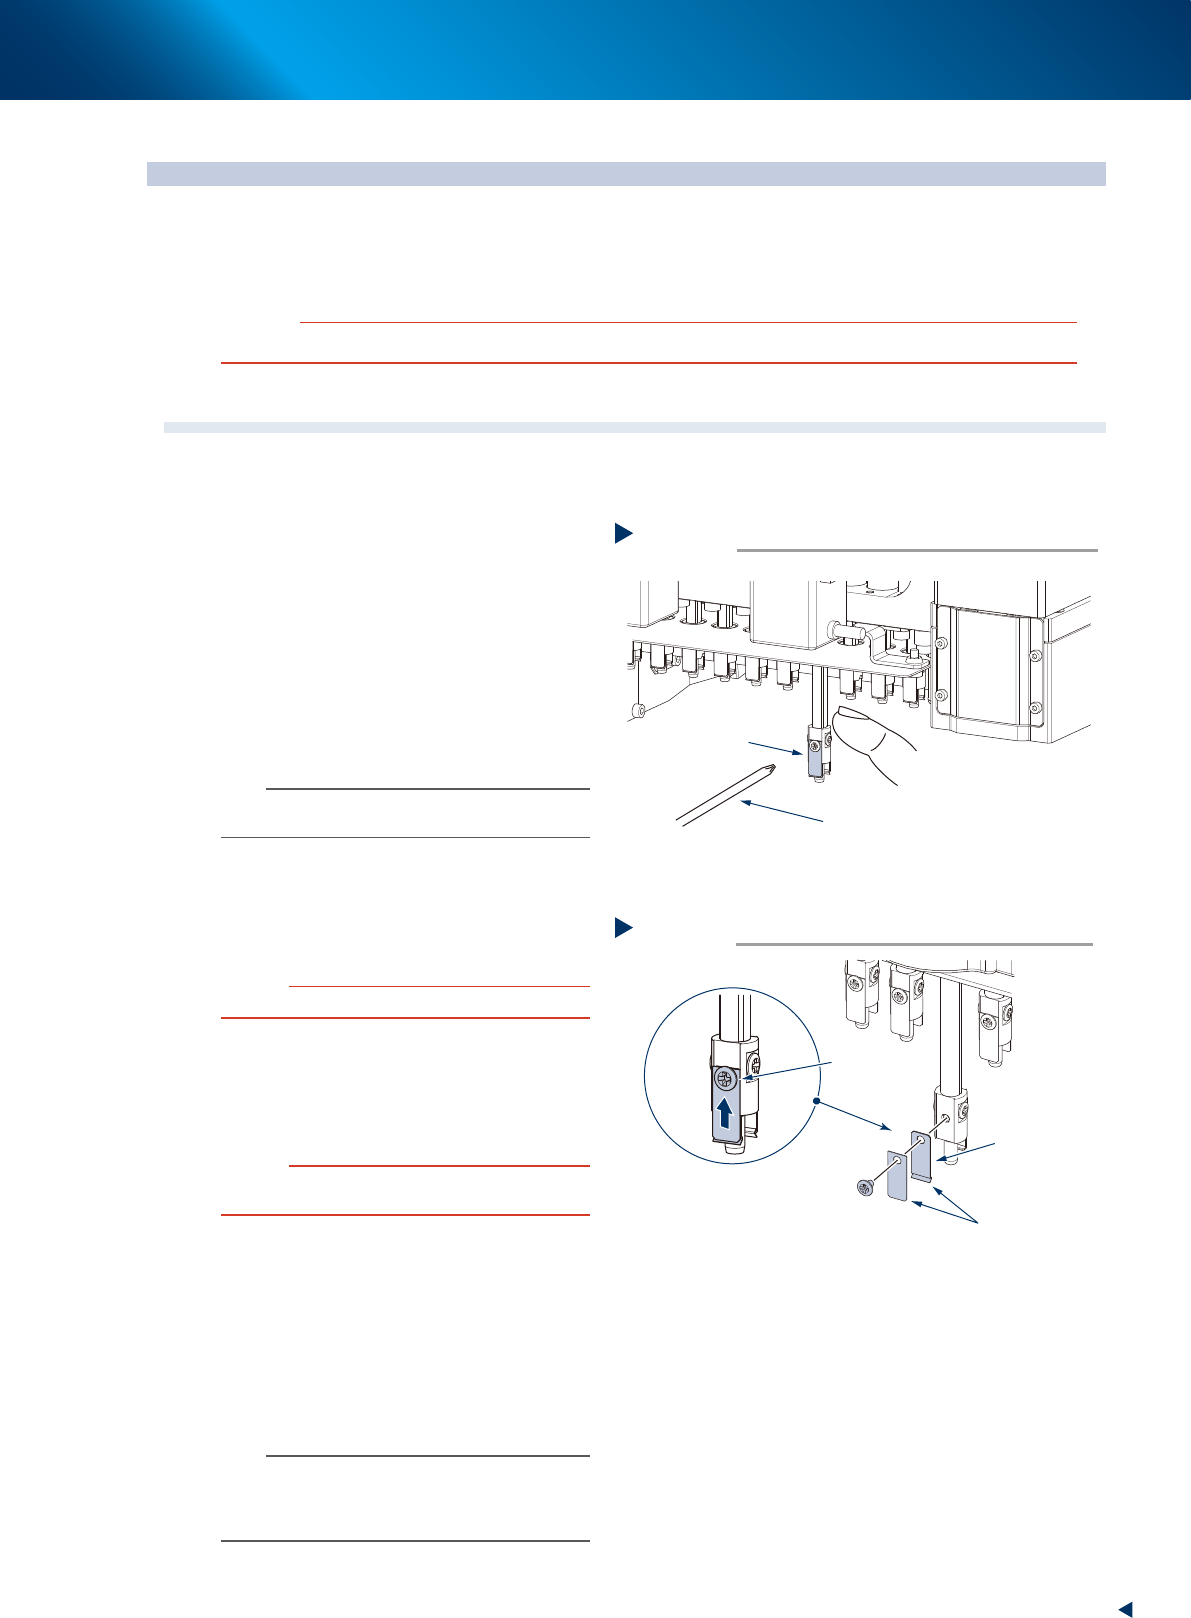
Detach the nozzle.
1. Press the emergency stop button and detach
the feeder exchange carriage.
2. Open the machine safety cover and move
the head unit to the position where facilitates
your work.
3. Place a square cloth beneath the head unit.
4. If a nozzle is attached to the head which
has a leaf spring to be replaced, detach the
nozzle manually.
n
NOTE
When the machine is equipped with a nozzle station,
return all nozzles to the nozzle station.
2
Detach the leaf springs to be replaced,
by removing mounting screw with a
precision Phillips screwdriver while
holding shaft.
c
CAUTION
Only remove the screw of leaf springs.
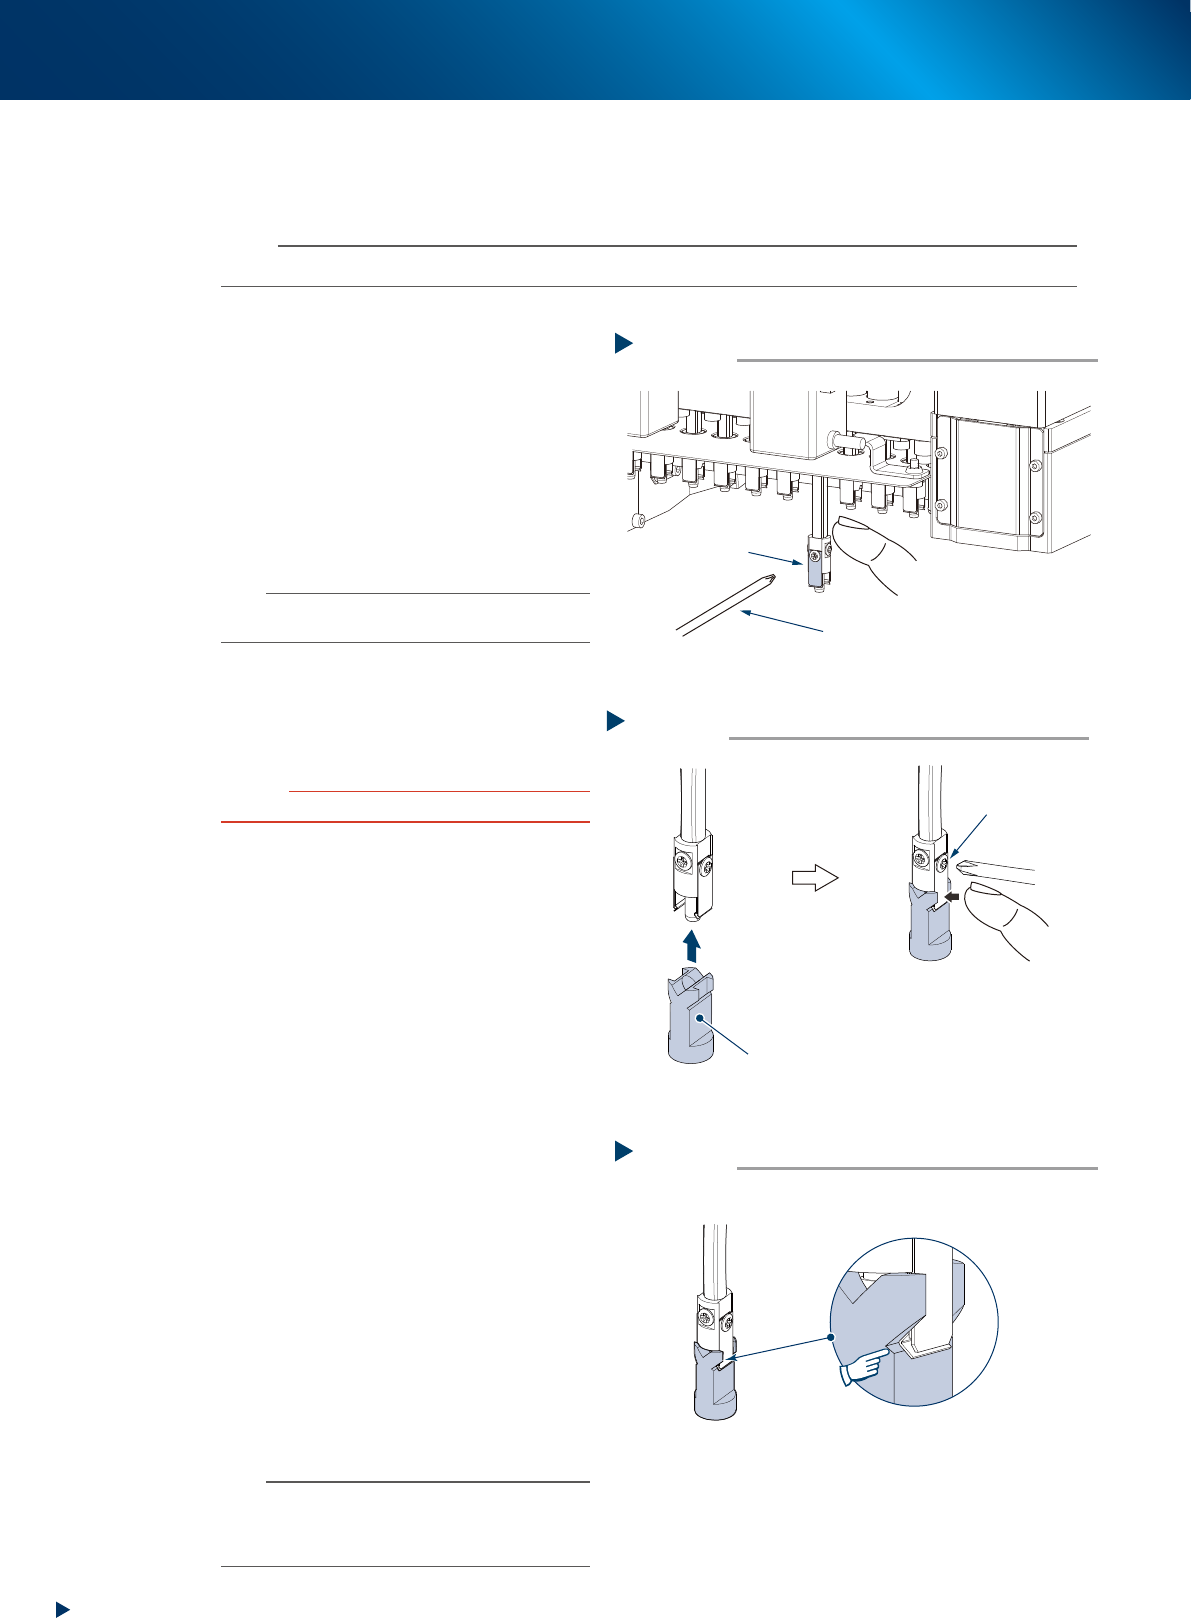
3
Attach the new leaf spring by keeping it
pushed upward and tightening mounting
screw with a precision Phillips
screwdriver to assemble leaf spring.
c
CAUTION
Always attach the leaf springs so that they become
parallel.
4
Attach the nozzle.
5
Check that the nozzle is held securely.
1. Insert the nozzle and check that there is no
gap between leaf spring and nozzle.
2. Manually detach/attach nozzle several
times to check that there is no looseness.
3. Retrieve a square cloth.
n
NOTE
Be sure to return the nozzle you have detached to its
mating head. When the nozzle has been detached from
the nozzle station (option), return it correctly to the storage
position where you have detached the nozzle.
Detaching the leaf spring
Step 2
Precision Phillips screwdriver
Leaf spring to
be replaced
53502-KMX-00
Attaching the leaf springs
Step 3
New leaf springs
Confirm
the direction
of leaf springs
Mounting screw
Tighten the mounting screw
while keeping the leaf springs
pushed upward
53503-KMX-00
2. Nozzle leaf springs
5-4
Chapter 5 How to replace consumable parts
█
Upon using the leaf spring installation tool (option)
The optional purchase part "leaf spring installation tool (KGS-M8810-00X)" is provided for installing the
HM head nozzle leaf springs. It makes possible to install the leaf springs uniformly.
n
NOTE
When you have this tool, install the leaf springs with this tool.
e
1
Detach the nozzle.
1. Press the emergency stop button and detach
the feeder exchange carriage.
2. Open machine safety cover and move the
head unit to the position where facilitates
your work.
3. Place a square cloth beneath the head unit.
4. If a nozzle is attached to the head which
has a leaf spring to be replaced, detach the
nozzle manually.
n
NOTE
When the machine is equipped with a nozzle station,
return all nozzles to the nozzle station.
2
Detach the leaf springs to be replaced,
by removing mounting screw with a
precision Phillips screwdriver while
holding shaft.
c
CAUTION
Only remove the screw of leaf springs.
3
Install the leaf springs temporarily by
loosening the leaf spring mounting bolt
1/4 turn from its fully tightened
position.
4
Insert the tool into the nozzle shaft so
that the groove on the leaf spring
installation tool matches to the convex
part of the leaf spring.
Insert the tool all the way inside.
5
Mount the leaf springs while holding
the convex part of the leaf springs and
the groove on the tool by finger.
Tighten the leaf spring mounting screw
with a precision Phillips screwdriver.
6
Detach the tool after checking the tool
is tightly in contact with the convex part
of the leaf spring.
7
Check the leaf spring installation status.
1. Manually detach/attach nozzle several
times to check that there is no looseness.
2. Retrieve a square cloth.
n
NOTE
Be sure to return the nozzle you have detached to its
mating head. When the nozzle has been detached from
the nozzle station (option), return it correctly to the storage
position where you have detached the nozzle.
Detaching the leaf spring
Step 2
Precision Phillips screwdriver
Leaf spring to
be replaced
53502-KMX-00
Insert the tool all the way
to the upper position
Leaf spring installation tool
Tighten the mounting screw
while holding the convex part
of the leaf spring and
the groove on the tool.
Mounting screw
Using the leaf spring installation tool
Step 4,5
53505-KMX-00
Checking the leaf spring installation
The convex part of the leaf spring
must be tightly in contact with the groove
on the tool.
Position to be
checked
Step 6
53506-KMK-00
3. Head unit
5-5
Chapter 5 How to replace consumable parts
3. Head unit
When a motion trouble is found at the operation valve, blow valve or blow valve for cleaning, replace
them by following procedures.
3.1 HM head: Replacing the valves
1
Prepare for work.
1. Press the emergency stop button and detach
the feeder exchange carriage.
2. Close the applications and power OFF the
machine.
3. Rotate the air supply/exhaust switch on the
lower left of the machine clockwise (EXH) to
turn OFF the main air.
4. Open the machine safety cover and move
the head unit to the position where facilitates
your work.
5. Place a square cloth beneath head unit.
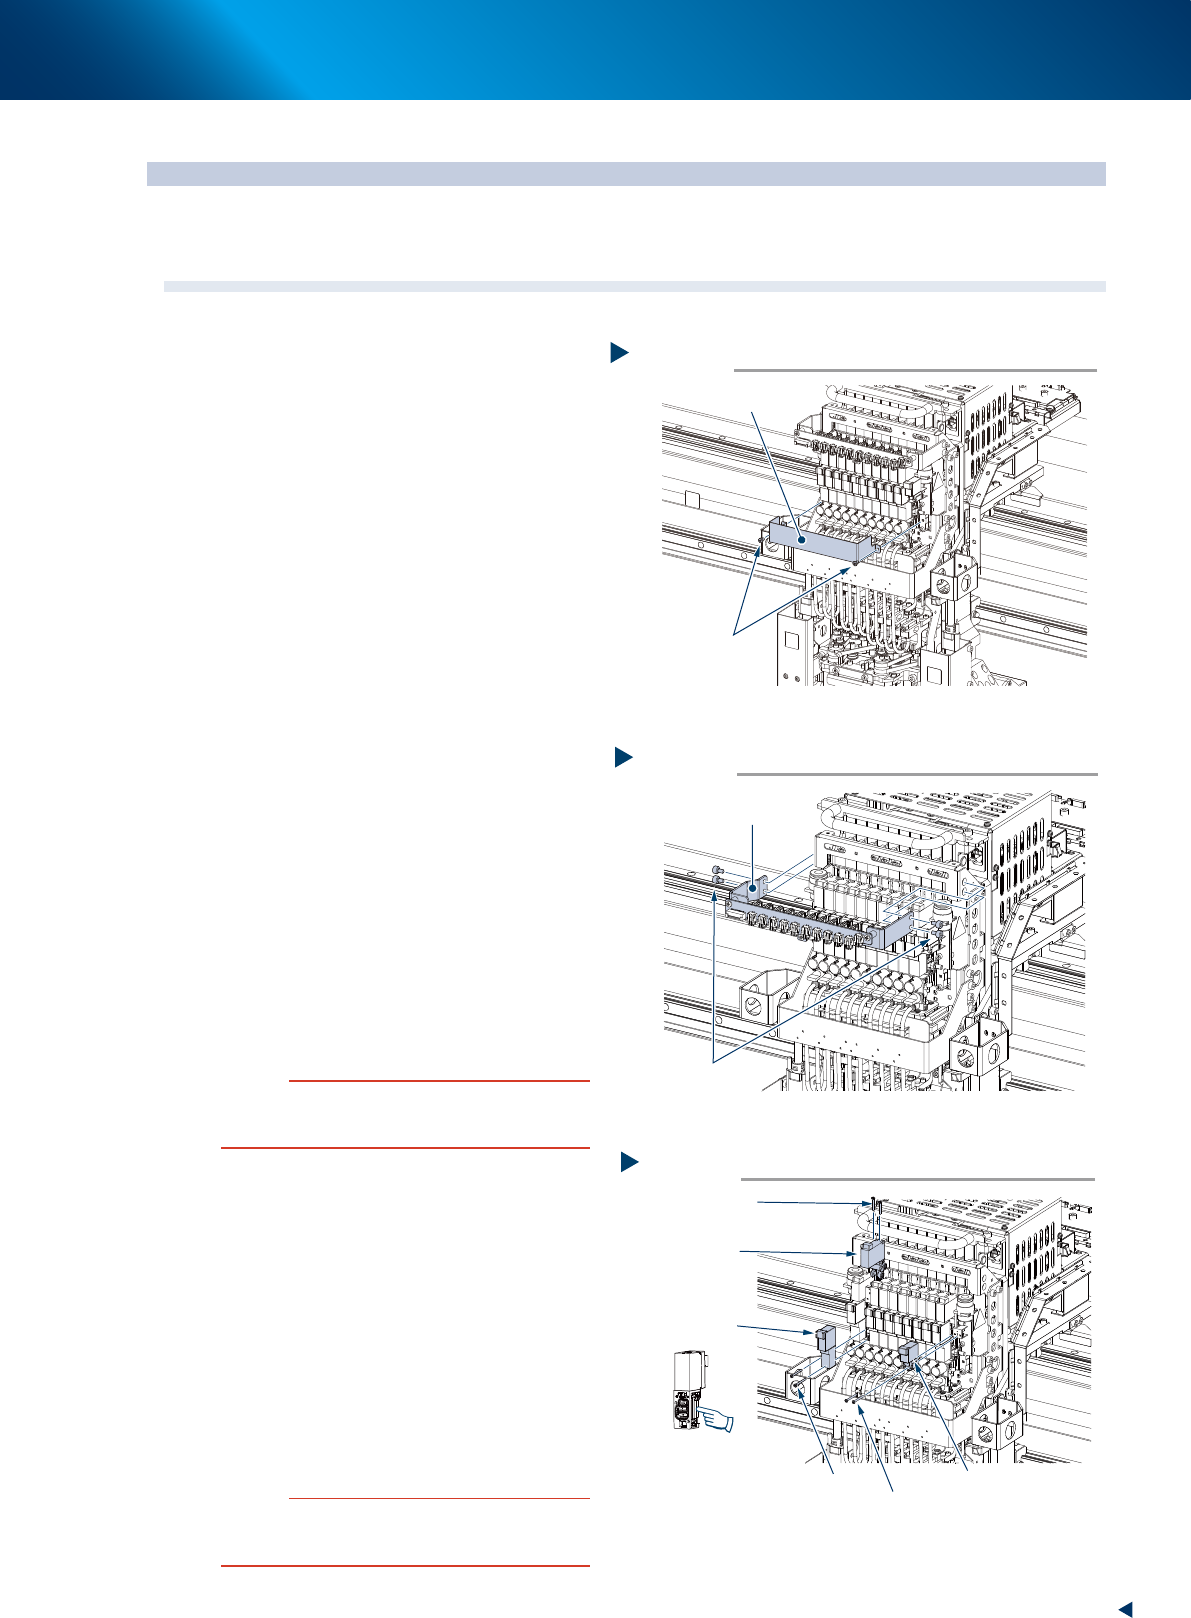
2
Detach the baffle plate. (Only when
replacing the operation valve)
Remove the baffle plate mounting screws (2pcs.)
with a Phillips screwdriver.
3
Detach the head plate. (Only when
replacing the blow valve)
Remove the head plate mounting bolts (4pcs.)
with a hex wrench (3). The cables are
connected to the head plate. However, these
cables do not need to be disconnected.
4
Disconnect the connector.
Disconnect the connector of the valve you want
to replace.
5
Replace the valve.
Remove 2 mounting screws of the valve to be
replaced with a precision Phillips screwdriver,
and then replace the valve.
c
CAUTION
The packing is attached to the back of the valve. Replace
the valve with a new one while carefully checking the
packing for dropping or catching.
6
Return the parts to their original
positions.
1. Return the connector, head plate, and baffle
plate to their original positions.
2. Remove the square cloth and close the
machine safety cover.
7
Check the valve operation.
1. Turn on the supply air and power on the
machine and set the feeder exchange
carriage.
2. Then check the operation of each valve on
the [Unit] - [Head] screen or [I/O] screen.
c
CAUTION
When the operation check for the blow valve for cleaning
is performed at the [I/O] screen, perform it in condition
that the nozzles are detached from all the heads.
Removing the head plate from HM head
Step3
Head plate
4 mounting bolts
53512-KMX-00
Removing the current plate from HM head
Step3
Current plate
Mounting screws
53511-KMX-00
Replacing the HM head valve
Step5
Blow valve
Mounting screw
Blow valve for cleaning
Mounting screw
Operation valve
Mounting bolt
[Caution for dropping off]
A packing is attached to
the back of the valve.
53513-KMX-00