YRM20_Mainte_E.pdf - 第120页
5. 1-year maintenance 3-53 Chapter 3 Periodic maintenance items 5 T urn the he ad unit minus 9 0-degree. 1. Close the machine safety cover and attach the feeder exchange carriage. Then release the emergency stop. 2. Chan…
5. 1-year maintenance
3-52
Chapter 3 Periodic maintenance items
5.4 HM head: cleaning the shaft tip
When the dust or dirt is found at "3.1.4 Inspecting shaft tips", clean the shaft tips as the following
procedure.
1
Detach all the nozzles.
When a nozzle station is equipped:
1. Open the [Unit] - [Head] screen.
2. Select any head unit from "Table Select".
3. Press the [Nozzle Change] button.
4. Select "ALL" for "Head Number" and select
"Store Nozzle" for "Nozzle Type" on the
"Nozzle Change" screen.
5. Press the [OK] button to return all nozzles to
the nozzle station.
n
NOTE
When the nozzle station is not equipped, open the
machine safety cover and detach the nozzles by hand.
2
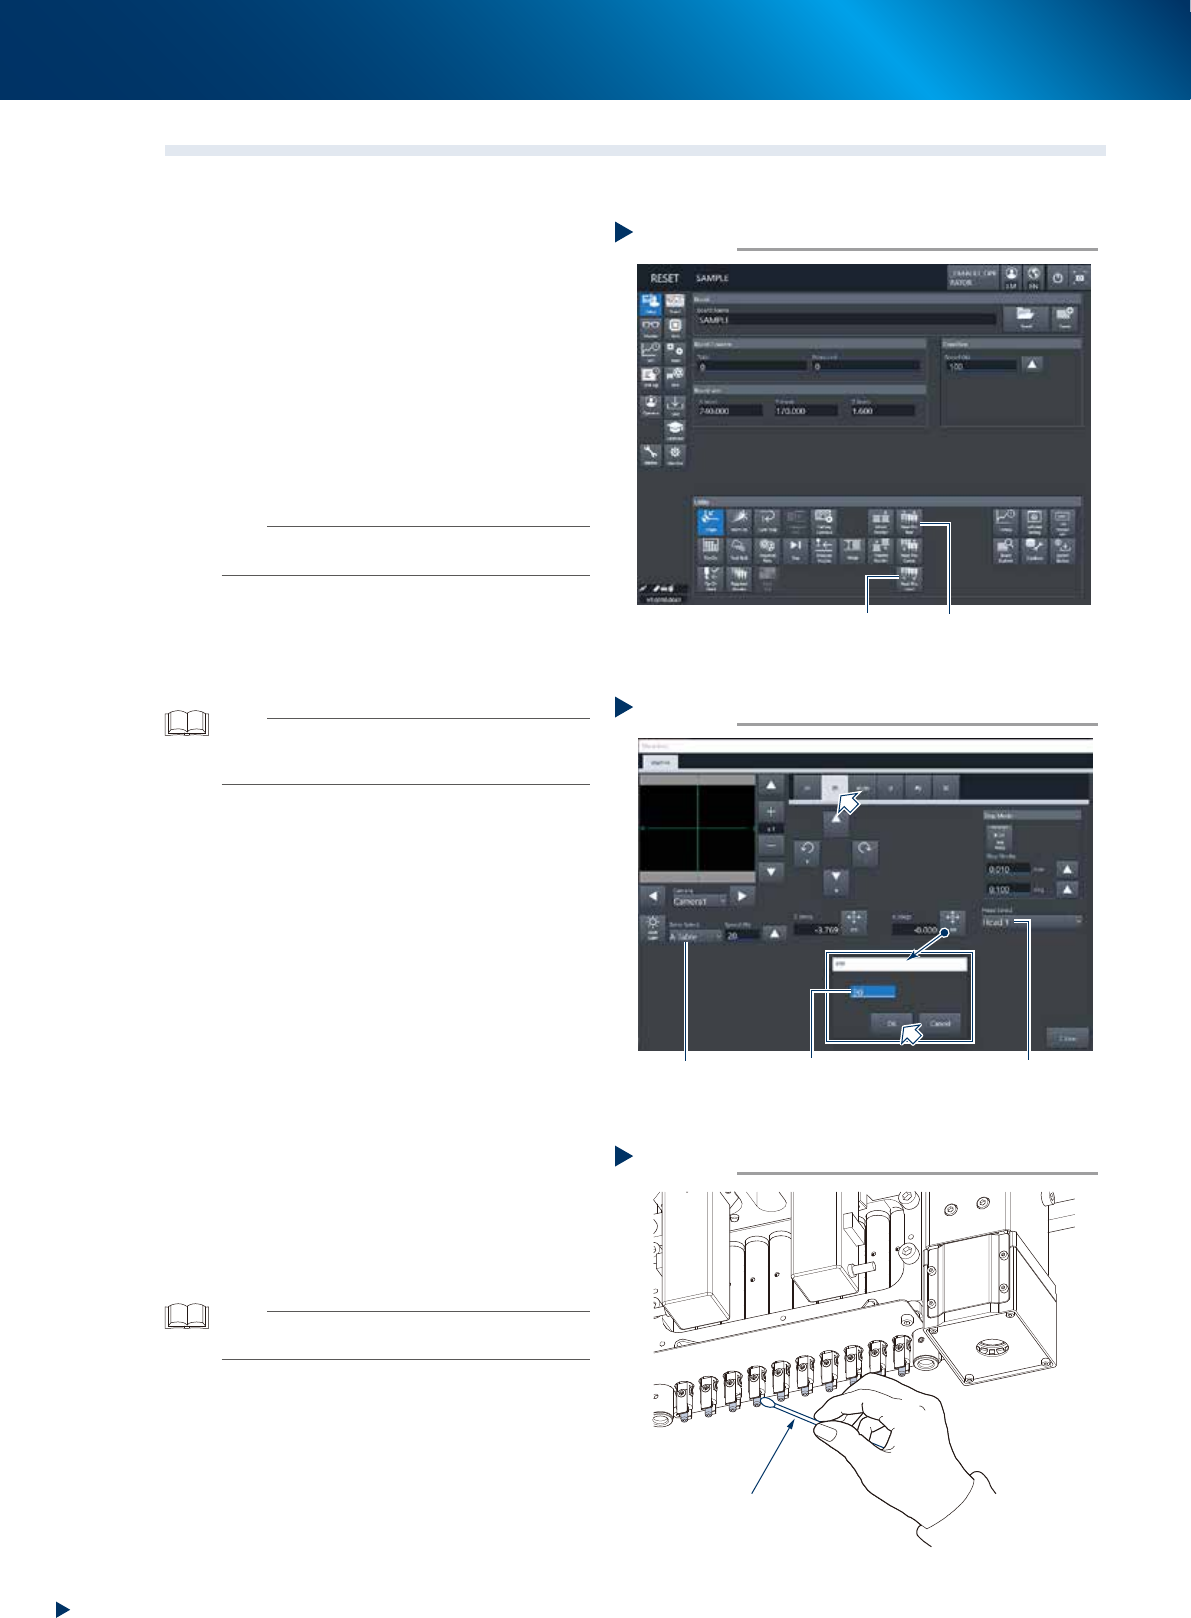
Move the head unit to working position.
Press the [Head Pos. Front] or [Head Pos. Rear]
button on the "Utility" field to move the head
unit to convenient position to work.
TIP
As to the 2-beam type machine, moving the front head unit
to rear and the rear head unit to front facilitate your access
to the head unit.
3
Turn the head unit 90-degree.
1. Press the [Move axis] button on the [Unit]
- [Conveyor] screen and select "ZR" tab.
2. Select any head unit from the "Table Select"
field.
3. Select "Head 1" from the pull-down menu of
the "Head Select" field.
4. Press the [PTP] button of "R (deg)" and input
90-degree, then press the [OK] button. The
head direction from no.1 to no.5 change.
Also, the direction of head unit no.6 to
no.10 can be changed by selecting the
head 6 and inputing 90-degree.
e
5. Press the emergency stop button and detach
the feeder exchange carriage. Then open
the machine safety cover.
4
Clean the shaft tip using a cotton swab
applied a few drops of ethanol. Twist
the swab tip lightly to make it slim upon
cleaning the side of shaft.
TIP
When the cleaning has some trouble, push down the
Z-axis joint block by hand to clean well.
Moving the head unit
Step 2
[Head Pos. Front] button [Head Pos. Rear] button
54317-KMX-00
Turning the head unit
Step 3
Input 90 degrees Select headSelect table
54318-KMX-00
Cleaning the shaft tip
Step 4
Cotton swab
53399-KMX-00
5. 1-year maintenance
3-53
Chapter 3 Periodic maintenance items
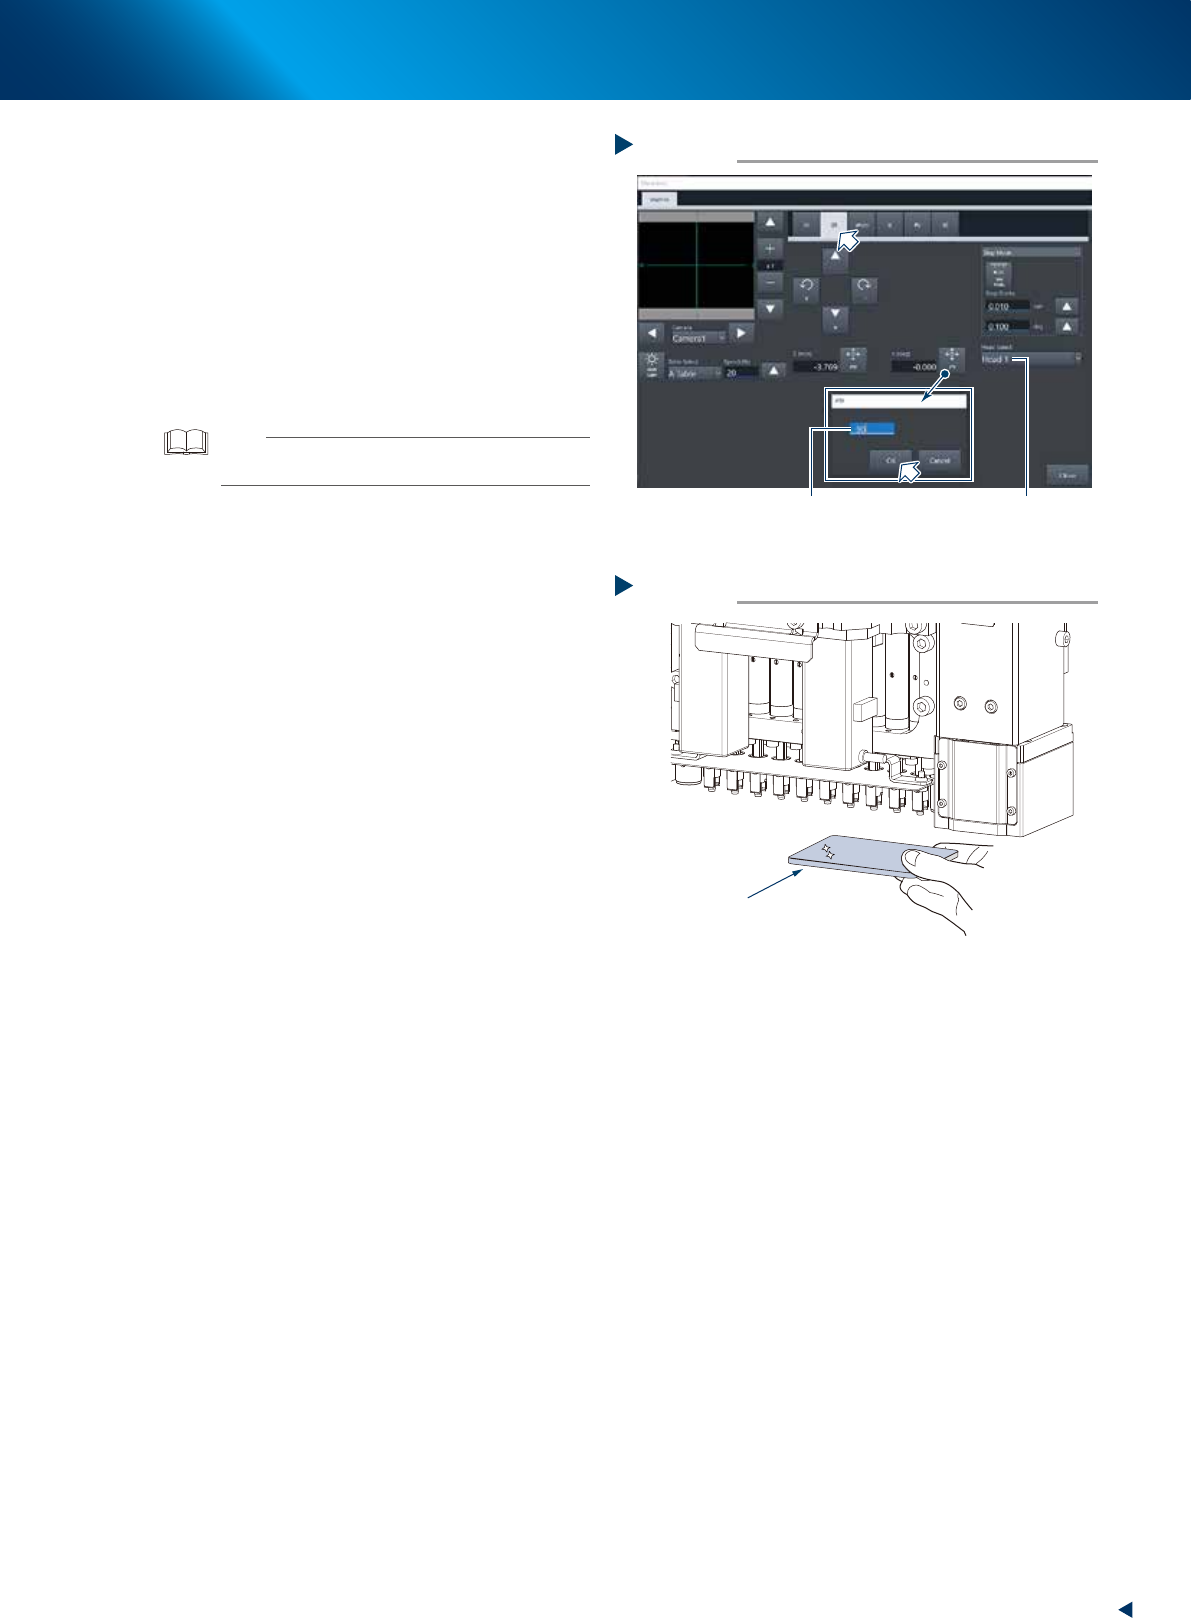
5
Turn the head unit minus 90-degree.
1. Close the machine safety cover and attach
the feeder exchange carriage. Then release
the emergency stop.
2. Change the head unit direction to minus
90-degree by the same procedure of Step 3.
e
3. Press the emergency button and detach the
feeder exchange carriage. Then open the
machine safety cover.
6
Clean other shaft tip (at reverse side) as
the same procedure of Step 4.
TIP
When the cleaning has some trouble, push down the
Z-axis joint block by hand to clean well.
7
Check that the shaft tips are completely
cleaned using a hand mirror or similar.
8
When the nozzles are detached by hand,
return each nozzle to the head which it
was detached
Turning the head unit
Step 5
Input -90 degree Select head
54319-KMX-00
Checking the shaft tips
Step 7
Check all the head
Hand mirror
533A0-KMX-00
5. 1-year maintenance
3-54
Chapter 3 Periodic maintenance items
5.5 Base section
5.5.1 Replacing the air and mist filter element and cleaning the cup
An air filter and an oil mist filter are installed in YRM20 to prevent oil, water, and impurities in the air
compressor from entering the machine.
This section describes the procedure for inspecting and cleaning these filters and also for replacing the filter
media (filter elements). Detach the air coupler from the air supply fitting to ensure worker safety.
1
Detach the air coupler of air supply.
1. Rotate the "Air supply/exhaust" switch to
left (EXH) to shut down the air supply.
2. Detach the air coupler from the air supply
fitting.
c
CAUTION
When disconnecting the air coupler from the air supply
fitting, be aware that a loud air exhaust sound occurs.
Also be aware of oil, water, and impurities that may spray
out.
2
Check the inside of the filer cup visually
for oil or water deposits in the filter
cup.
If the window is dirty, follow the procedure of
Step 3 to Step 6 to clean the filter cup.
TIP
The drain cock at the bottom of the filter cup is an
auto-drain type. It automatically drains the oil or water
when deposited in the cup. We recommend connecting a
hose to this drain cock.
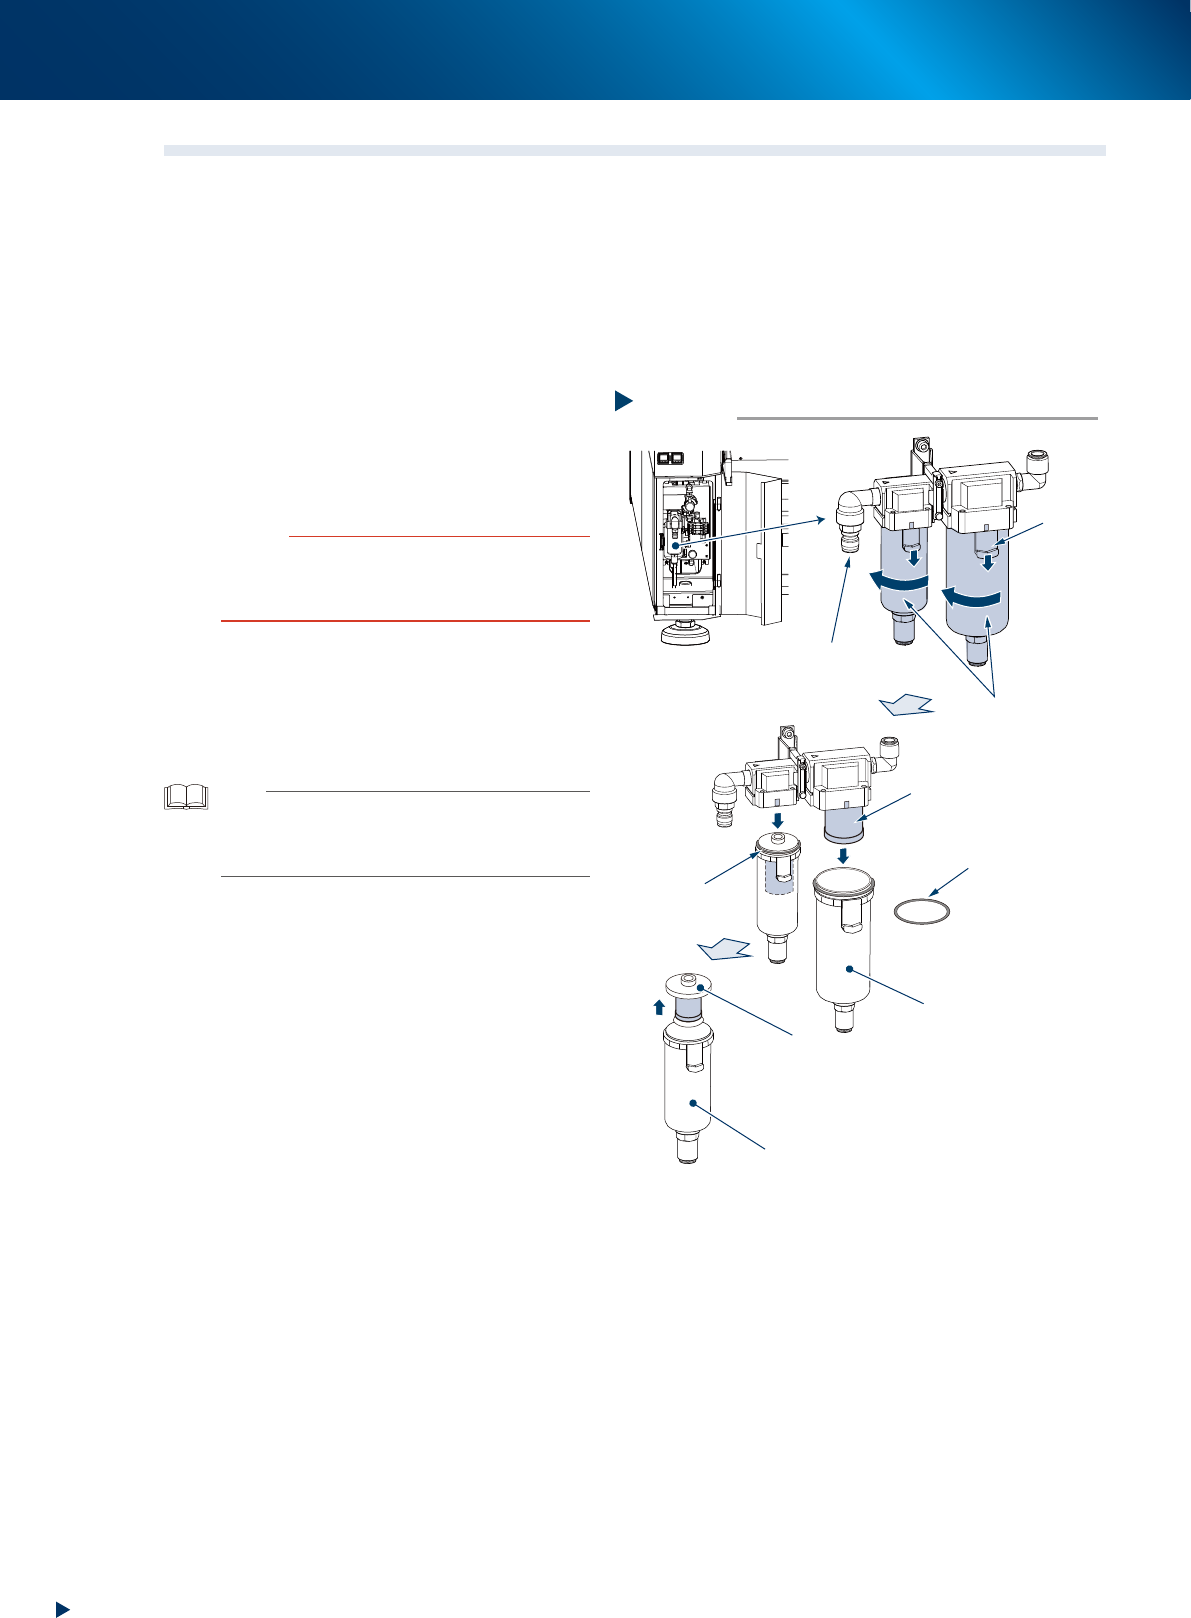
3
Detach the filter cup.
Oil mist filter:
Push down the cup's button, and turn the cup
45-degree counterclockwise. Then pull
downward to detach it.
Air filter:
1. Push down the cup's button, and turn the
cup 45-degree clockwise. Then pull
downward to detach it.
2. Pull out the internal filter upward.
Step 3
Detaching the air coupler
Internal filter
Detaching the filter cup
Filter cup
Air filter
Oil mist filter
Button
O-ring for cup
O-ring for cup
Oil mist filter element
53383-KMX-10