LA 404-2 Pattern Controller Manual.pdf - 第39页
LA 404-2 Pattern Control System 33 P/N 7 1 1 9995A 2006 Nordson Corporation LA 4 04- 2 Is sued 12/06 Pressure 1 Settings Speed 1 0 P1 0 % Speed 2 100 P2 80 % Min 0 % Max 100 % O668 1. T o set Speed 1 a. Press t he or but…
LA 404-2 Pattern Control System
32
P/N 7119995A
2006 Nordson Corporation
LA 404-2
Issued 12/06
Pressure 1 and 2 Settings
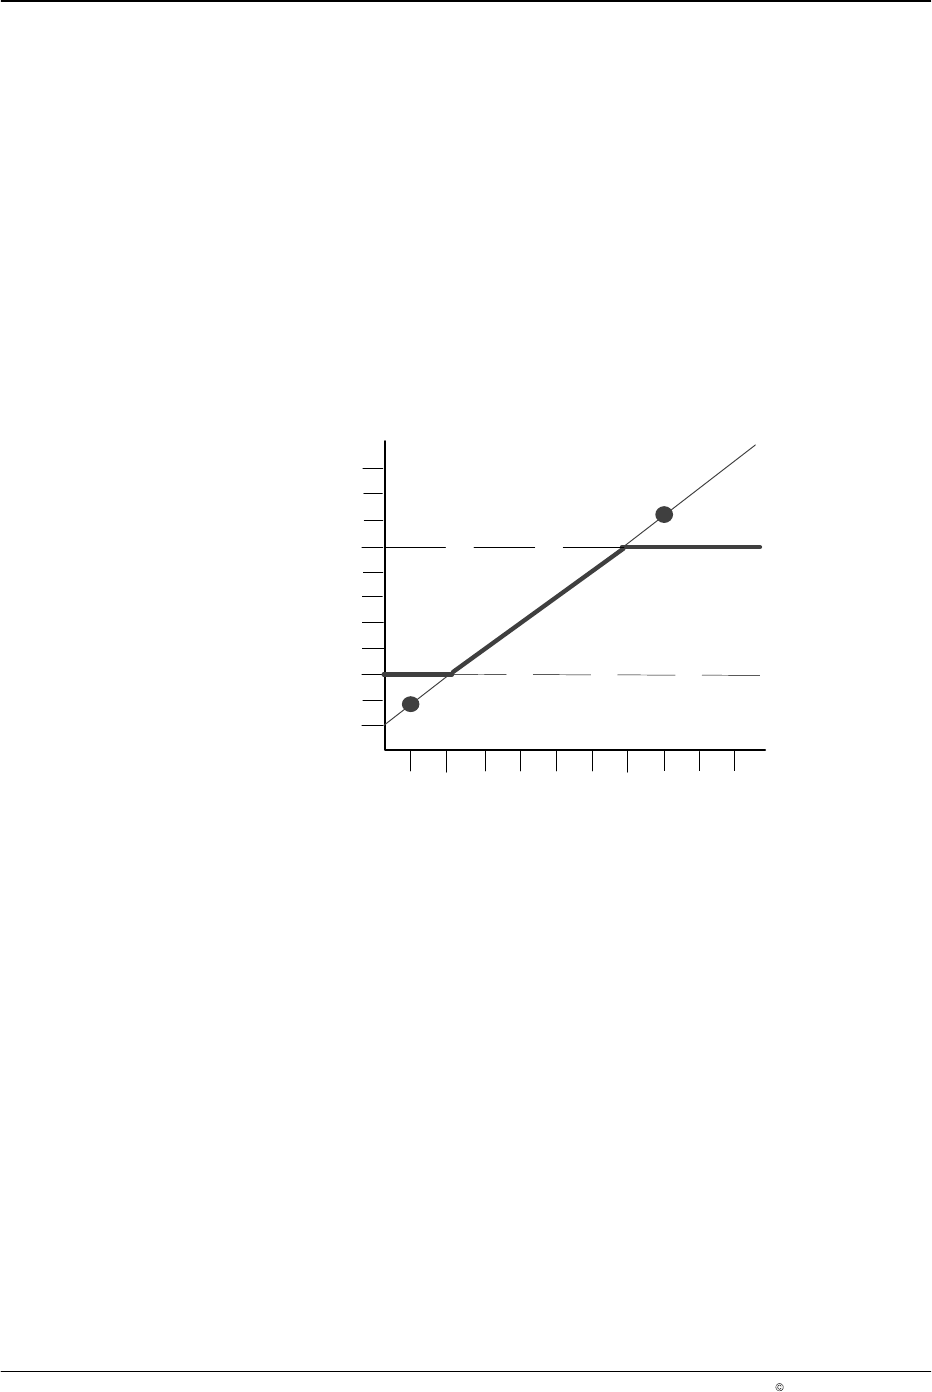
The pattern controller accurately regulates the system pressure to maintain
proper adhesive volume during line speed changes. This menu is used to
set the two-point linear pressure profile for each runup.
The linear pressure curve is defined by setting Speed 1 (S1) at Pressure 1
(P1), and Speed 2 (S2) at Pressure 2 (P2), see Figure 5.
Maximum and Minimum Line Pressure
The minimum line pressure is reached at the minimum cutoff limit, and the
maximum pressure is reached at the maximum cutoff limit. Pressure cannot
be set below the assigned minimum cutoff limit or above the assigned
maximum cutoff limit.
90 %
10 %
30 %
50 %
70 %
0
50
500
450
100 %
150 250
400
350
100 200
300
Maximum
S1, P1
S2, P2
Pressure Profile
Minimum
Minimum and maximum line pressure settings:
Minimum = 30 %
Maximum = 80 %
Speed 1 = 50 m/min, Pressure 1 = 20 %
Speed 2 = 400 m/min, Pressure 2 = 95 %
6640013A
Pressure
Speed (m/min)
Fig. 5 Pressure Curve Settings
LA 404-2 Pattern Control System
33
P/N 7119995A
2006 Nordson Corporation
LA 404-2
Issued 12/06
Pressure 1 Settings
Speed 1 0 P1 0 %
Speed 2 100 P2 80 %
Min 0 % Max 100 %
O668
1. To set Speed 1
a. Press the or button for the cursor to appear beside the numeric
value.
b. Press the or button to set the desired speed value from 0 - 599
m/min.
2. To set P1
a. Press the or button for the cursor to appear beside P1’s
numeric percentage value.
b. Press the button to set P1 from 0 - 100 %.
3. To set Speed2
a. Press the or button for the cursor to appear beside the numeric
value.
b. Press the or button to set the desired speed value from 1 - 599
m/min.
4. To set P2
a. Press the or button for the cursor to appear beside P2’s
numeric percentage value.
b. Press the button to set P2 from 0 - 100 %.
5. To set minimum and maximum pressure:
a. Press the or button for the cursor to appear beside either Min
or Max.
b. When the cursor appears beside Min, press the or button to
set the desired percentage value from 0 - 99%.
c. When the cursor appears beside Max, press the or button to
set the desired percentage value from 1 - 99%.
6. Press the top SETUP button to open the Pressure 2 settings menu and
then repeat steps 1 - 5.
LA 404-2 Pattern Control System
34
P/N 7119995A
2006 Nordson Corporation
LA 404-2
Issued 12/06
Purge Pressure
This menu is used to configure the run-up pressures when purge is
activated. In addition, the user can configure the Flush mode of the Purge
button on the front panel. When set to Purge, the gun outputs remain open
as long as the button is pressed. When set to Flush, pressing the button
activates the gun channel output, and pressing the button again deactivates
the gun channel output. This function is used for flushing systems using
cold liquid adhesive.
Purge Pressure
Run−up 1 10 %
Run−up 2 10 %
Purge Mode Purge
O669
1. To set Run−up 1:
a. Press the or button for the cursor to appear beside the
percentage value.
b. Press the or button to set the desired value from 0 - 100%.
2. To set Run−up 2:
a. Press the or button for the cursor to appear beside the
percentage value.
b. Press the or button to set the desired value from 0 - 100%.
3. To set Purge mode
a. Press the or button for the cursor to appear beside Purge.
b. Press the or button to set Flush or Purge.
NOTE: Flush mode stops automatically after 5 minutes if the user does not
press the PURGE button again.
Remote Purge
Each of the 4 channels is equipped with a contact at the remote purge input
for triggering remote purging. If the switch of the corresponding channel is
closed at the input, purging is activated for the selected channel.