00198375-02_UM_OnBoardPCB-Inspection-R18-1_DE_EN.pdf - 第58页
4 Teaching Inspection Areas at the Station 4.3 Teaching with Before Placement Inspection (BPI) 58 User Manual / Bedienungsanleitung Onboard PCB Inspection 06/2018 4.3.3 Defining Exclusion Areas Areas such as holes can le…
4 Teaching Inspection Areas at the Station
4.3 Teaching with Before Placement Inspection (BPI)
User Manual / Bedienungsanleitung Onboard PCB Inspection 06/2018 57
●
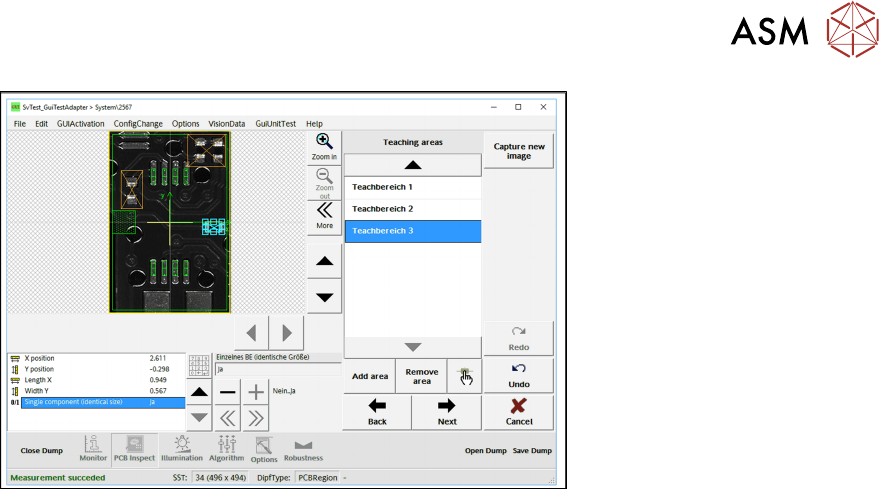
Areas with orange border = teaching area
●
Area with turquoise border = currently selected teaching area
Tips and tricks
●
The teaching area (light blue) should be slightly bigger than the area with the components ac-
tually is (increase tolerance area)
●
You may need to move the teaching area so that all the components to be inspected can be
reached.
●
If there are multiple components with significantly differing heights in one and the same teach-
ing area, divide the teaching areas up.
– In example 3 teaching areas – selected at Teaching area 1 to n.
► Click on the Next button.
ð The following view Define Exclusion Areas is opened.
Selecting a new, separate teaching area (optional steps)
It may happen that components that are placed too close to each other and obscured by another
component cannot not be teached (and as a result will not be inspected). In this case, you can se-
lect a new teaching area for each component that was not teached which has exactly the same
size as the component.
In this case, set the parameter Single component (identical size) to Yes. A special mode will be
activated with which, however, such components can be found.
Recommended procedure:
●
First teaching attempt with a common teaching area
●
Check: Select learnt solder deposits / components. Each component must have a blue border.
– No blue border => a separate exact teaching area for each of these components
– Message "Great height differences..." => partitioning the teaching areas
► Click on the Next button.
ð The following view Define Exclusion Areas is opened.
4 Teaching Inspection Areas at the Station
4.3 Teaching with Before Placement Inspection (BPI)
58 User Manual / Bedienungsanleitung Onboard PCB Inspection 06/2018
4.3.3 Defining Exclusion Areas
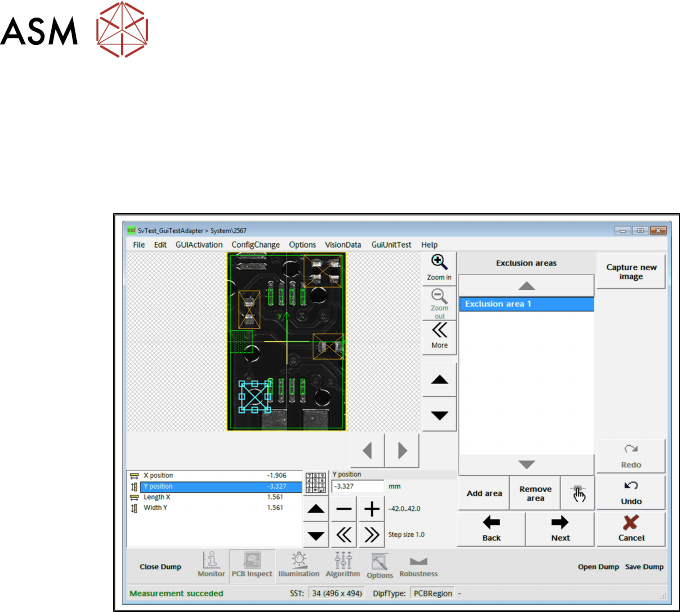
Areas such as holes can lead to problems during the inspection. No height is calculated in the ex-
clusion areas, i.e. they appear plain in the topographic image, and no inspection is performed.
Define the exclusion areas here:
► Click on Add areato create an exclusion area.
●
Areas with yellow border = areas that are to be excluded.
●
Area with a light blue border = currently selected exclusion area. This example shows a hole
in the board.
The individual exclusion areas can be selected at "Exclusion areas".
► Click on the Next button.
ð The teaching procedure will begin.
4 Teaching Inspection Areas at the Station
4.3 Teaching with Before Placement Inspection (BPI)
User Manual / Bedienungsanleitung Onboard PCB Inspection 06/2018 59
4.3.4 Applying the Successful Teaching Run
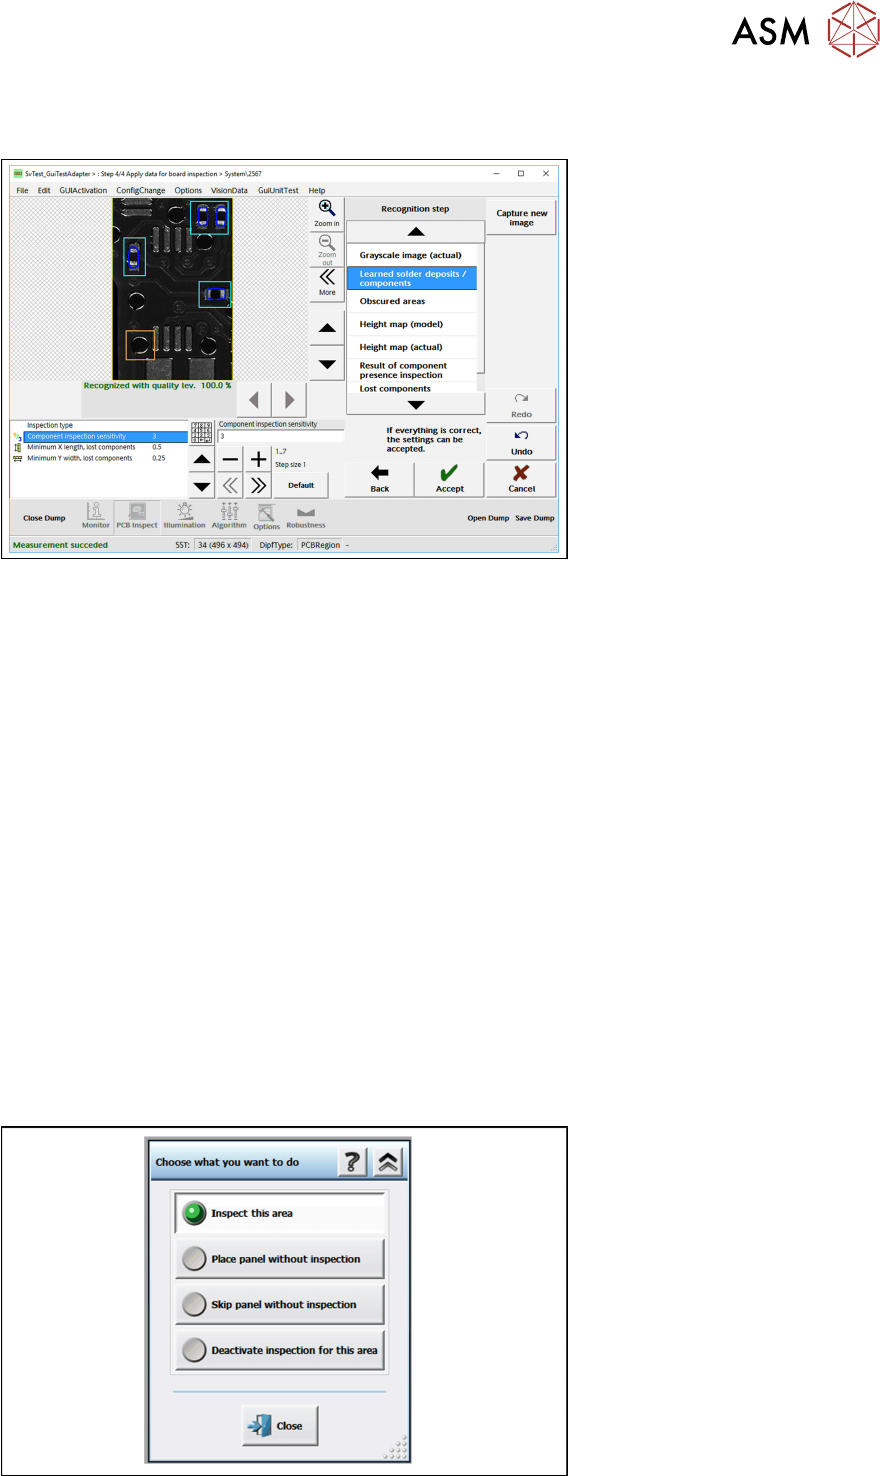
► Go to Recognition step and click on Learned solder deposits/components.
●
Components which have been taught have a blue border.
●
Teach areas have a turquoise border.
●
Exclusion areas have an orange border.
In the example you can see four detected components in the three defined teaching areas (marked
with a turquoise border). The hole in the board, found as an exclusion area, is marked with an or-
ange border.
Parameters
Various parameters can be set to improve the result.
●
Inspection type
– Shows the setting of the inspection type in SIPLACE Pro for your information.
●
Sensitivity of CO inspection
– Global value without a unit to set the sensitivity of the procedure. Especially for recognizing
lost components. Value range between 1 (max. sensitivity) and 7 (max. robust). If many
false alarms occur, increase this value.
●
Minimum X length of lost components and Minimum Y length of lost components
– Here, you can set the minimum size of components that are to be recognized as lost.
► If you are satisfied with the result, click on Accept to apply the teaching result and save it at
the station.
ð A dialog box will open in which you can select how to continue.