X-Series-Maintenance-Manual(1).pdf - 第32页
Minor Maintenance Maintenance Tasks for Base Machine Performing Maintenance Tasks 32 Maintenance Manual SIPLACE X Series Performing Maintenan ce Tasks 4.2.3 Performing Maintenance Tasks Checking and Cleaning/Replaci ng t…
Minor Maintenance
Consumables, Spare and Wear Parts, Tools Maintenance Tasks for Base Machine
Maintenance Manual SIPLACE X Series 31
Mainten ance Task s for Base Machi ne
4.2 Maintenance Tasks for Base Machine
Consumables, Spare and Wear Parts, Tools
4.2.1 Consumables, Spare and Wear Parts, Tools
▪ Lint-free cloths [03082092-xx]
▪ SIPLACE cleansing tissue [00315253-xx]
▪ Protective latex gloves [00372972-xx]
▪ Rust prevention spray WD40, 400 ml [00325833-xx]
▪ Sheet of DIN A4 paper
▪ ESD wristband [00320279-xx]
▪ Vacuum cleaner with appropriate nozzle
▪ New compressed air filter, if required:
– Filter element 5 μm [03050213-xx]
HSxx / D1 / D2 / D4 / SX series / X series from March 2008 pneumatic valve [03062274-xx]
(for [03060279-xx] pneumatic unit)
– Replacement filter for 5 μm compressed air filter for pneumatic valve [03038979-xx]
X series up to SN B089 [03004680-xx]
(for [03004151-xx] pneumatic unit)
– Filter element for 5 μm filter (new) for pneumatic valve [03039182-xx]
X series from SN B090 [03038691-xx]
(for [03038058-xx] pneumatic unit)
▪ Filter element 40 µm (head exhaust air filter for X axis) [03003717-xx]
▪ Cooling air filter Y-Achse (air filter unit for suction air filter) [00376006-xx]
▪ Felt filter RFF-092-NV (axis and computer unit) [03006574-xx]
▪ Filter unit - plastic grate (axis and computer unit) [03003425-xx]
▪ Axial fan type 4414 FNN (covers) [03056479-xx]
▪ Axis unit version 1 and 2 (center and bottom): axial fan 4414F 24 VDC [00319141-xx]
▪ Axis unit version 3 (center and bottom): axial fan air vent 24 VDC [03057927-xx]
▪ Fan unit for computer unit [03006602-xx] (not for BoxPC - the fan for the BoxPC is in the computer
and is monitored by this.)
▪ Weak or slightly alkaline cleaning agent, if required
Preparatory Steps
4.2.2 Preparatory Steps
► There must be no PCBs on the PCB conveyor for the following jobs.
► Switch off the machine, disconnect it from the power supply and secure it to prevent unauthorized
reactivation. Observe the instructions in section "1.2 Preparatory Work..." [ ➙ 11].
Minor Maintenance
Maintenance Tasks for Base Machine Performing Maintenance Tasks
32 Maintenance Manual SIPLACE X Series
Performing Maintenance Tasks
4.2.3 Performing Maintenance Tasks
Checking and Cleaning/Replacing the Compressed Air Filter (if required)
4.2.3.1 Checking and Cleaning/Replacing the Compressed Air Filter (if required)
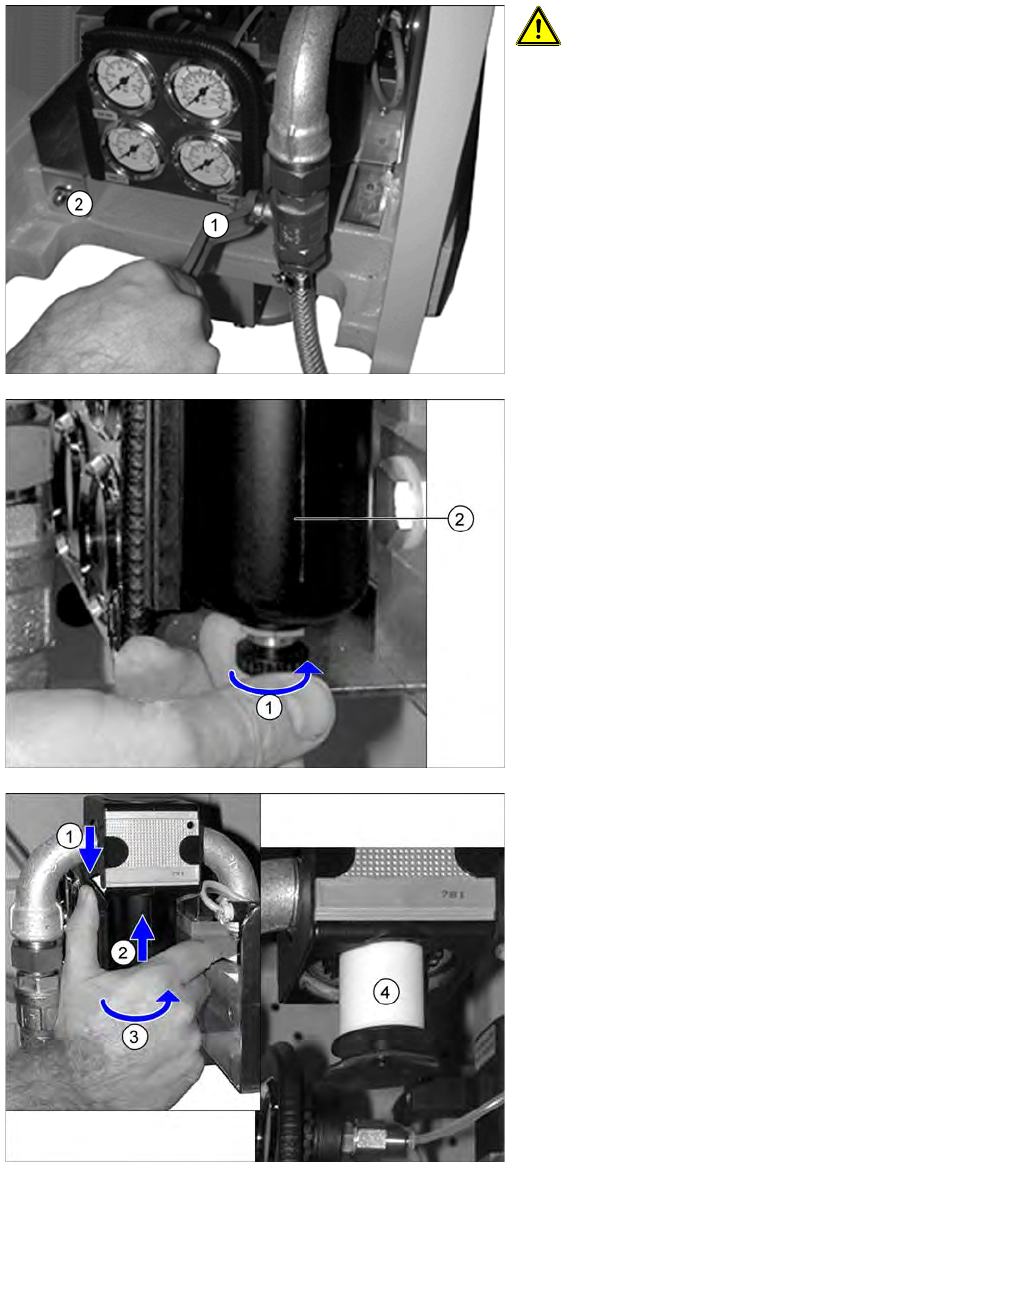
CAUTION! Before checking or replacing the
compressed air filters, you need to shut off the supply of
air!
► Use the machine key to open the door to the
compressed air supply, detach the cable and remove
the door.
► Turn the main compressed air valve (1) clockwise. All
manometers must be set to zero.
► Loosen the screw (2) , and pull out the compressed
air supply.
► Place the collecting vessel under the compressed air
supply.
► Open the screw (1) beneath the cover cap (2) to
release the pressure.
► Pull the locking lever (1) on the cover downwards.
Press the cover (2) upwards and unscrew by turning
to the left (3).
► Unscrew the compressed air filter (4) and check for
dirt.
► Replace the filter if it is dirty.
⇨ Filter element 5 μm [03050213-xx]
HSxx / D1 / D2 / D4 / SX series / X series from
March 2008 pneumatic valve [03062274-xx]
(for [03060279-xx] pneumatic unit)
⇨ Replacement filter for 5 μm compressed air filter
for pneumatic valve [03038979-xx]
X series up to SN B089 [03004680-xx]
(for [03004151-xx] pneumatic unit)
⇨ Filter element for 5 μm filter (new) for pneumatic
valve [03039182-xx]
X series from SN B090 [03038691-xx]
(for [03038058-xx] pneumatic unit)
Minor Maintenance
Performing Maintenance Tasks Maintenance Tasks for Base Machine
Maintenance Manual SIPLACE X Series 33
Cleaning /Replacin g the Head Exhaus t Air Fil ter/X Mo tor Cooli ng
4.2.3.2 Cleaning/Replacing the Head Exhaust Air Filter/X Motor Cooling
Checking/Cleaning the Cooling Air Filter/Y Axes
4.2.3.3 Checking/Cleaning the Cooling Air Filter/Y Axes
Replacin g the Cool ing Air Filter/Y Ax es
4.2.3.4 Replacing the Cooling Air Filter/Y Axes
► Remove the filter as described in "4.2.3.3 Checking/Cleaning the Cooling Air Filter/Y Axes" [ ➙ 33]
and replace it with a new filter [00376006-xx].
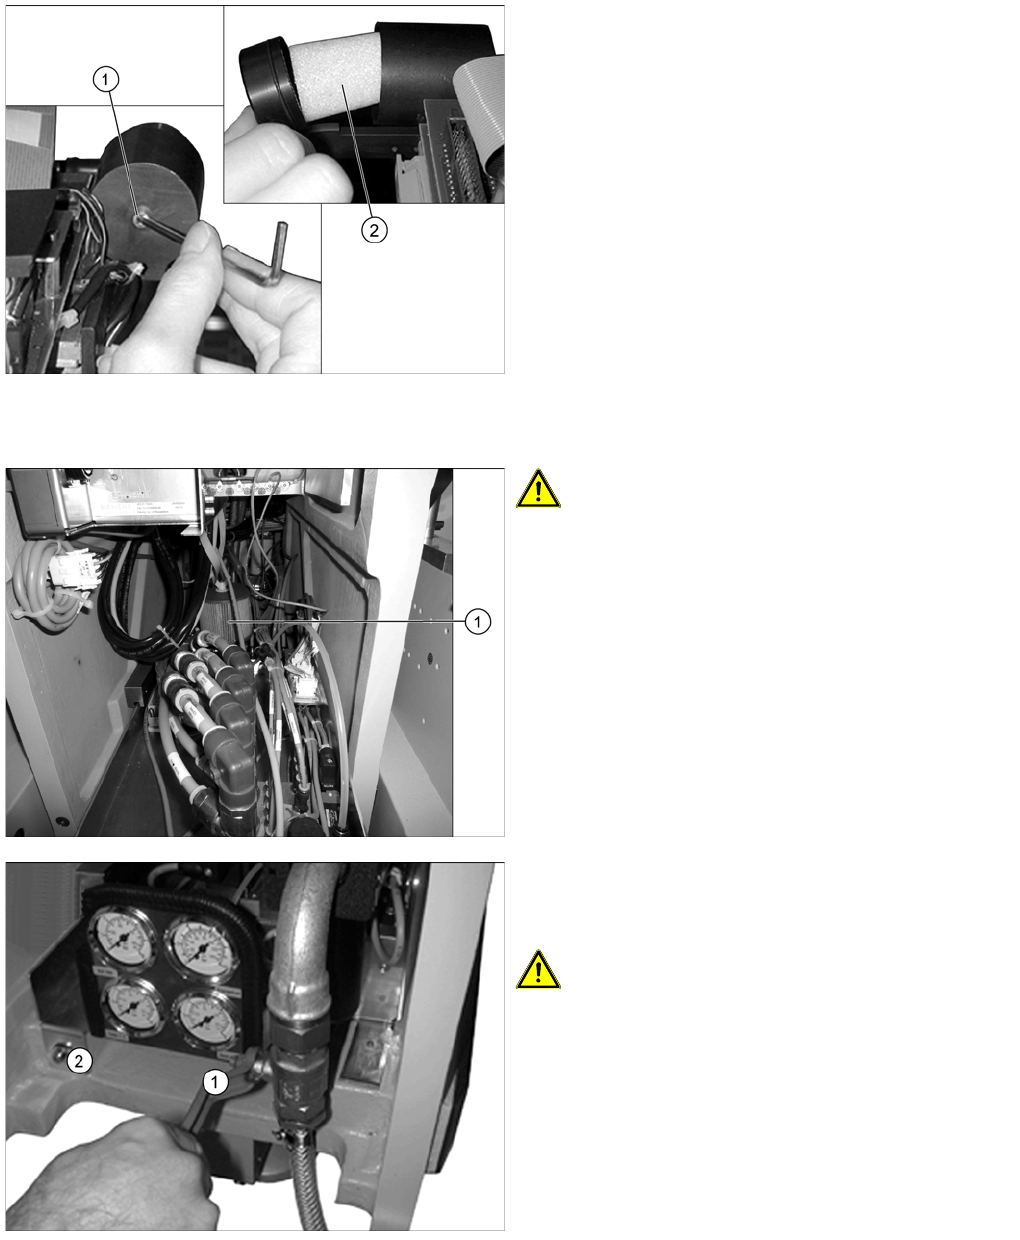
► Remove the protective cover from the relevant
placement head.
► Loosen the fastening screw (1) on the filter casing.
► Check the "filter element 40 µm" [03003717-xx] (2)
for discoloration.
If you see discoloration, replace with a new one.
► Fit the filter, the casing and the protective cover for
the placement head.
► Repeat these steps for the filter elements of all
placement heads.
CAUTION! The main compressed air valve must
be closed for this work and the manometer set to zero!
► Open the wing screw on the upper side of the filter (1)
and pull it up and out.
► Check the filter for dirt and vacuum if required.
► Push the pneumatic unit carefully back into the
machine and fix into place with the screw
provided (2).
CAUTION! Make sure that you do not pinch any
cables or hoses!
► Open the main compressed air valve once more (1).
► Close the door to the compressed air supply.