X-Series-Maintenance-Manual(1).pdf - 第72页
Major Maintenance Maintenance Work on the Gantry Preparatory Steps 72 Maintenance Manual SIPLACE X Series Filling th e Grease Gun 5.4.2.1 Filling the Grease Gun ► Pull back the greas e gun plunger. It must lock into plac…
Major Maintenance
Consumables, Spare and Wear Parts, Tools Maintenance Work on the Gantry
Maintenance Manual SIPLACE X Series 71
Maintenanc e Work on the Gantry
5.4 Maintenance Work on the Gantry
Consumables, Spare and Wear Parts, Tools
5.4.1 Consumables, Spare and Wear Parts, Tools
▪ Lint-free cloths [03082092-xx]
▪ SIPLACE cleansing tissue [00315253-xx]
▪ Klüberplex BEM 34-132 lubricant, 1 kg tin [00374565-xx]
▪ Protective latex gloves [00372972-xx]
▪ Cotton gloves [00359087-xx]
▪ ESD wristband [00320279-xx]
▪ Grease gun with hose for Y axis (volume applied: approx. 0.4 g) [00374563-xx]
▪ Grease gun with nozzle for X axis (volume applied: approx. 0.13 g) [00374564
-
xx]
▪ DIN71412 - A M6 lubrication nipple [03036936-xx], if required
▪ Cooling air set (black) [03003704-xx] or cooling air set (white) [03030955-xx], if required
▪ Set of Allen wrenches
▪ A high-precision set of scales (recommended minimum measuring accuracy: 1 g)
Preparatory Steps
5.4.2 Preparatory Steps
► There must be no PCBs on the PCB conveyor for the following jobs.
► Switch off the machine, disconnect it from the power supply and secure it to prevent unauthorized
reactivation. Observe the instructions in section "1.2 Preparatory Work..." [ ➙ 11].
► Prepare the grease gun.
Major Maintenance
Maintenance Work on the Gantry Preparatory Steps
72 Maintenance Manual SIPLACE X Series
Filling the Grease Gun
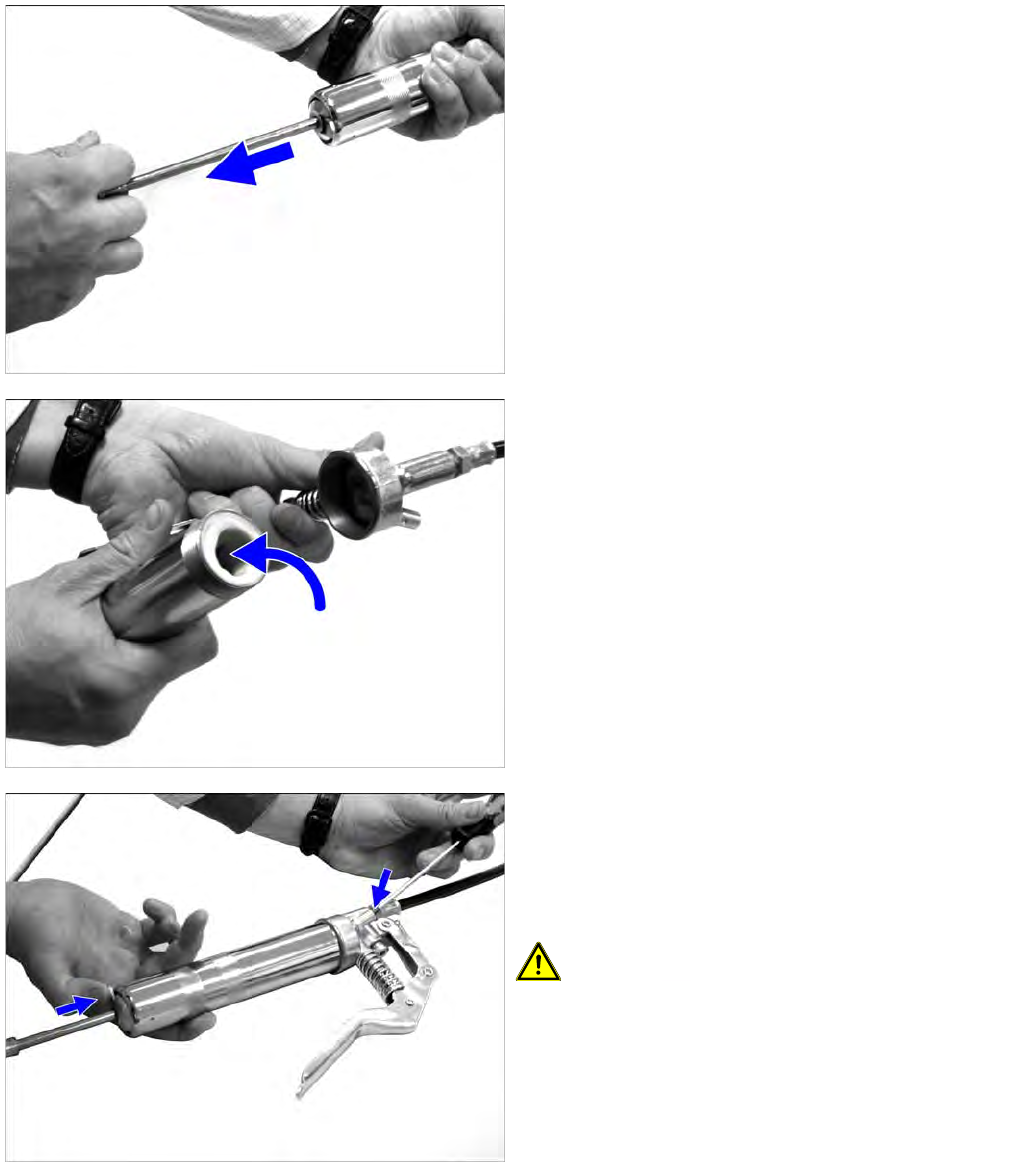
5.4.2.1 Filling the Grease Gun
► Pull back the grease gun plunger. It must lock into
place.
► Open the grease gun by unscrewing the top section.
► Fill the grease gun with suitable grease. Use a clean
spatula.
Try to fill the gun with grease without trapping in any
air pockets.
► Close the grease gun by screwing the top section
back on.
► Loosen the lock on the back of the grease gun. The
spring force moves the plunger forward.
► Push back the ball on the vent screw to vent the
grease gun. Use a screwdriver or similar tool to help
you.
CAUTION! Always vent the grease gun once
you have finished greasing the machine!
► Press the trigger until the grease emerges from the
front of the gun.
► Remove excess grease with a lint-free cloth.
The grease gun is now ready for use.

Major Maintenance
Performing Maintenance Tasks Maintenance Work on the Gantry
Maintenance Manual SIPLACE X Series 73
Performing Maintenance Tasks
5.4.3 Performing Maintenance Tasks
See also
1.1.2 Safety Instructions for Working with Strong Magnetic Fields [ ➙ 8]
Greasing and Cleaning the X A xis
5.4.3.1 Greasing and Cleaning the X Axis
► Check the amount of grease with the help of the scales. Adjust the amount of grease if necessary.
When using the "grease gun with nozzle for the X axis (dosage approx. 0,13 g)" [00374564-xx], the
amount of grease can be changed with a setting screw on the handle.
CAUTION
Greas all grease nipples and pay attention to the capacity!
► Remember to grease every visible grease nipple on the X and Y axes!
► Use the amounts of grease specified. Too much or too little grease can damage the
bearing.
► Fill the "X axis with travel limitation" grease gun with
Klüberplex BEM 34-132.
► Set the grease gun to a dosage of 0.13 g, by
adjusting the screw (1) to 29 mm.
NOTICE
Checking the amount of grease
Depending on the accuracy of your scales, you might need to do 10 or 100 strokes, for example,
to check the amount of grease. Select the number of strokes accordingly to ensure adequate
accuracy. (e.g. for a pair of scales with a measuring accuracy of 1 g: 100 strokes --> 13 g)