Nordson_EFD_GV_Series_Operating_Manual.pdf - 第49页
GV Series Automated Dispensing Systems 49 www.nordsonefd.com info@nordsonefd.com +1-401-431-7000 Sales and service of Nordson EFD dispensing systems are available worldwide. Setting Up the System Using the Robot Initial …
GV Series Automated Dispensing Systems
48 www.nordsonefd.com info@nordsonefd.com +1-401-431-7000 Sales and service of Nordson EFD dispensing systems are available worldwide.
Setting Up and Calibrating the System (Required)
Before creating any programs or using the automatic offset update capabilities of the system, you must properly set
up and calibrate the system. Correct system setup and calibration is critical for proper system operation.
The Robot Initial Setup wizard guides you through the complete setup and calibration process. This process must
be performed at initial startup and also after any change to the system.
Examples of system changes include the following:
• Any time a component installed on the Zaxis (such as the syringe barrel or camera) is moved.
• Any time a dispensing tip or nozzle is changed.
Setup and calibration includes the following tasks:
• Verifying the robot model and tip detector selection
• Opening the robot initial setup wizard and focusing the camera
• (Only GV systems with a tip detector) setting up the tip detector*
• Setting the camera-to-tip offset
• Setting a mark
• Setting the camera scale*
• Setting the tip-to-workpiece offset*
• (Only GV systems with a tip detector) testing the system setup and calibration
• (Only GV systems without a tip detector) testing the system setup and calibration
*All required setup and calibration tasks are guided by the Robot Initial Setup wizard. However, the tasks shown above with
an asterisk (*) can be performed individually as needed. Refer to “AppendixB, Non-Wizard Setup Procedures” on page124
for the procedures.
NOTE: Refer to “About Offsets” on page27 for an explanation of offsets.
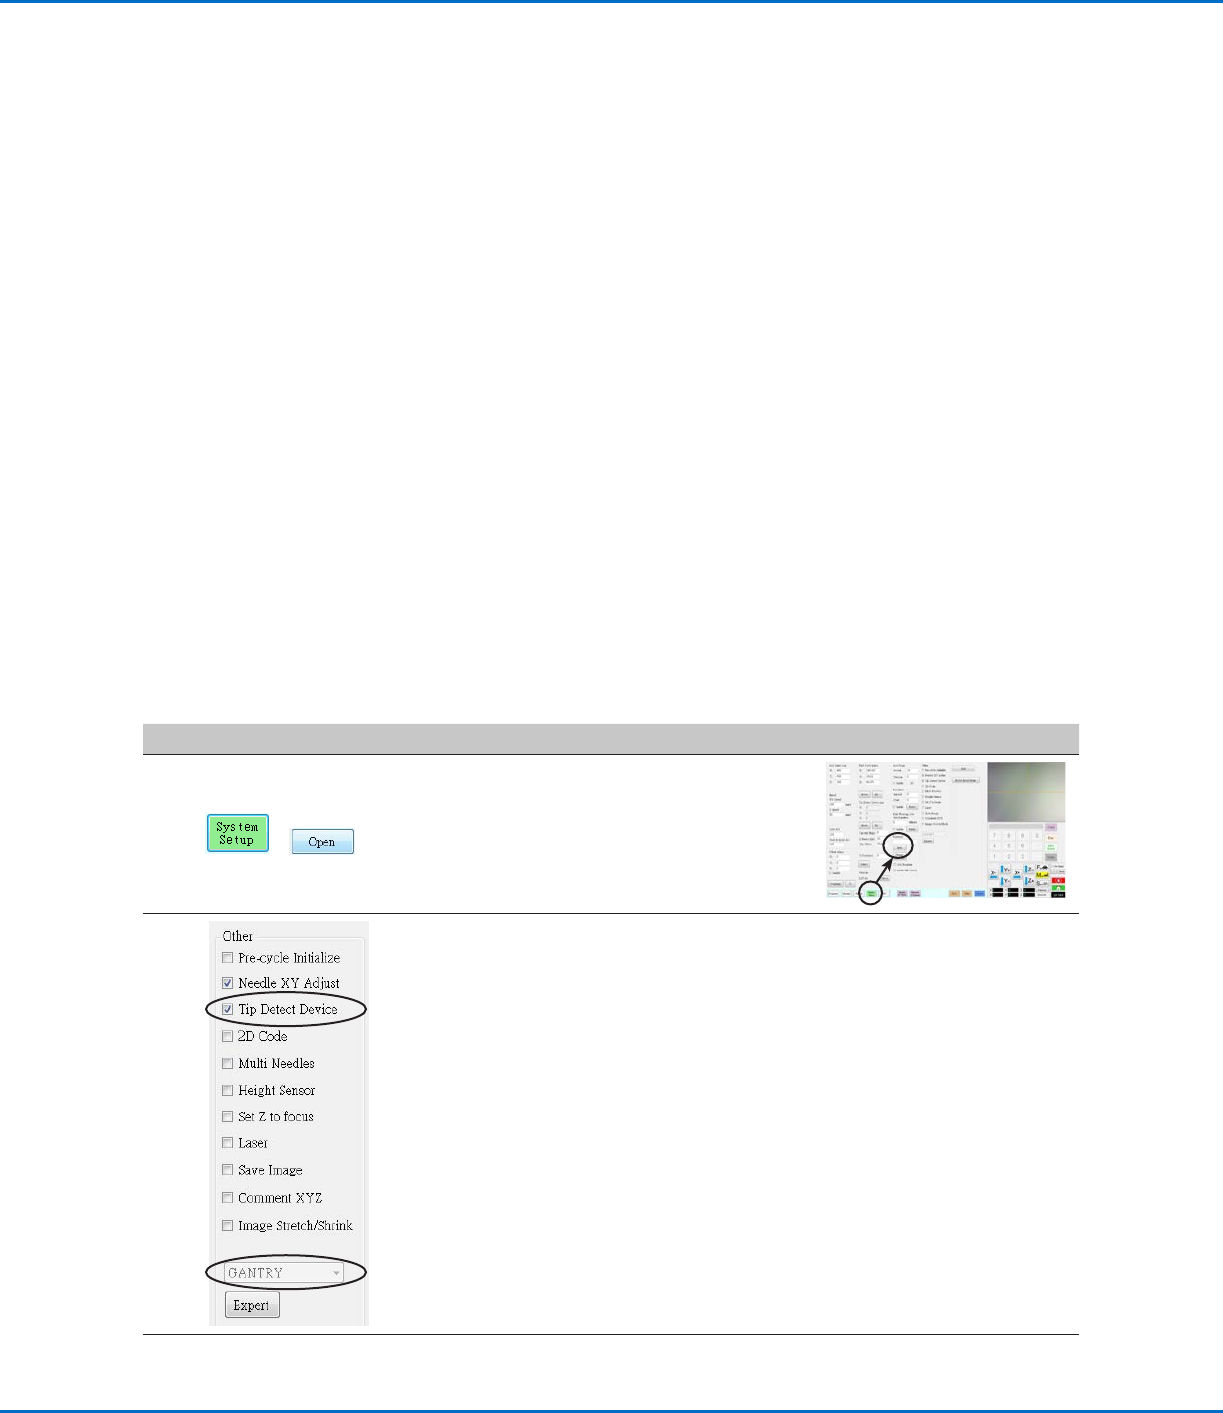
Verifying the Robot Model and Tip Detector Selection
#
Click Step Reference Image
1
>
• Click SYSTEM SETUP > OPEN.
2
• Under Other, verify the following:
- If your system includes a tip detector, Tip
Detect Device is checked.
- The correct robot model is shown. If
the robot model is not correct, go to
“Changing the Robot Model Selection”
on page57 to select the correct model.
Return here to continue.
• If you made changes, close and reopen the
DispenseMotion software for the changes to
take effect.
3
• Continue to “Setting Up the System
Using the Robot Initial Setup Wizard” on
page49.
GV Series Automated Dispensing Systems
49www.nordsonefd.com info@nordsonefd.com +1-401-431-7000 Sales and service of Nordson EFD dispensing systems are available worldwide.
Setting Up the System Using the Robot Initial Setup Wizard
The Robot Initial Setup wizard guides you through all the steps required to properly set up the system, including the
calibration and setting of offsets.
Robot Initial Setup (Step1 Tab): Opening the Robot Initial Setup Wizard and Focusing the Camera
# Click Step Reference Image
1
> >
• Click SYSTEM SETUP > OPEN > ROBOT
INITIAL SETUP.
The Robot Initial Setup wizard opens.
• Perform the actions on tabs 1–6 one at a
time. The actions are also provided in this
manual, starting with the next step, for your
reference as needed.
2
>
• Click the STEP1 tab.
• Jog the tip over the entire workpiece
to ensure that there is at least 5 mm of
clearance between the bottom of the tip to
the highest part of the workpiece.
• Adjust the camera on its bracket until
the camera’s field of view shows the
correct area of the workpiece for setup or
programming.
• Jog the tip to a good location to deposit a
test dispense dot.
• Bring the image on the screen into a sharp
focus. Refer to “Camera” on page18
as needed for instructions on focusing the
camera.
3
• Continue to “Robot Initial Setup (Step 2
Tab): (Only GV Systems With a Tip Detector)
Setting Up the Tip Detector” on page50.
GV Series Automated Dispensing Systems
50 www.nordsonefd.com info@nordsonefd.com +1-401-431-7000 Sales and service of Nordson EFD dispensing systems are available worldwide.
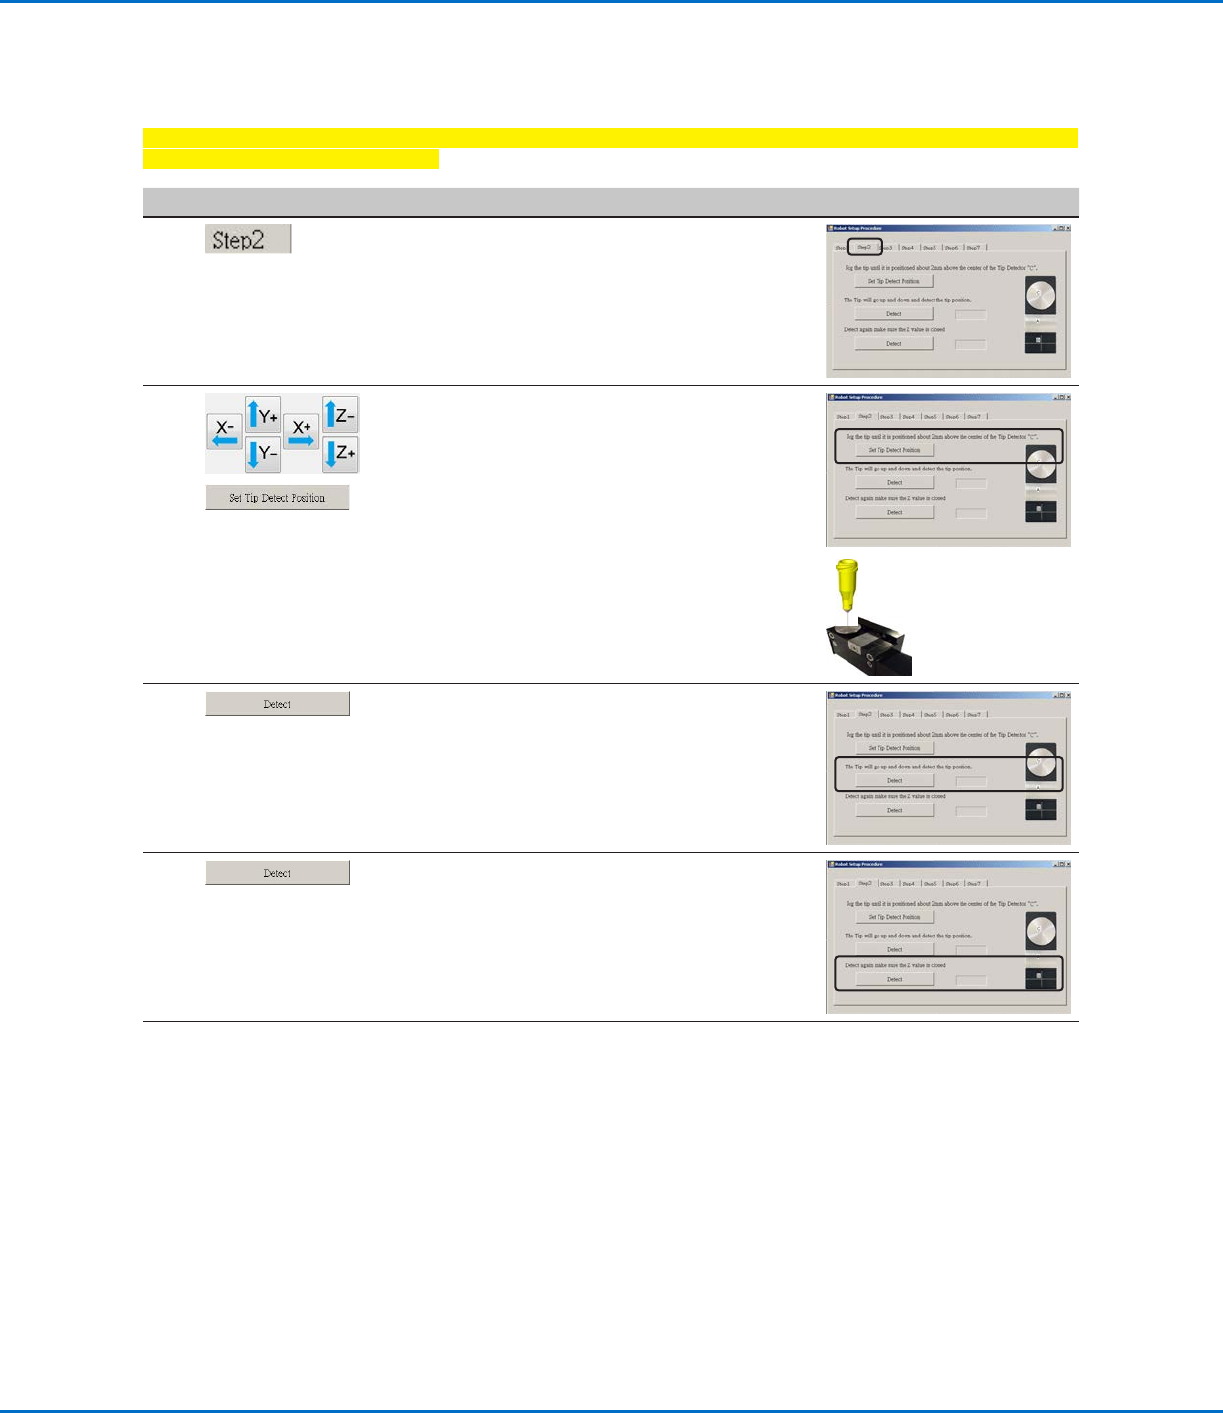
Robot Initial Setup (Step 2 Tab): (Only GV Systems With a Tip Detector) Setting Up the Tip Detector
Important: If your system does not include a tip detector, skip to “Robot Initial Setup (Step3 Tab): Setting the
Camera-to-Tip Offset” on page51.
# Click Step Reference Image
1
• Click the STEP2 tab.
2
>
• Jog the tip until it is positioned about 2 mm
above the sensor on the tip detector.
• Click SET TIP DETECT POSITION.
3
• Click DETECT.
The tip touches the sensor to detect the
tip position and the system displays the tip
offset value next to the Detect button.
4
• Click DETECT again.
The system confirms the tip offset setting.
5
• Continue to “Robot Initial Setup (Step3
Tab): Setting the Camera-to-Tip Offset” on
page51.
Setting Up the System Using the Robot Initial Setup Wizard (continued)