Nordson_EFD_GV_Series_Operating_Manual.pdf - 第68页
GV Series Automated Dispensing Systems 68 www.nordsonefd.com info@nordsonefd.com +1-401-431-7000 Sales and service of Nordson EFD dispensing systems are available worldwide. How to Dispense on Multiple W orkpieces in an …
GV Series Automated Dispensing Systems
67www.nordsonefd.com info@nordsonefd.com +1-401-431-7000 Sales and service of Nordson EFD dispensing systems are available worldwide.
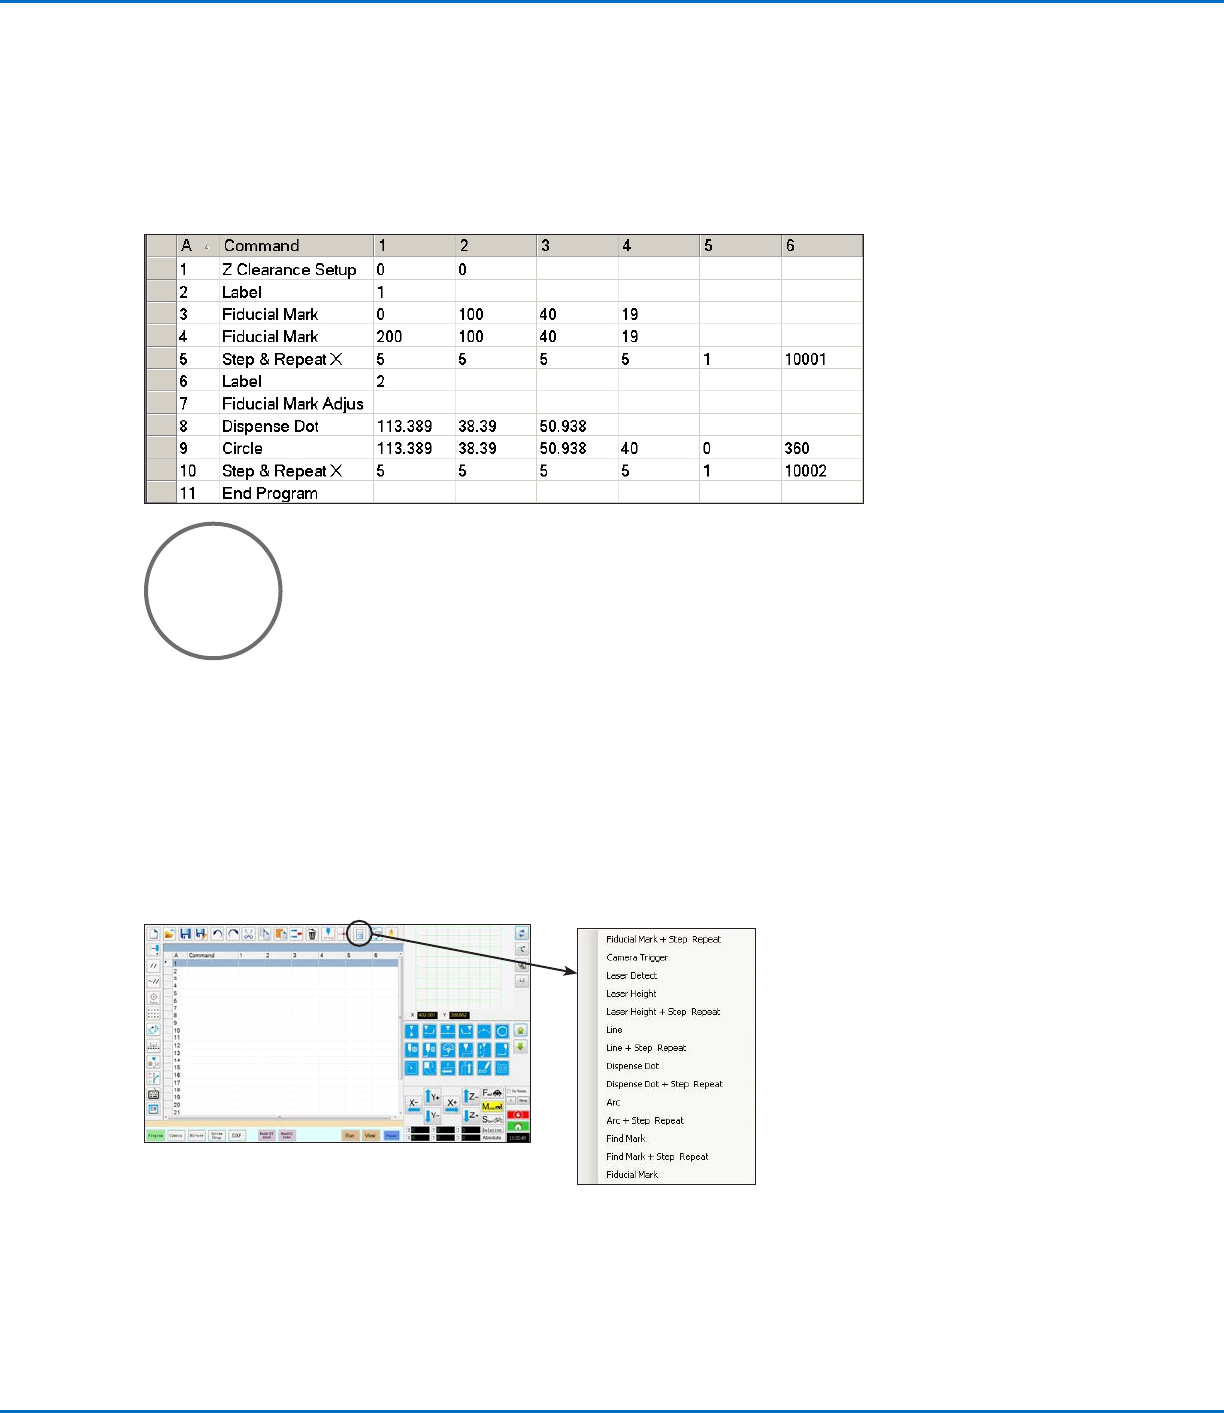
Circle Sample Program
NOTES:
• The X and Y parameters are the center of the circle.
• The diameter of the circle on the workpiece was measured as 5.5 mm. Click the Measure Circle Diameter icon
on the Camera screen to measure the diameter of a circle on a workpiece. Refer to “How to Measure a Path or
Circle on a Workpiece” on page65.
How to Use the Example Icon
A selection of pre-programmed sets of commands are available when you click the Example icon. You can use
these programs as a starting point for any program.
GV Series Automated Dispensing Systems
68 www.nordsonefd.com info@nordsonefd.com +1-401-431-7000 Sales and service of Nordson EFD dispensing systems are available worldwide.
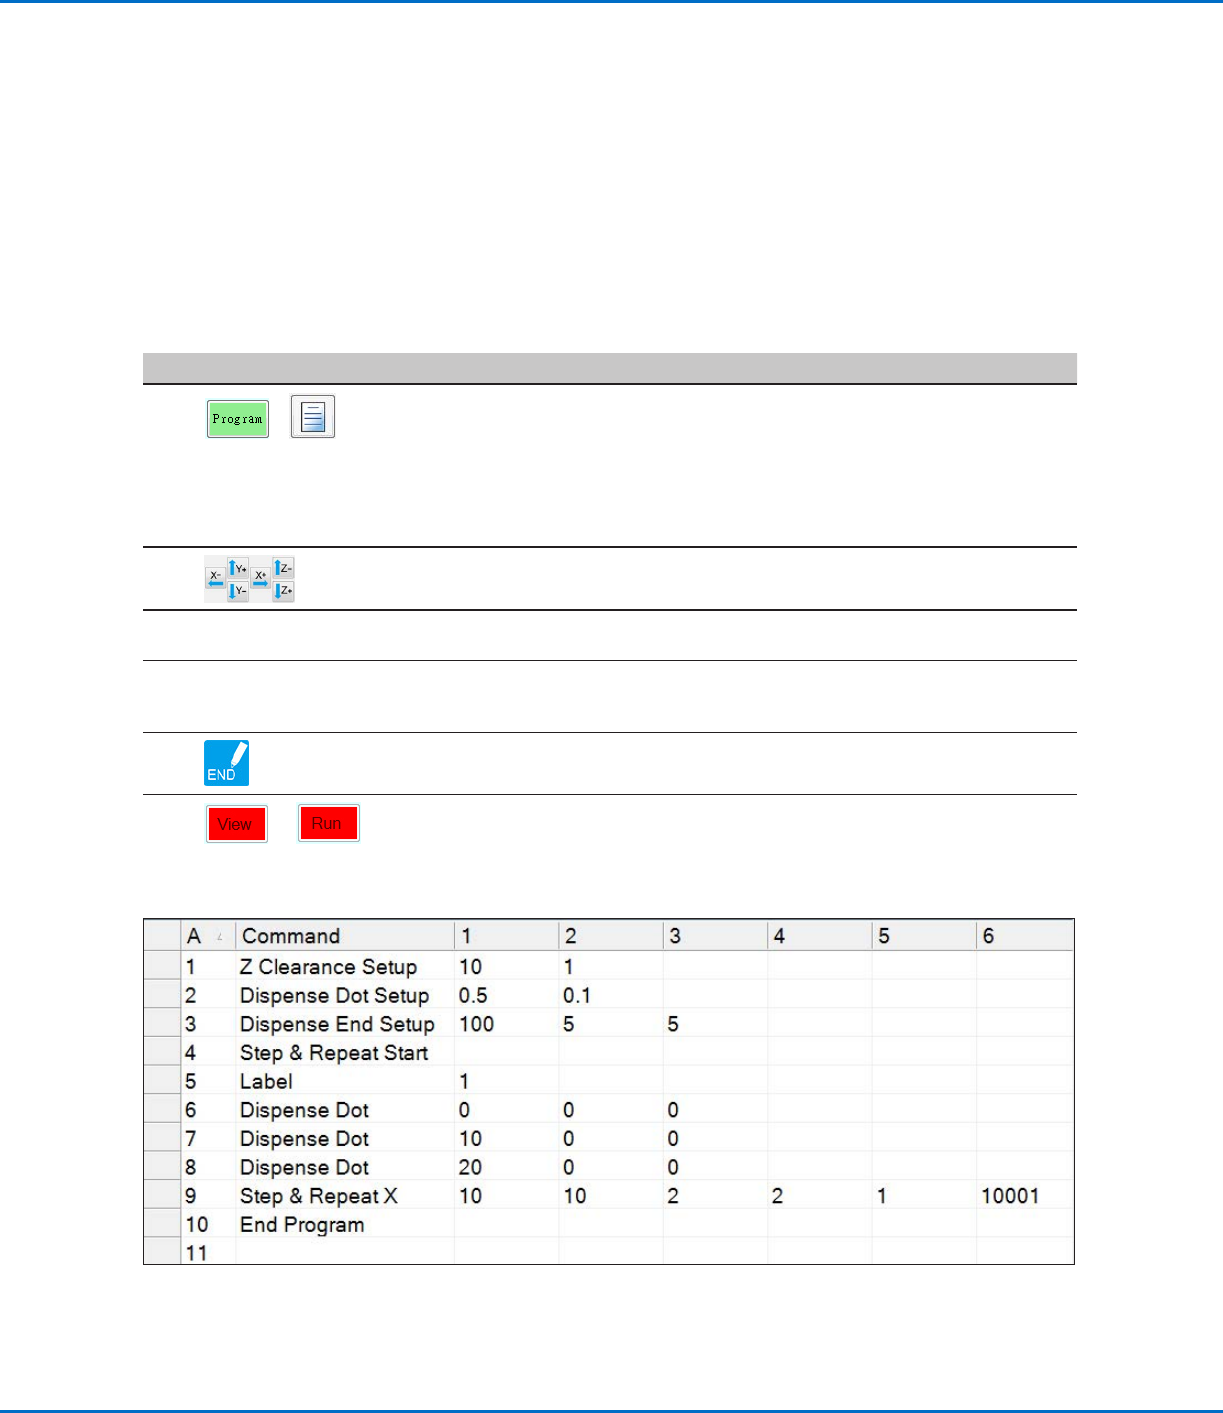
How to Dispense on Multiple Workpieces in an Array
Use the Step & Repeat commands to dispense the same pattern on multiple workpieces in an array.
NOTE: You can use the Step & Repeat Block icon to disable dispensing for workpieces not present. Refer to “How
to Disable Dispensing for Specific Workpieces in an Array” on page69.
PREREQUISITES
The system is properly set up. Refer to “Setting Up and Calibrating the System (Required)” on page48.
If the tip or any element of the Zaxis head was changed, repeat system setup and calibration using the Robot
Initial Setup wizard. Refer to “Setting Up the System Using the Robot Initial Setup Wizard” on page49.
The system is in the CCD Mode.
Multiple workpieces are properly positioned on the fixture plate.
#
Click Step
1
>
• Click the PROGRAM tab, then click the Example icon and select FIND MARK
+ STEP REPEAT. Click YES when prompted for confirmation.
A sample Step & Repeat X program appears.
NOTE: You can also use Step & Repeat Y to dispense onto multiple pieces in
an array. Refer to “AppendixA, Command Function Reference” on page98
for detailed information on both Step & Repeat commands.
2
• Jog the dispensing tip to the first workpiece in the array and create a mark.
Refer to “How to Create a Mark” on page70 as needed.
3
• Click the FIND MARK command and enter the number of the mark created in
step 2.
4
• Click the remaining commands and enter the parameters that will work
for your array. Refer to “AppendixA, Command Function Reference” on
page98 for detailed information on commands.
5
• Click END PROGRAM to end the program.
6
or
• Test the program and make adjustments until the program runs correctly.
GV Series Automated Dispensing Systems
69www.nordsonefd.com info@nordsonefd.com +1-401-431-7000 Sales and service of Nordson EFD dispensing systems are available worldwide.
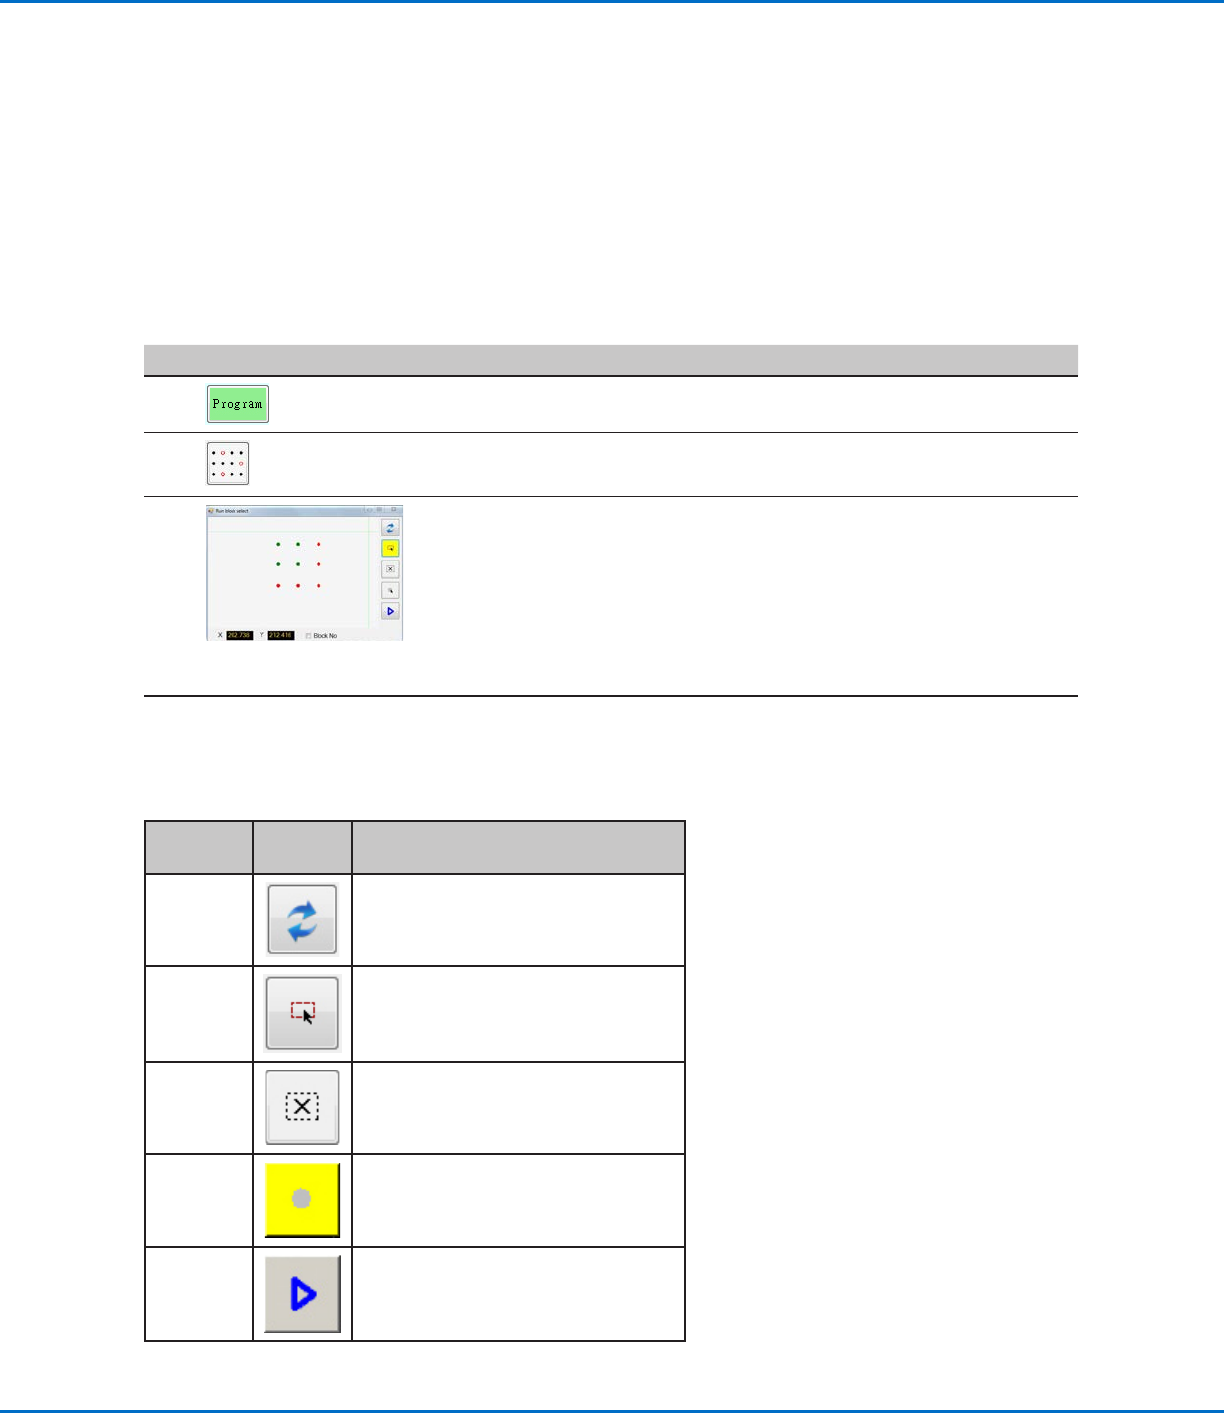
How to Disable Dispensing for Specific Workpieces in an Array
You can use the Step & Repeat Block icon to disable or enable dispensing for specific workpieces in an array.
NOTE: Use the Step & Repeat commands to create a program that dispenses the same pattern on multiple
workpieces in an array. Refer to “How to Dispense on Multiple Workpieces in an Array” on page68.
PREREQUISITES
The system is properly set up. Refer to “Setting Up and Calibrating the System (Required)” on page48.
The system is in the CCD Mode.
Multiple workpieces are properly positioned on the fixture plate.
The correct Step & Repeat program for the array on the fixture plate is open.
#
Click Step
1
• Make sure the Program screen is open.
2
• Click the STEP & REPEAT BLOCK icon.
The Run Block Select window appears.
3
• To disable dispensing for specific workpieces, click the workpiece locations
in the window. Selections turn red when disabled.
- Green: Enabled
- Red: Disabled
• Leave the Run Block Select window open during dispensing.
NOTE: Refer to “Function of the Icons in the Run Block Select Window”
below for the function of the Run Block Select window icons.
4
• When dispensing is complete, close the Run Block Select window. The
system clears all disabled selections.
Function of the Icons in the Run Block Select Window
Icon
Name
Icon Function
Refresh
Refreshes the window.
Select
Entity
Selects a group of blocks.
Cancel
Select
Cancels any selections
Toggle
Select
Toggles a selected block between
enabled and disabled.
Run Block
Select
Runs the currently selected and
enabled blocks.