OM-1271-003_w.pdf - 第32页
29 Tg1097-ID-OP 0708-003 [1] Select Head Button The button images showing the head positions are displayed. Using these buttons, the PEC recognition camera used for the teaching is selected. [2] "Head Nozzle Inclina…
28
Tg1097-ID-OP
0708-003
8.4 Head Nozzle Inclination Offset
By means of recognizing the jig component (QFP Glass Plate Jig) picked up
by using the nozzle, at angles of 0°, 90°, 180° and 270° using the component
recognition camera, the offset data is taught to correct the inclination of the
head nozzle.
Note
When the machine is delivered, such data has been adjusted and set.
Therefore, usually the offset teaching operation is not required.
(1) When the [OTHERS] button is pressed on the "TEACHING"
submenu bar, the menu bar for the other teaching functions is
popped up.
(2) Press the [NOZ INCLN OFFSET] button in the pop-up menu bar.
[2]
[1]
[3]
[4]
[5]
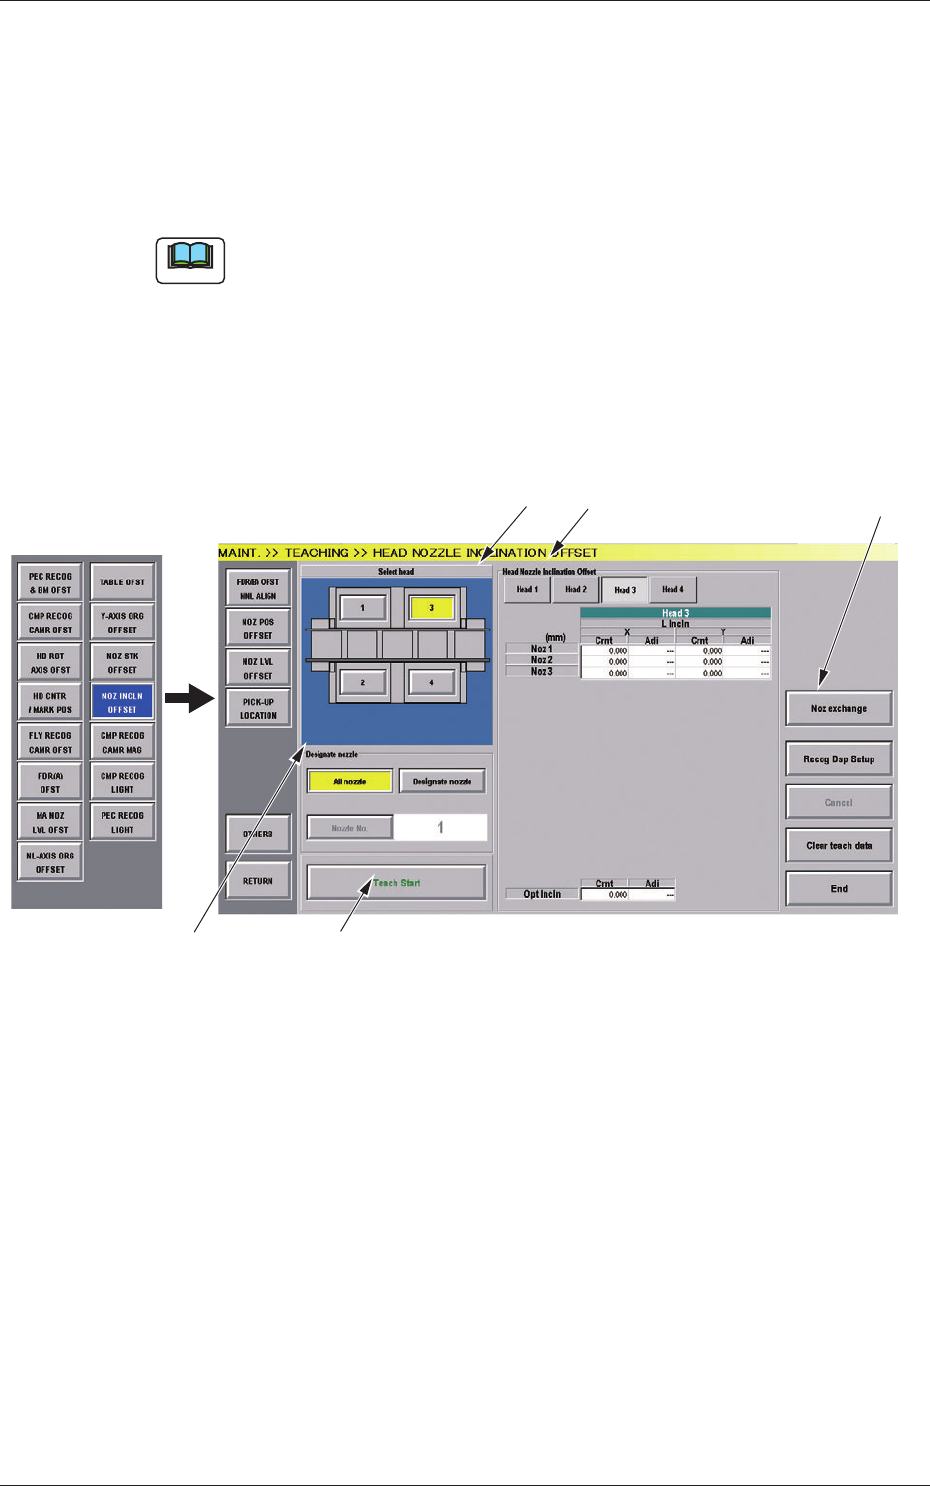
Fig.7-7 "HEAD NOZZLE INCLINATION OFFSET" Window
8.4 Head Nozzle Inclination Offset

29
Tg1097-ID-OP
0708-003
[1] Select Head Button
The button images showing the head positions are displayed.
Using these buttons, the PEC recognition camera used for the teaching
is selected.
[2] "Head Nozzle Inclination Offset" Display
When the button showing the head of which data is to be displayed, is
pressed, the head data is displayed.
NL Inclination
The offset data values for X (horizontal) (mm) and Y (vertical)
(mm) for each nozzle for multi-functional heads, are displayed.
HL Inclination and DD Inclination
The offset data values for X (horizontal) (mm) and Y (vertical)
(mm) for multi-functional heads are displayed.
Optical Axis Inclination
The offset data for each nozzle for the multi-functional heads, is
displayed.
Cmt
: Offset values before teaching
Adj
: Offset values obtained as the result of teaching
[3] Designate Nozzle
[All Nozzle] Button (Disable)
Using this button, all nozzles are taught.
[Designate Nozzle] Button
Using this button, the nozzle, for which the teaching is
performed, is designated.
When the [Designate Nozzle] button is pressed, the [Nozzle No.]
button is enabled.
[Nozzle No.] Button
Using this button, the nozzle for which the teaching is performed
is designated.
When the [Nozzle No.] button is pressed, the "Nozzle No."
selection window appears.
[4] [Teach Start] Button
Using this button, the teaching is performed.
8.4 Head Nozzle Inclination Offset

30
Tg1097-ID-OP
0708-002
[5] [Noz exchange] Button
When this button is pressed, the "Noz Exchange" window appears.
Reference
Refer to Chapter 4, 4.2 "Nozzle Change" Window in the main
machine instruction manual, for the details of the Nozzle Exchange
Window.
•
Teaching Jig
For the teaching of the head nozzle inclination offsets, the QFP Glass Plate
Jig JG-0188 is used.
•
Jig Pick-up Nozzle
For picking up the QFP Glass Plate Jig, the jig nozzle (standard accessory) or
usual vacuum nozzle FA06 is used.
•
Teaching Procedure
Procedure
(1) Before the teaching, change the nozzle to the jig nozzle and
place the QFP Glass Plate Jig on the jig storage space on the
component recognition camera.
Place the QFP Glass Plate Jig with its printed surface turned
down.
(2) Select the head (1 or 2) and nozzle for which the Head Nozzle
Inclination Teaching is performed.
(3) Press the [Teach Start] button.
The head nozzle inclination offset teaching will be performed.
•
When the teaching is performed, the start-up conditions are
checked.
•
If any recognition error occurs in the course of the teaching,
or the [STOP] button is pressed on the operation panel, the
operation is paused. From this condition, re-start is available.
•
In the pause condition, any other menu can not be selected.
When the teaching is completed, the designated head is returned
to the origin automatically. The teaching results are displayed in
the "Head Nozzle Inclination Offset" display section.
(4) Repeat the Step (1) through (3) and teach the necessary nozzles.
(5) When the teaching is completed, remove the QFP Glass Plate Jig.
8.4 Head Nozzle Inclination Offset