YS12P_YS12F_YG12F_Mainte_E.pdf - 第56页
3-4 3 Periodic maintenance items 1.2 Checking the conveyor sensor condition and operation Thismachineusesatransmissionmodefibersensorastheconveyorsensor. Checkwhetherthesensoroperatescorrectlyevenwhent…
3-3
3
Periodic maintenance items
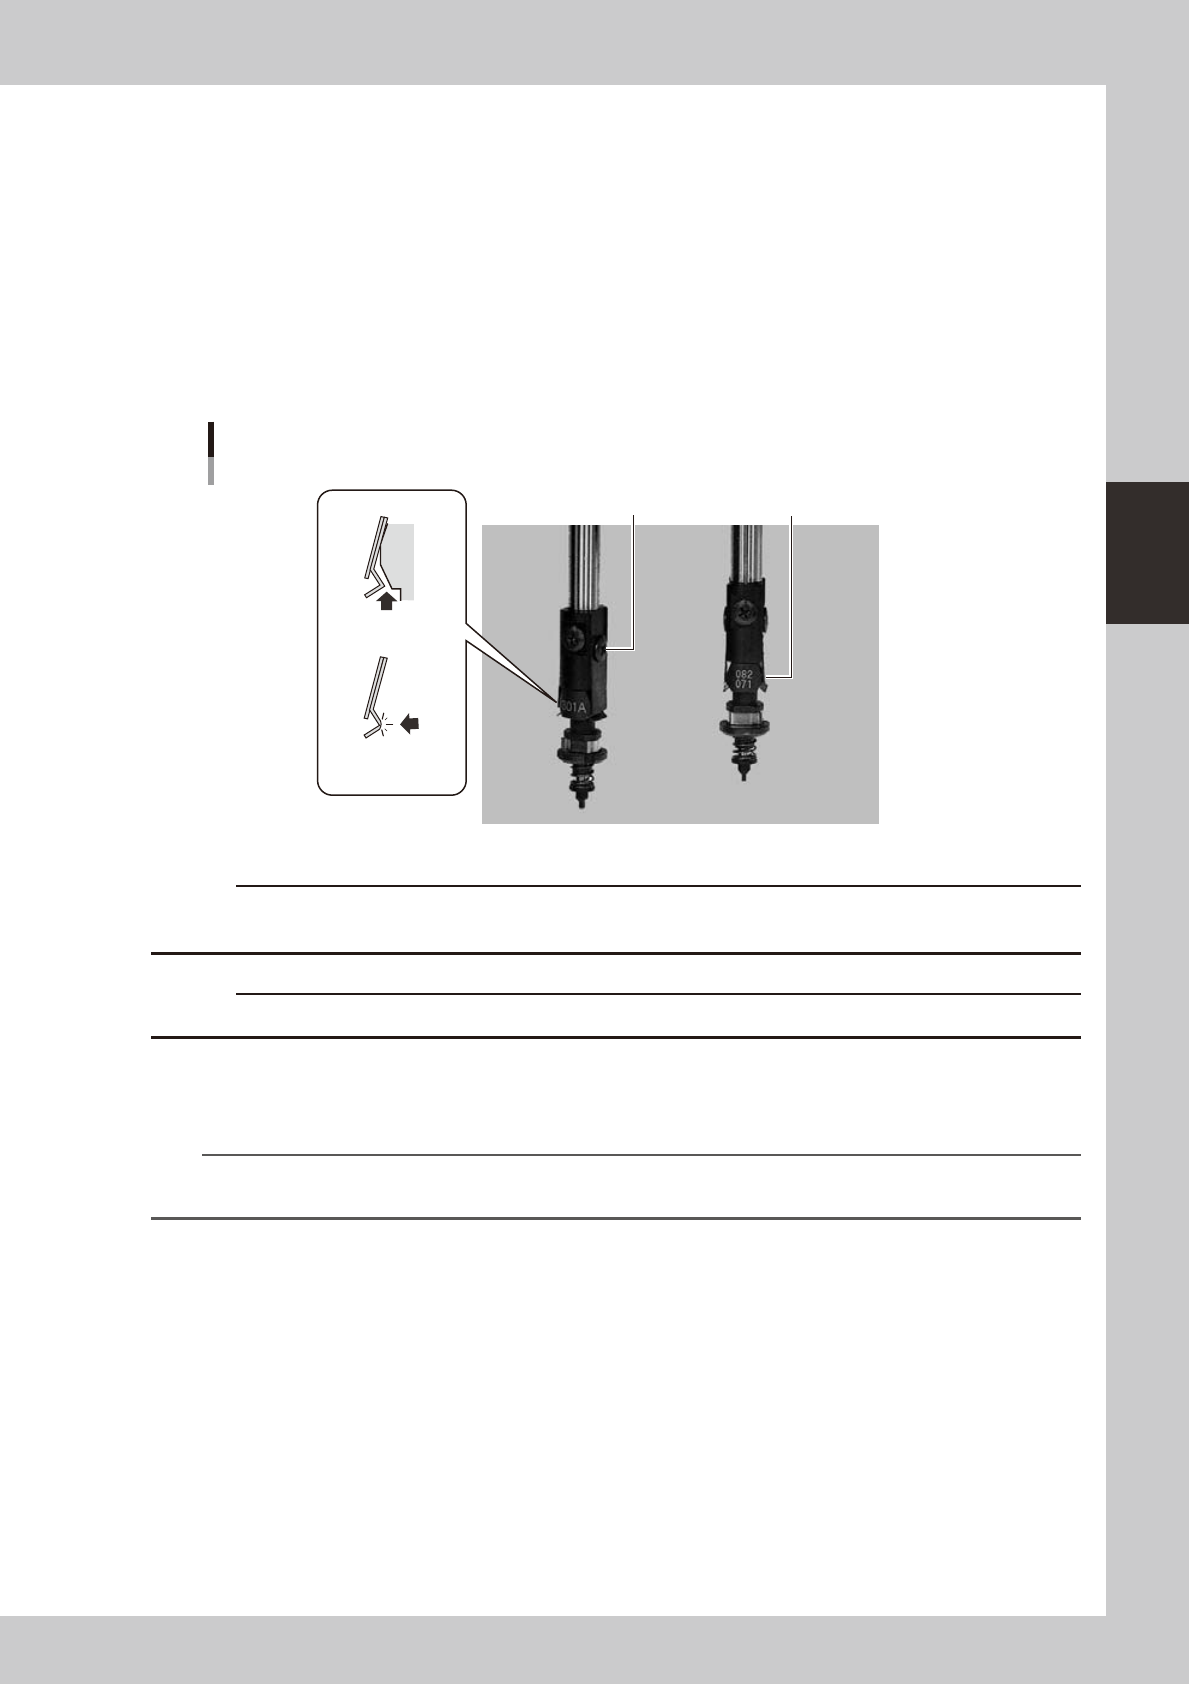
1.1.2 Checking the nozzle leaf springs
If nozzle leaf springs cannot hold a nozzle securely, this adversely affects pickup, recognition and mounting
operations. Periodically check the leaf springs for nozzle holding status.
n
Leaf spring inspection points
Checkthefollowingpointsbyremovingthenozzleandreattachingittothenozzleholder.
•Theleafspringhasenoughgrippingforce.
•Thereisnogapbetweentheleafspringsandthenozzle.
•Theleafspringisnotwarpedordeformed.
•Thegrippingpartoftheleafspringisnotfrayed.
Checking the leaf spring condition
Screw should
be tightened.
Leaf spring should not be
warped or deformed.
There should be
no gap.
Leaf spring should
not be frayed.
53308-L6-00
c
c
1.1.3 Cleaning the nozzle top end
Cleanthecontaminationofthenozzletopendwithanozzletopendcleaningtapesuppliedwiththemachine.
n
NOTE
An ultrasonic cleaning unit (option) is effective to remove the contamination of the nozzle which has not been
removed with the nozzle top end cleaning tape.
n
Cleaning procedure
Sticktheadhesivesurfaceofthenozzletopendcleaningtapetothenozzletopendandpeelitofftoremovethe
contamination.
3-4
3
Periodic maintenance items
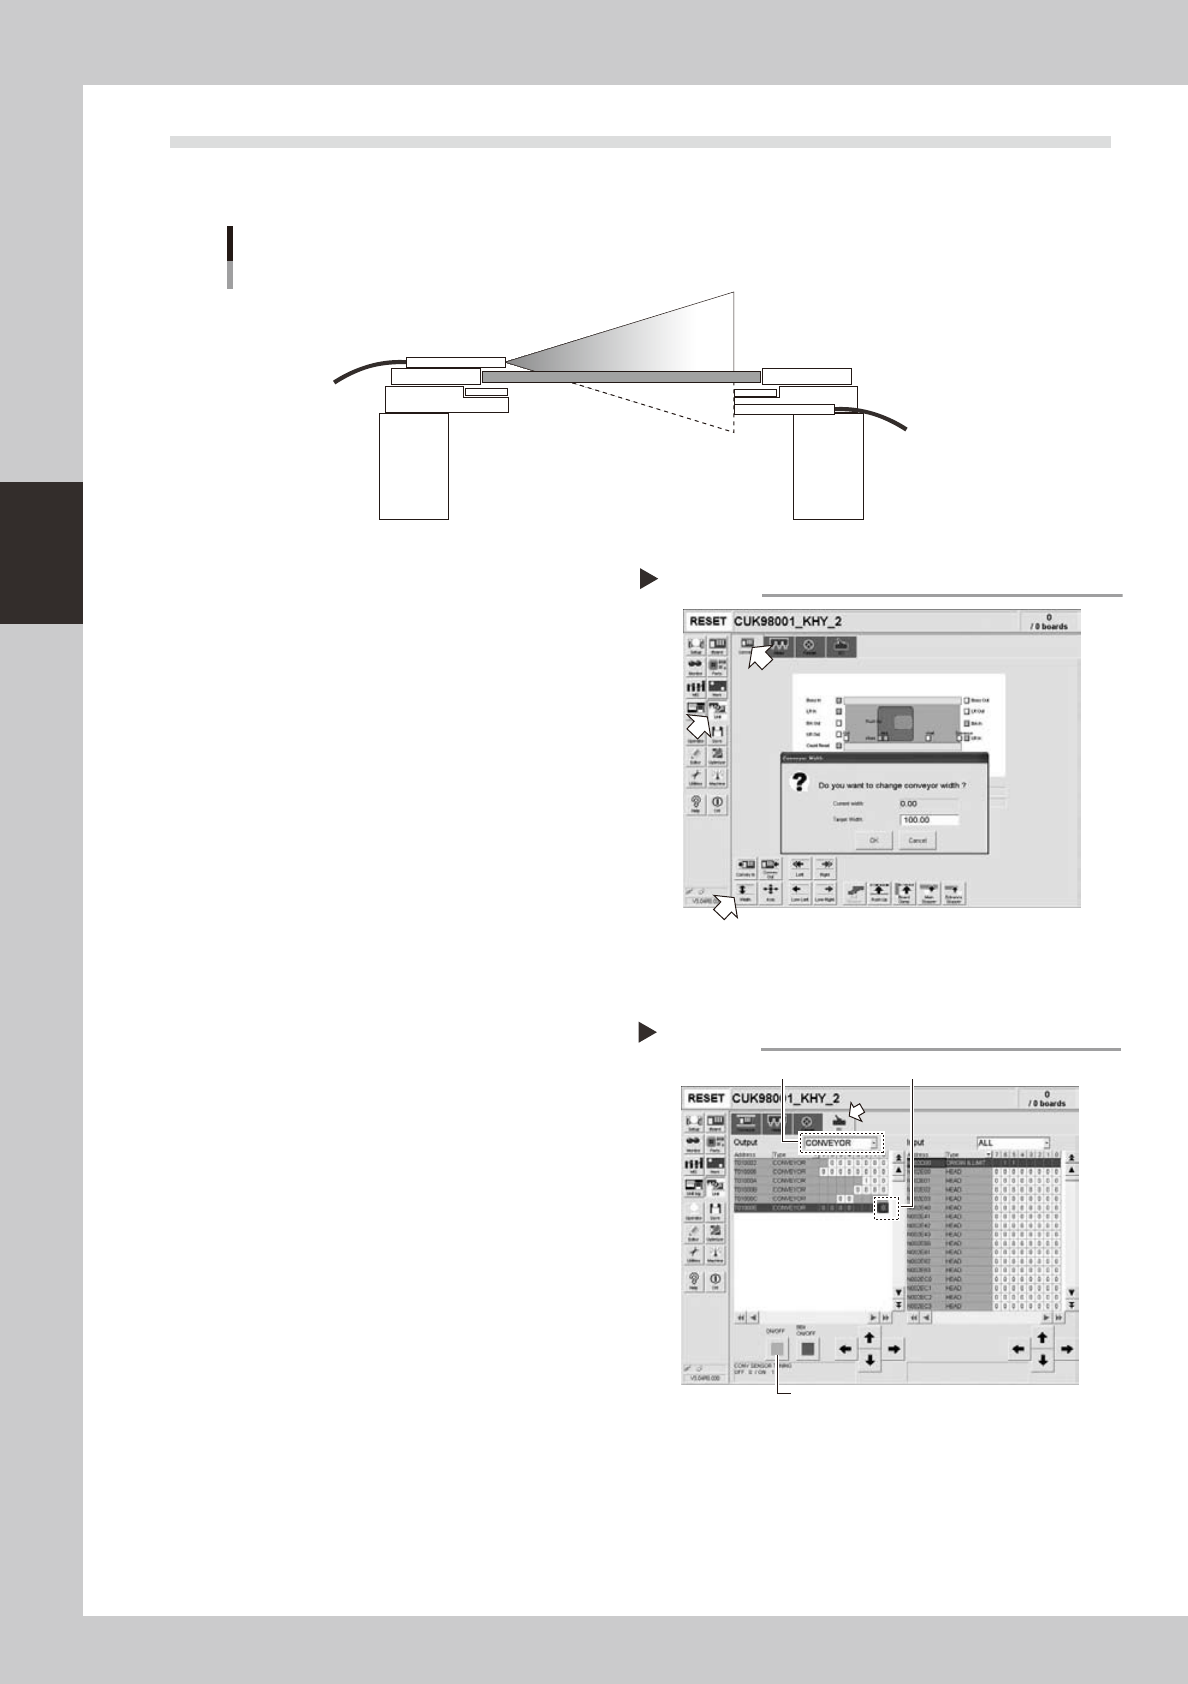
1.2 Checking the conveyor sensor condition and operation
Thismachineusesatransmissionmodefibersensorastheconveyorsensor.
Checkwhetherthesensoroperatescorrectlyevenwhentheconveyorrailwidthischanged.
Checking the conveyor sensor condition and operation
Light emitter
Light
sensor
53353-L6-00
1
Open the [Unit] – [Conveyor] tab.
2
Press the [Width] button to change
the conveyor width.
In the "Conveyor Width" dialog box that
appears, enter a conveyor width and press
[OK].
The conveyor is changed to the width that
was just entered.
3
Check whether an error has
occurred.
The conveyor sensor is operating properly
unless an error message appears when the
conveyor width is changed. No further check
is necessary.
54301-L6-00
n
If an error message appears, then adjust the sensor with the procedure below.
· Adjusting the conveyor sensor
Ifanerroroccurredwhentheconveyorwidthwas
changed,checktheoutputstatusoftheconveyor
sensor.
1.Openthe[Unit]–[I/O]tab.
2.Fromthe"Output"drop-downlist,select
"CONVEYOR".
3.Select"CONVSENSORTUNING"(T01000E)inthe
outputI/Olist.
4.Pressthe[ON/OFF]buttontoswitchtheI/Ostatus
from"0"(OFF)
→
"1"(ON)
→
"0"(OFF)toperform
autotuning.
5.Onthe[Unit]–[Conveyor]tab,pressthe[Axis]
buttonagainandchangetheconveyorwidth.The
sensorisoperatingproperlyunlessanerrormessage
appears.
54302-L6-00
Checking the conveyor sensor
Step 1-3
Conveyor sensor tuning
2
3
4
3-5
3
Periodic maintenance items
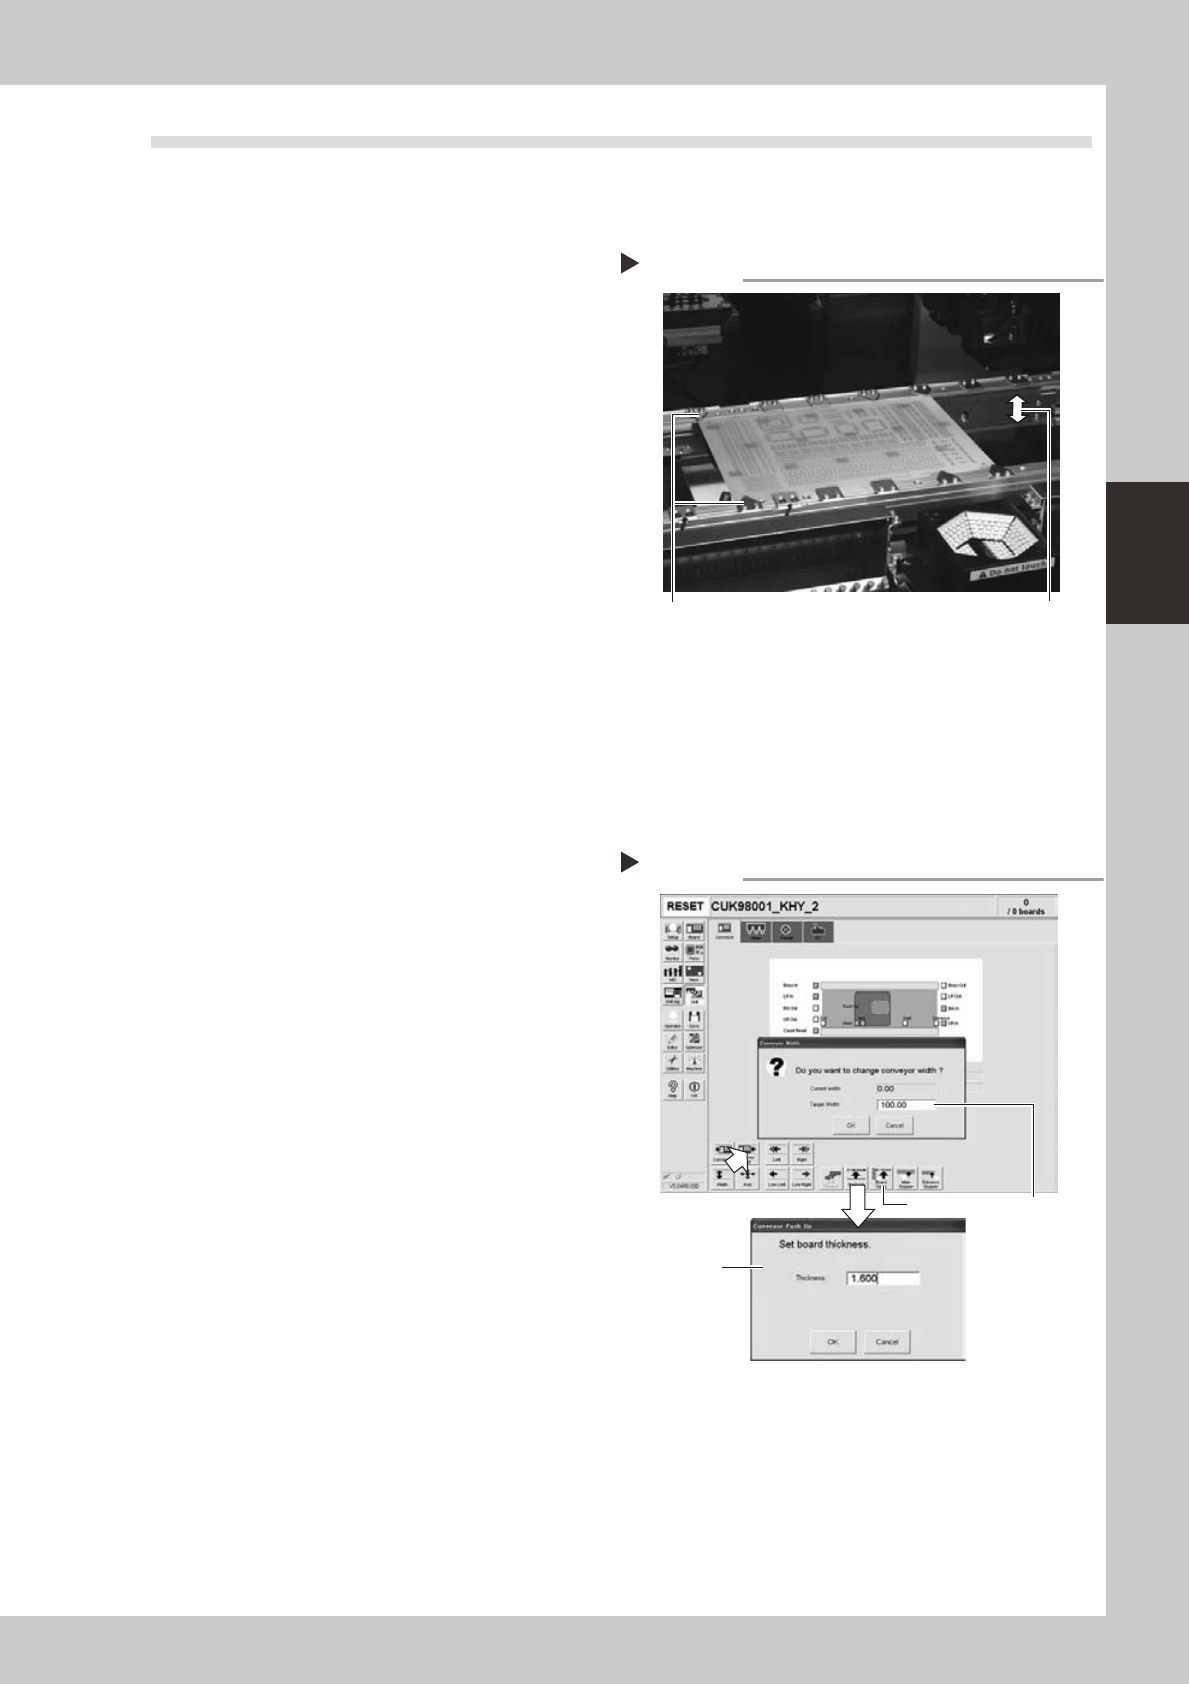
1.3 Checking the board clamp condition and operation
1.3.1 Checking the board clamp condition
Checkthefollowingpointstoseetheboardclampcondition.
1.Theboardisclampedwithoutplaywhentheboard
clampisraised.
2.Thereisnoclearancebetweentheboardandthe
boardholdplatewhentheboardclampisraised.
3.Theboardisflushwiththeuppersurfaceofthe
conveyorrailswhentheboardclampisraised.
4.Theboardclampunitmovessmoothly.
53301-L6-00
1.3.2 Checking the board clamp operation
1
Open the [Unit] – [Conveyor] tab.
2
Press the [Width] button to set the
conveyor width.
In the "Target Width" box in the "Conveyor
Width" dialog box that appears, enter the
board width and press [OK].
The conveyor is changed to the width that
was just entered.
3
Press the [Push Up] button to enter
the board thickness.
In the dialog box that appears, enter the
board thickness and press [OK].
4
Press the [Board Clamp] button to
clamp the board.
5
Press the [Board Clamp] button
again to unclamp the board.
54309-L6-00
Repeatsteps4and5toclampandunclampthe
boardtomakesuretheclampunitoperates
smoothly.
Checking the clamp condition
Check that there is no clearance
between the board and board hold
plate and also that the board is flush
with the conveyor rails.
Clamp and unclamp the
board to check the
movement.
Checking the clamp operation
Step 2-5
Step2
Step3
Step4, Step5