YS12P_YS12F_YG12F_Mainte_E.pdf - 第68页
3-16 3 Periodic maintenance items 3. Three-month inspection 3.1 Cleaning and replacing the ejector filter Althoughdependingontheairsupplyconditionsandoperatingtime,ejectorsshouldbeinspectedonceevery 3mon…
3-15
3
Periodic maintenance items
2.5 Inspecting and cleaning the board conveyor belt (bimonthly)
Asthebeltwearsaway,slippagesmayoccurthatpreventsecurelyconveyingtheboards.Itistherefore
necessarytomakeperiodicchecksforwearoftheconveyorbelt.
Beltwearmayalsocausetroublesuchaserroneousdetectionoftheconveyorsensorduetodustfrombelt
wearaccumulatingonthesensorsurface,ordustfrombeltwearaccumulatinginthebeltguidegroovesmay
causethebelttostick,etc.
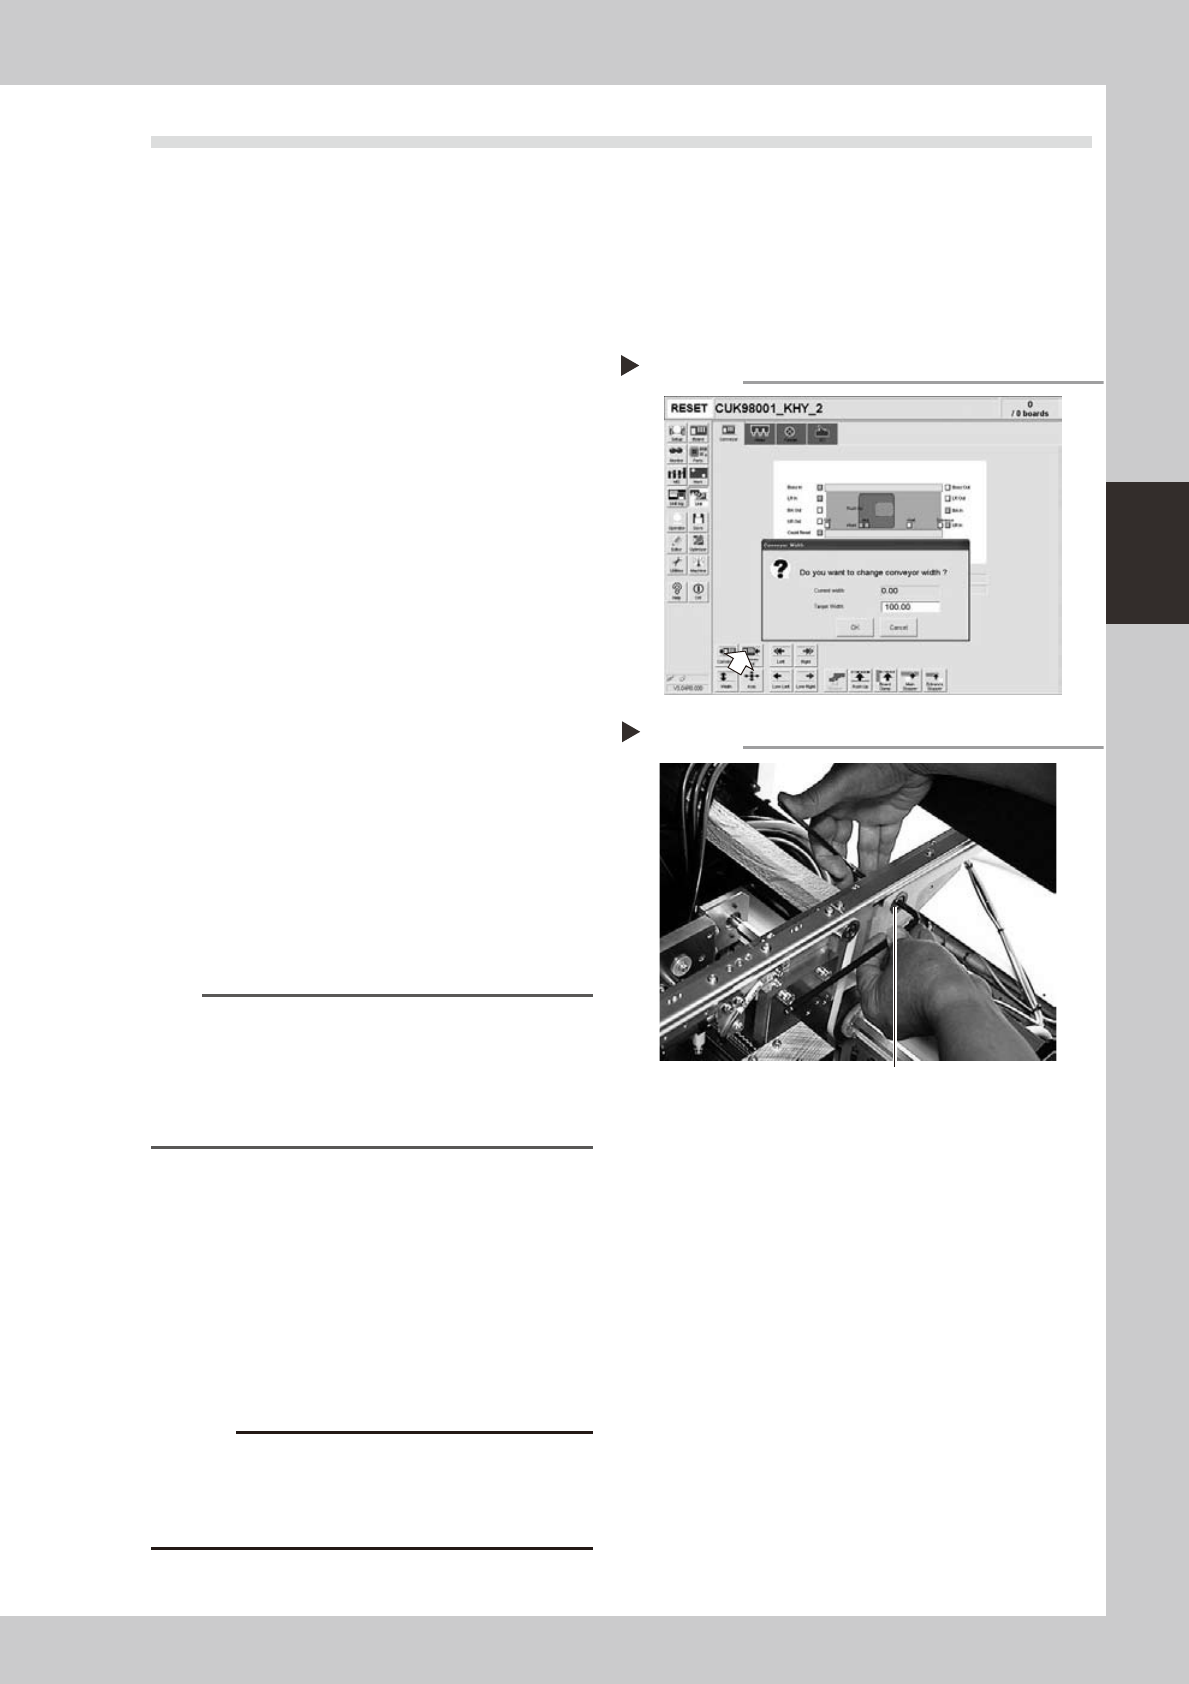
1
Change the conveyor width to a
convenient width for maintenance
work.
1. Press the [Width] button to display the
"Conveyor Width" dialog.
2. In the "Target Width" box, enter a width
large enough for maintenance work
(about 200mm) and press [OK].
The conveyor is changed to the width
that was just entered.
54304-L6-00
e
2
Loosen the tension on the conveyor
belt.
Press the emergency stop button and then
use a 4mm and 5mm hex wrenches to
loosen the belt tension.
53332-L6-00
3
Remove the conveyor belt.
Remove the conveyor belt from the pulley
and the belt groove of the board guide.
4
Check for wear on the board
conveying side of the conveyor belt.
After removing the belt in step 3, check for
wear on the board conveying side of that
conveyor belt.
TIP
About half (3 to 4 mm) the belt width is used for board
conveying. If the board conveying side of the conveyor
belt is worn, then you can still reuse the belt by switching
the used side with the opposite side. However, this will
cause errors after long-term use, so early belt
replacement is recommended.
5
Clean the pulley and the belt
groove on the board guide.
Using a vacuum cleaner or similar device,
suction up the belt wear dust deposited in
the belt groove or on the sensor surface. Also
use a vacuum cleaner while brushing debris
away with the brush supplied with the
machine.
Also clean the pulley and other parts for the
conveyor belt.
c
sometimes adhere to and darken the outer
Changing the conveyor width
Step 1
Step 2
Tensioner bolt
Loosening the tension on the belt
3-16
3
Periodic maintenance items
3. Three-month inspection
3.1 Cleaning and replacing the ejector filter
Althoughdependingontheairsupplyconditionsandoperatingtime,ejectorsshouldbeinspectedonceevery
3months.Useanairblowguntoremovedustbuildupswhensmall.Werecommendreplacingtheairfilterif
heavydustdepositsarefound.
1
Move the head all the way to the
front end of the Y axis.
On the [Unit]-[Head] tab (or [conveyor] tab)
screen, press the [Axis] button to open the
"Move Axis" screen. Then move the head
assembly all the way to the front of the Y
axis (front of machine).
TIP
The ejector unit is located at the front of the head
assembly. It is easier to inspect the ejector filters when
the head assembly is positioned to the front side of the
Y axis. (Inspect the ejector filters from the front of the
machine.)
e
2
Press the emergency stop button.
The machine should be in emergency stop
to ensure safety during work.
3
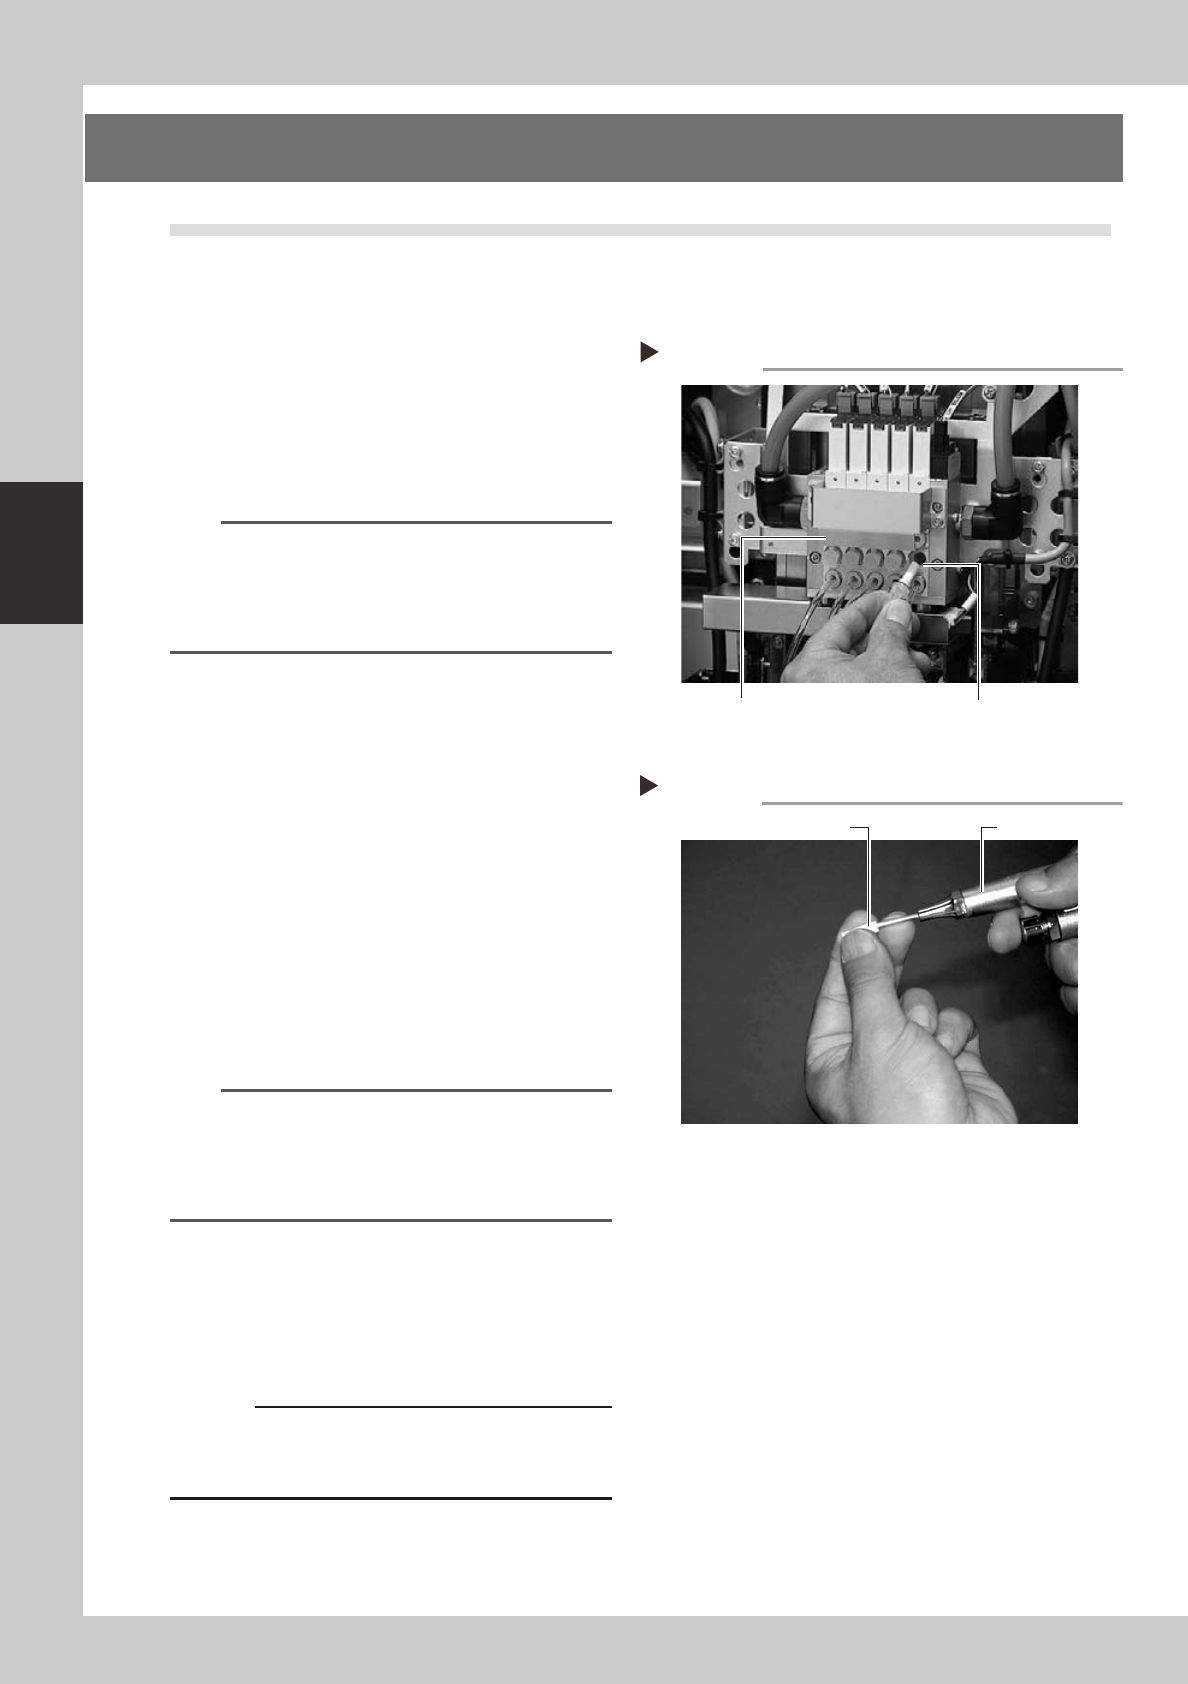
Remove the filter cap.
Loosen and remove the filter cap with a
slotted screwdriver.
53340-L6-00
4
Clean the filter.
Use tweezers to take the filter out of the
ejector. When there is only a little dust in the
filter, use an air blow gun to blow it away
and return the filter back to the original
position.
53316-L6-00
n
NOTE
If there are heavy dust deposits in the filter or the filter
has discolored, replace it with a new filter (K46-M8527-
C0X). As a general guide, filters should be replaced
once every 3 months, although this depends on the
actual operating time.
5
Reattach the filter cap.
1. Fit the filter into the filter cap and insert it
into the ejector.
2. Turn the filter cap to the right until it locks
and clicks.
c
Cleaning the filter
Step 4
Air blow gunFilter
Removing the filter cap
Step 3
Ejector unit Ejector filter
O-ring
Filter cap
3-17
3
Periodic maintenance items
3.1.1 Checking the ejector vacuum pressure
Checkthevacuumlevelofeachejectoroftheejectorunittoseeifitisworkingcorrectly.
e
1
Press the emergency stop button.
The machine should be in emergency stop
to ensure safety during work.
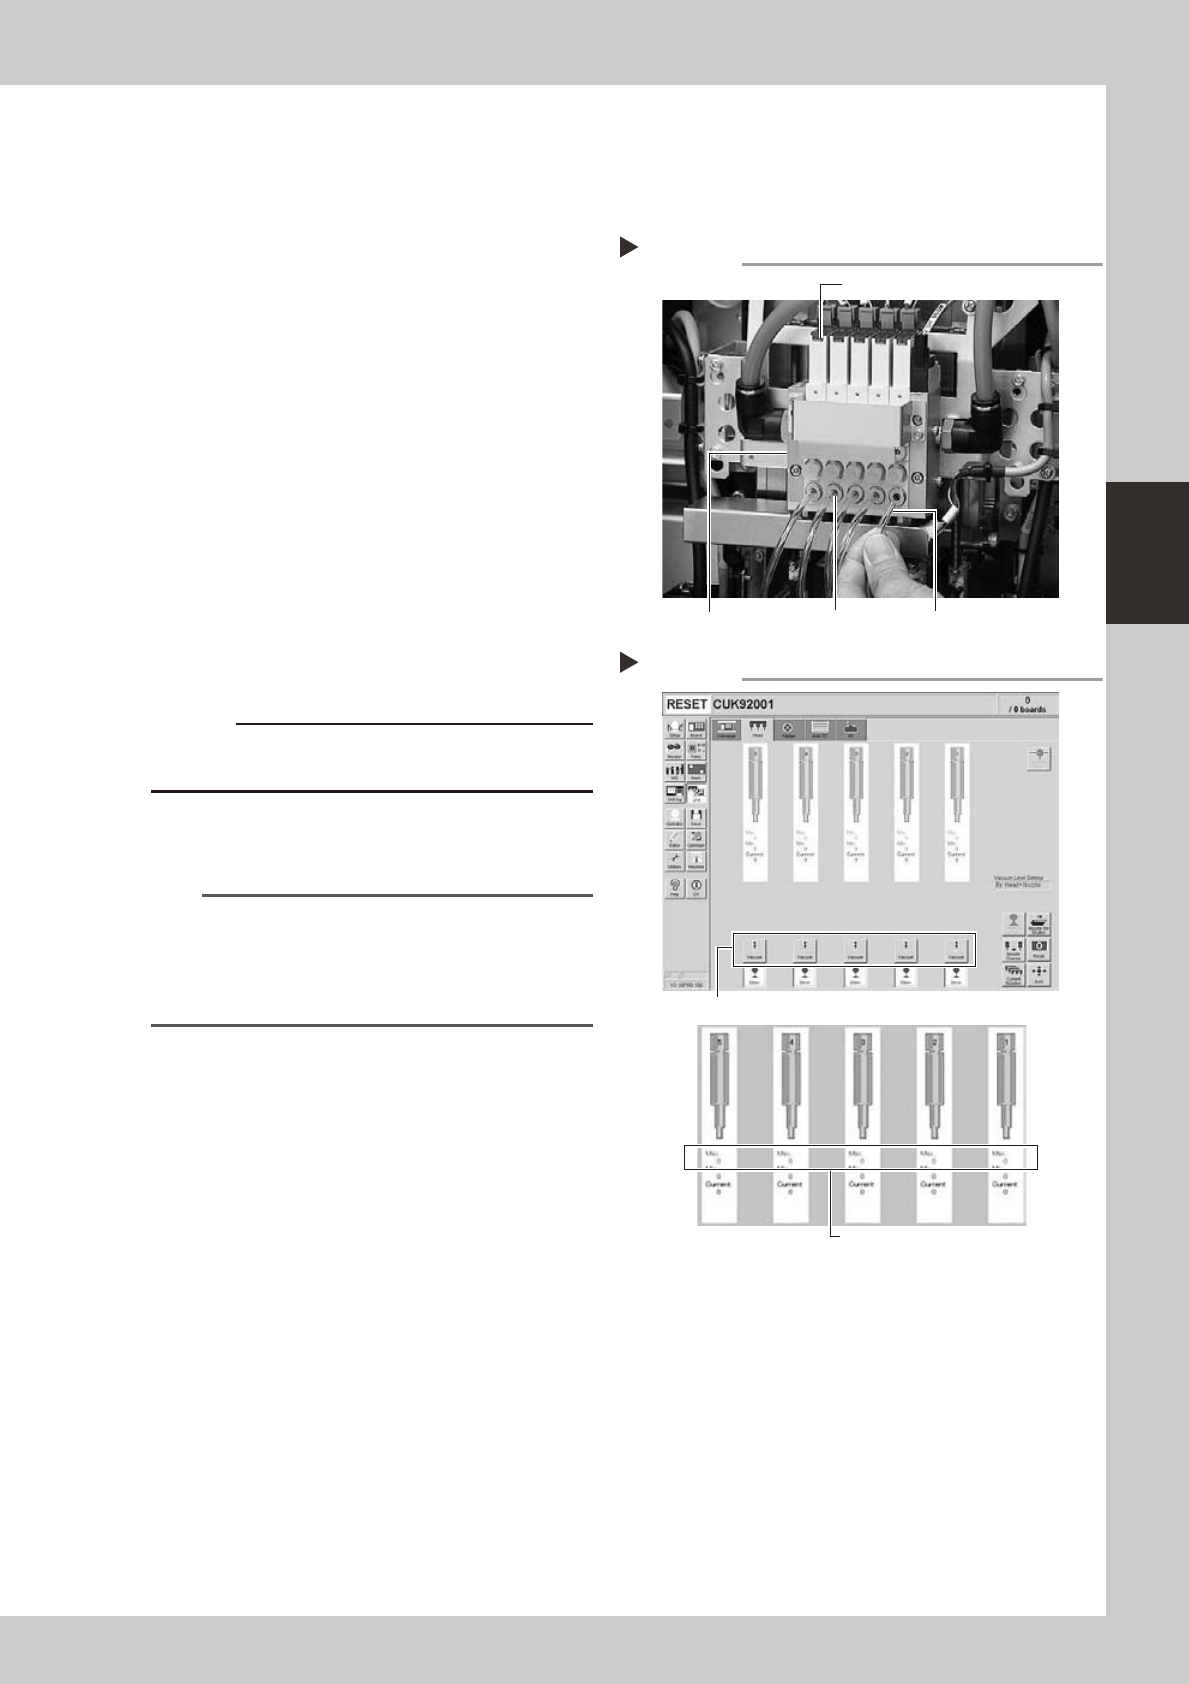
2
Disconnect the air hose from the
air joint under each ejector.
Disconnect all air hoses from the air joints (air
couplings).
53333-L6-00
3
Check the ejector vacuum level.
1. Open the [Unit]-[Head] tab.
2. Press the [Vacuum] button while blocking
each air joint with your finger.
3. Make a note of the "Max" reading of
each head while the air joint is blocked,
and check that the reading is higher
than the criterion value below.
Make the same check for all heads.
54305-L6-10
c
to wear safety goggles.
n
Criterion of ejector vacuum level
Whenairjointisblocked:190ormore
TIP
If the vacuum level of any head does not reach the
criterion value, then check the air path in the head
(interior of the spline shaft or air hose between the
ejector and spline shaft). Clean or replace it if
necessary.
Disconnecting the air hoses
Step 2
Transparent air hoseAir jointEjector unit
Ejector
Checking the vacuum levels
Step 3
Press the [Vacuum] button for each head.
Check "Max" vacuum levels
(with air joint blocked).