YS12P_YS12F_YG12F_Mainte_E.pdf - 第92页
4-5 4 How to replace consumable parts 3. Cleaning and replacing the conveyor belts e 1 Pr ess the emergency stop button. The machine m ust be in emergency stop to ensure safety during work. 2 Slacken the belt. Loosen the…
4-4
4
How to replace consumable parts
2.3 Replacing the cleaning blow valve
1
Turn off the air supply and the
power to the machine.
Quit the software and turn off the machine
power switch. Then turn the air supply/shutoff
valve inside the machine lower left panel to
the right, to stop the air supply.
2
Move the head to a convenient
position for replacement work.
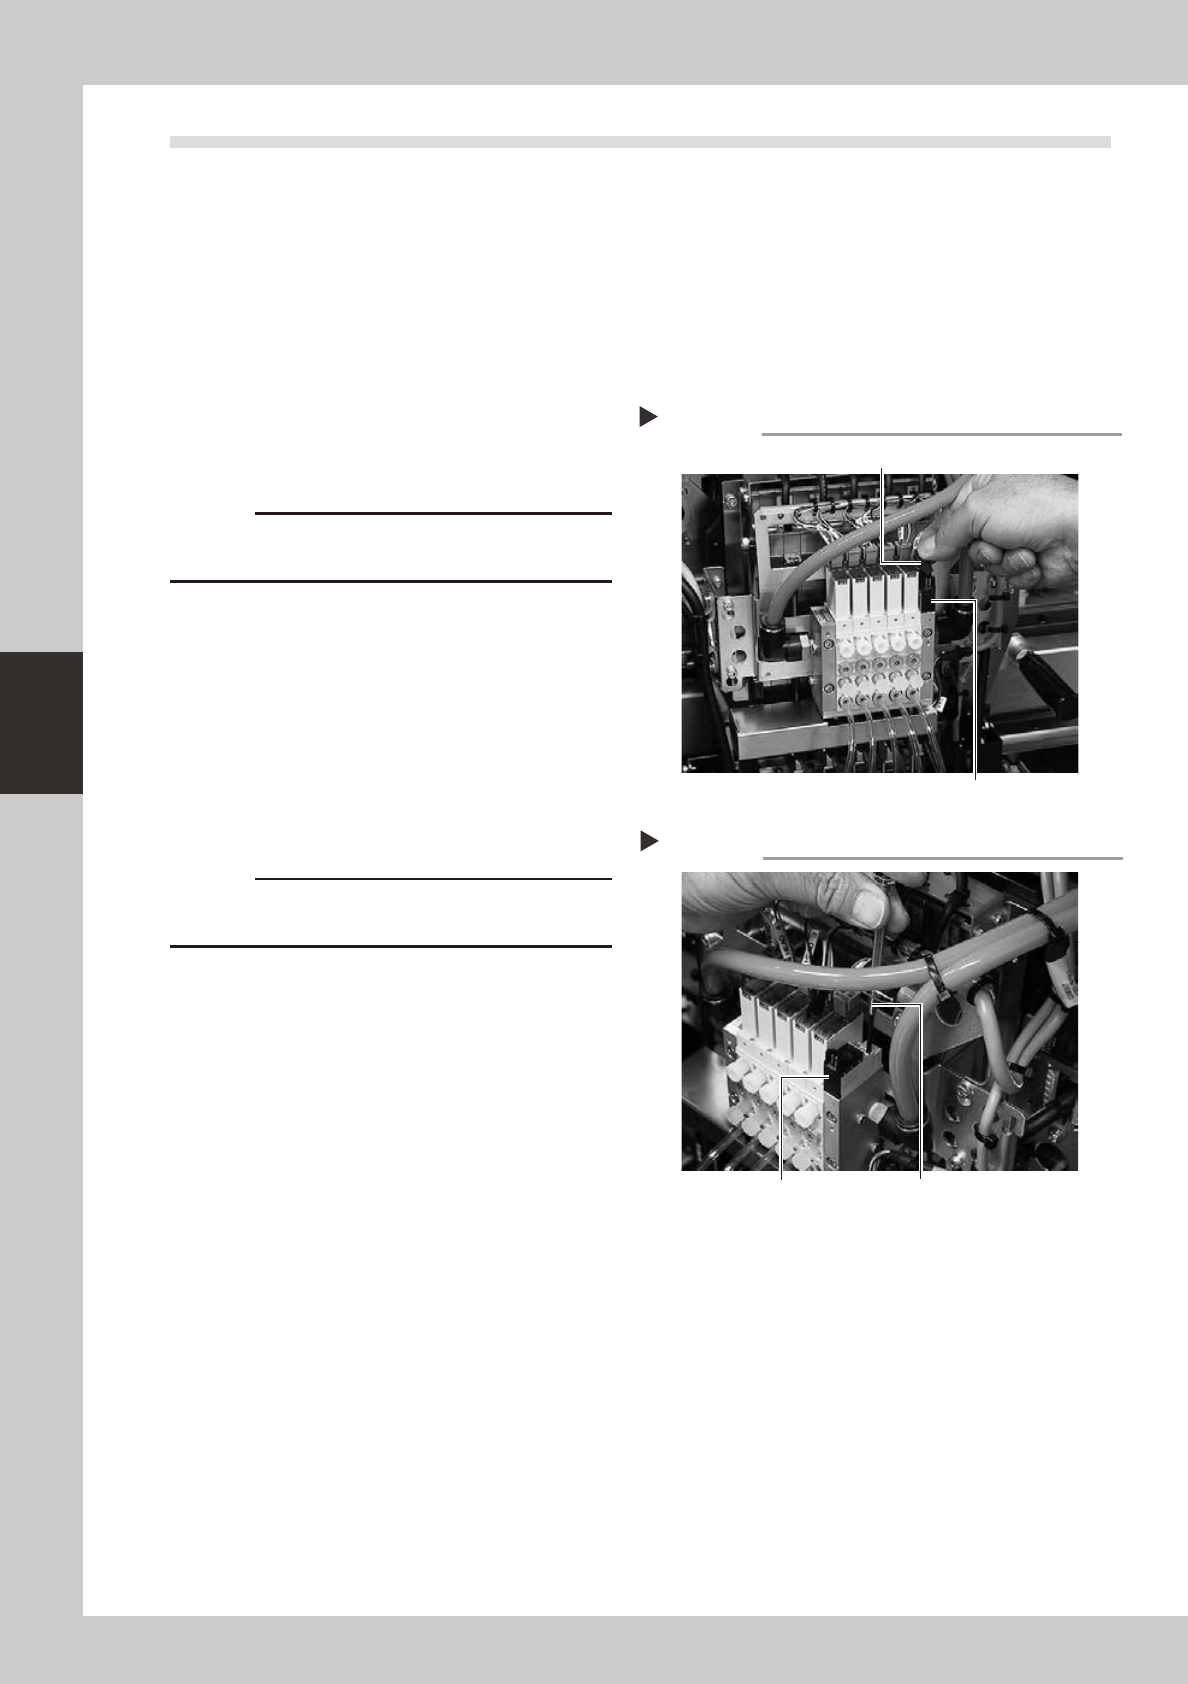
3
Disconnect the connectors of the
cleaning blow valve.
53406-L6-00
c
harness.
4
Remove the cleaning blow valve.
Use a precision Phillips screwdriver to loosen
the two screws securing the cleaning blow
valve and then remove the blow valve.
53407-L6-00
5
Attach a new cleaning blow valve
using the reverse procedure of step 4.
Also reconnect the air hoses and connectors
back to their original positions.
c
out or pinch it.
6
Supply air to the machine and turn
on the machine power.
When the machine has started, perform
return-to-origin.
7
Check the operation.
Generate a negative pressure (vacuum)
with the same procedure described in 3.1.3,
"Checking the cleaning blow valve
operation" in Chapter 3, and check that no
abnormal values appear.
Disconnecting the connector
Step 3
Blow valve connector
Blow valve
Removing the cleaning blow valve
Step 4
Precision Phillips screwdriverBlow valve

4-5
4
How to replace consumable parts
3. Cleaning and replacing the conveyor belts
e
1
Press the emergency stop button.
The machine must be in emergency stop to
ensure safety during work.
2
Slacken the belt.
Loosen the belt tensioner bolt with the M4
hex wrench and slide the bolt fully along the
elongate hole (in the direction of slackening
the belt).
53417-L6-00
3
Detach the belt.
Using the M3 hex wrench, loosen the bolt
securing the belt drive pulley and pull out
the shaft. Then detach the belt from the
pulley and take it out through the space
between the pulley and the shaft.
53418-L6-00
4
Remove the board clamp assembly.
Using the M3 hex wrench, remove the two
bolts securing each board clamp assembly
and remove the board clamp assemblies
(two assemblies per belt).
53419-L6-00
Loosening the belt tensioner bolt
Step 2
Tensioner bolt
Removing the shaft
Step 3
Shaft
Drive pulley
Removing the board clamp assembly
Step 4
Board clamp assembly Board clamp assembly mounting bolt

4-6
4
How to replace consumable parts
5
Detach the belt from the conveyor.
53421-L6-00
6
Clean the conveyor rail.
Use a fine brush or cleaning cloth to clean
the gap between the conveyor rail and
board guide.
7
Attach a new belt.
1. Temporarily fit a new belt onto the pulley.
2. Reconnect the shaft to the pulley and
tighten the bolt.
3. Tighten the belt tensioner bolt while
applying a proper tension to the belt by
moving the belt tensioner bolt.
c
Always set the belt tensioner (pulley) tightening torque
8
Reattach the board clamp assembly.
1. Install the board clamp assembly in the
original position and temporarily tighten
the bolts to secure the board clamp
assembly.
2. On the [Unit] – [Conveyor] tab, press the
[Board Clamp] button to raise the board
clamp assembly and tighten the bolts
securely.
53422-L6-00
c
and the board clamp raised.
9
Check the belt rotating condition.
1. Open the [Unit]-[Conveyor] tab, and
press the [Board Clamp] button again to
unclamp. At this point, make sure that the
top of the board clamp assembly is
0.5mm lower than the upper surface of
the belt.
2. On the [Unit]-[Conveyor] tab, press the
[Conveyor In] button or [Conveyor Out]
button to turn on the conveyor motor
and check the belt rotation.
3. If the rotation speed fluctuates or there is
slack in the belt, adjust the position of the
tensioner bolt and then check the
rotation again.
Step 5
Detaching the belt from the conveyor
Pull out the belt.
Installing the board clamp assembly
Step 8
Board clamp assembly
0.5 mm
Board clamp
Belt upper surface