00198519-03_UM_LDU_2_X_DE_EN_CHS-ZH.pdf - 第161页
4 Operation 4.1 Settings in SIPLACE Pro User Manual / Bedienungsanleitung / 用户手册 SIPLACE Linear Dipping Unit 2 X 05/2020 161 4.1.11 Setting the cicatrization time of the flux If longer standstill (inactive) times during …
4 Operation
4.1 Settings in SIPLACE Pro
160 User Manual / Bedienungsanleitung / 用户手册 SIPLACE Linear Dipping Unit 2 X 05/2020
4.1.9 Setting the creep distance
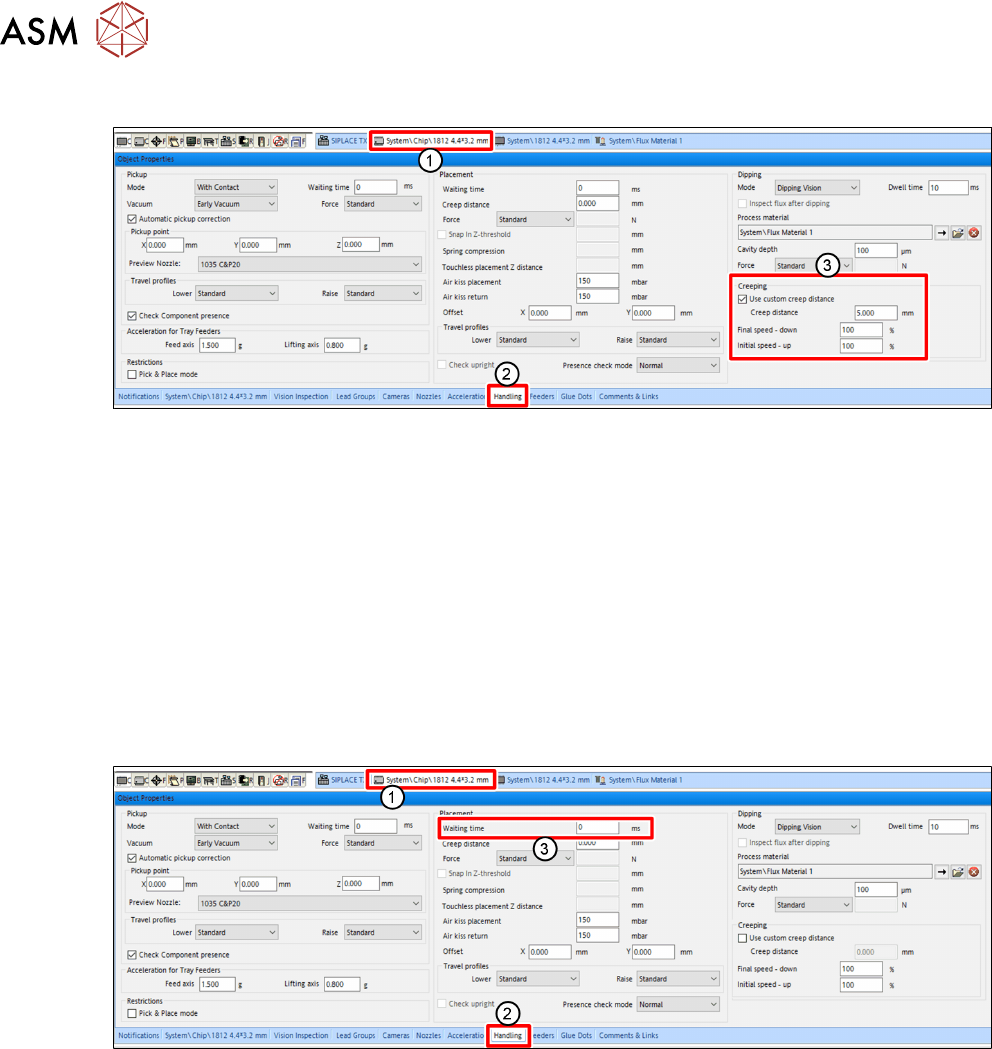
► In SIPLACE Pro, click on the tab of the component shape of the desired component(1).
► Click on the Handling tab(2) in the Object Properties view.
► Enable the Use custom creep distance option(3) under Creeping(3) in the Dipping area.
► Enter the desired length of the creep distance in the Creep Distance entry field.
► In the Speed down end entry field, enter the desired speed down.
► In the Speed up start entry field, enter the desired speed up.
For more information to creep distance, speed down and speed up, see chapter 3.3.7 "Creep dis-
tance" [}144].
4.1.10 Setting the waiting time
Depending on the component and the flux used, it can be advantageous to hold the component on
the PCB for a short waiting time during the placement process.
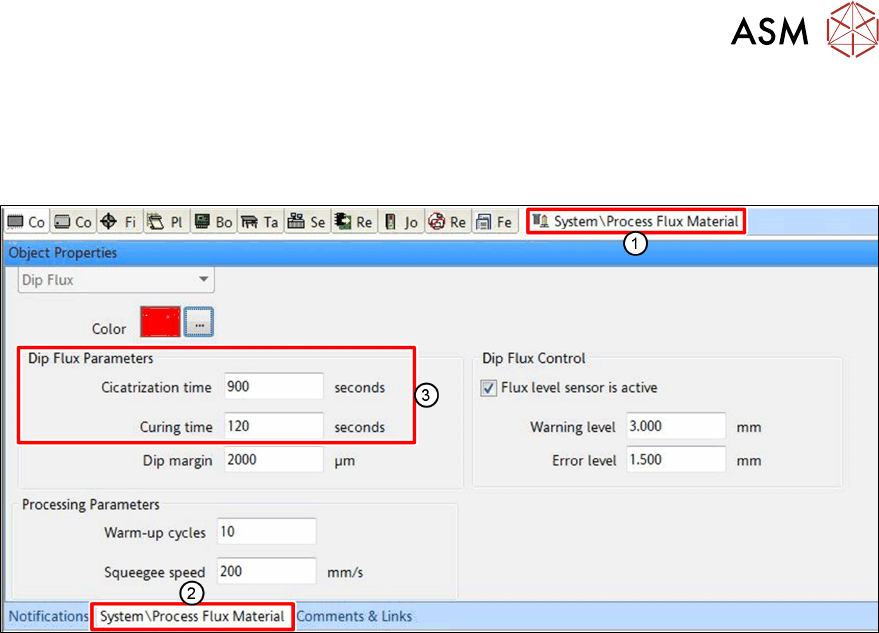
► In SIPLACE Pro, click on the tab of the component shape of the desired component(1).
► Click on the Handling tab(2) in the Object Properties view.
► Enter the Waiting time in milliseconds [ms] in the Waiting Time entry field (3) in the Place-
ment area.
4 Operation
4.1 Settings in SIPLACE Pro
User Manual / Bedienungsanleitung / 用户手册 SIPLACE Linear Dipping Unit 2 X 05/2020 161
4.1.11 Setting the cicatrization time of the flux
If longer standstill (inactive) times during the production run can be expected, you should set the ci-
catrization time of the flux used. The LDU will then perform an application run after this period has
expired.
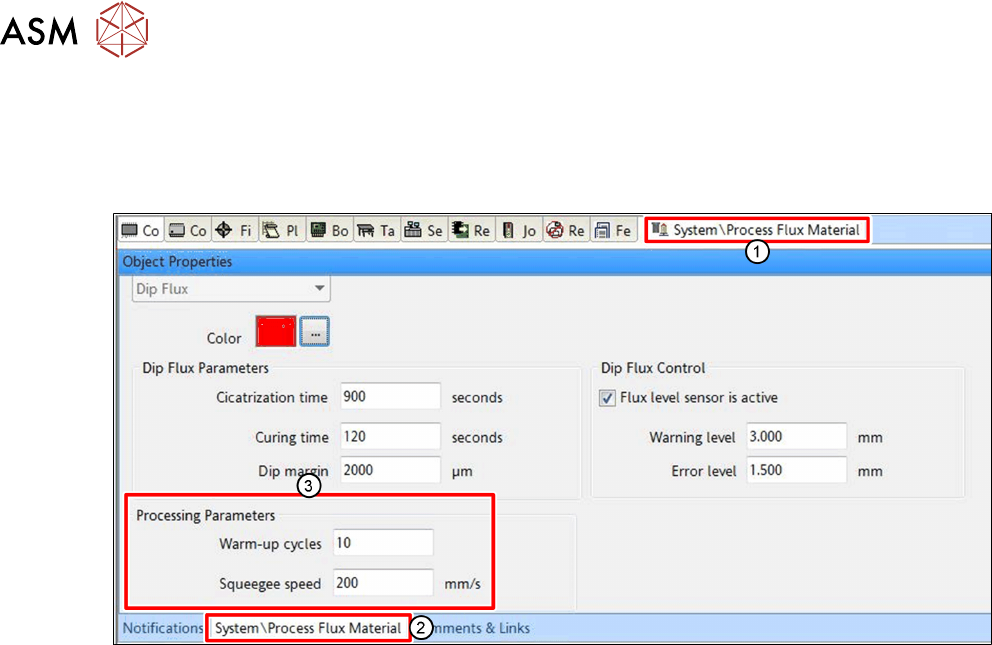
► In SIPLACE Pro, click on the tab of the relevant flux(1).
► Click on the tab of the flux(2) in the Object Properties view.
► Enter the cicatrization time of the flux used in seconds [s] in the Cicatrization time entry field
in the Dip Flux Parameters
area(3).
► Enter the curing time of the flux used in seconds[s] in the Curing time entry field in the Dip
Flux Parameters area(3).
Curing time defines the maximum time that must not be exceeded between dipping and pla-
cing a component.
For more information on the cicatrization time of fluxes, see chapter 3.3.3 "Cicatrization
time" [}142].
4 Operation
4.1 Settings in SIPLACE Pro
162 User Manual / Bedienungsanleitung / 用户手册 SIPLACE Linear Dipping Unit 2 X 05/2020
4.1.12 Setting the warm-up cycles and the squeegee speed
During the warm-up cycle, the LDU performs a set number of squeegee processes to prepare the
flux.
The squeegee speed is the speed with which the squeegee axis applies the flux in the cavity.
► In SIPLACE Pro, click on the tab of the relevant flux(1).
► Click on the tab of the flux(2) in the Object Properties view.
► Enter the number of squeegee processes which are to be performed during the warm-up
cycle in the Warm-up cycles
entry field in the Processing Parameters area (3).
► Enter the squeegee speed in millimeter per second [mm/s] in the Squeegee speed entry field
in the Processing Parameters
area (3).