SOM-1735-001.pdf - 第50页
*3 St atus Indication *4 [Cancel] Button *5 [End] Button When this button is pressed, a "Confirmation" dialog box opens. Fig. 102 *6 Control Switch When the [ENABLE] button on the front operation p anel is pres…

When the [Camera Sensitivity Check] button is pressed to check
the sensitivity of the camera, the background color of the button
turns yellow and the steps to be followed appear in "*2".
*2 Teaching Selection Buttons
Displayed are the steps to be followed for the teaching operation
on the item selected in "*1".
[1. Jig Atch (XY MVT)]
[2. Move to Head #1 Cam Lock]
Unlock Cam.
[3. Noz Sel (Noz #5 on Hd #1)]
Lock Cam.
[4. Move to 0 deg Place Posn.]
[5. Vacuum ON]
Attach Recog Jig (0124) to Nozzle.
[6. Move to Rcg Sta (XY Org).]
[7. Camera Sens Check ON]
[8. Jig Dtch (X/Y MVT)]
Detach Recog Jig (0124).
[9. Vacuum OFF]
[10. Move to H, X/Y Org Posn.]
9.1 "Comp. Recog. Light" Tab
0307-001 48 Tg0930-PM-SO

*3 Status Indication
*4 [Cancel] Button
*5 [End] Button
When this button is pressed, a "Confirmation" dialog box opens.
Fig. 102
*6 Control Switch
When the [ENABLE] button on the front operation panel is
pressed in two seconds after the [ON] button (entitled "MOVE")
is pressed, teaching operations are performed to obtain the
offset data.
9.1 "Comp. Recog. Light" Tab
0307-001 49 Tg0931-PM-SO
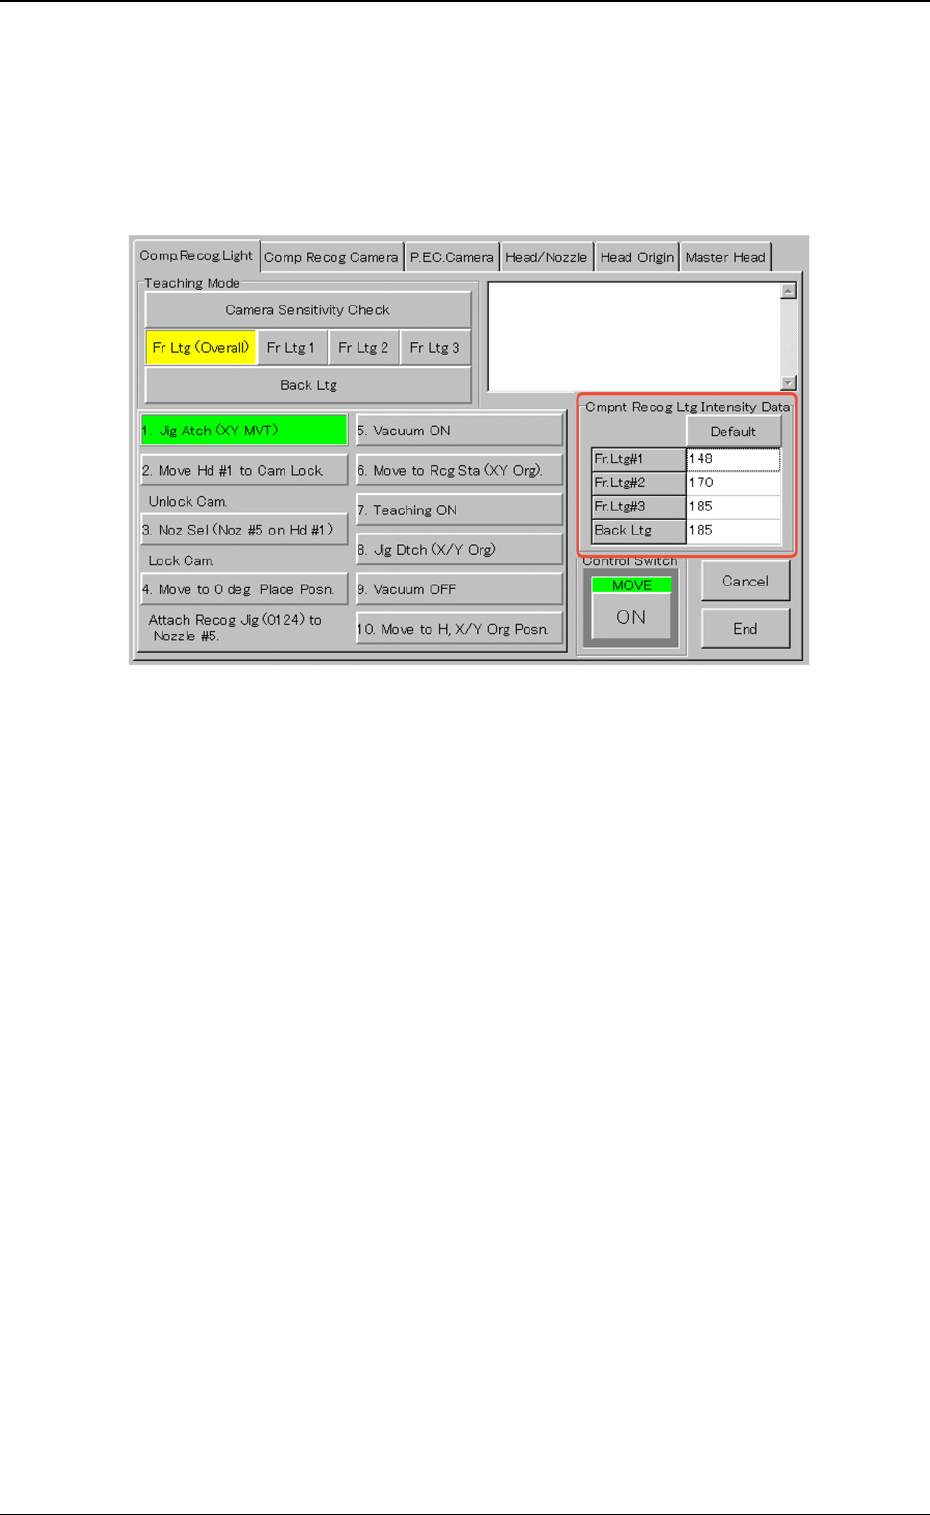
9.1.2 Teaching Operation on Lighting Intensity for Camera
When one of the buttons ([Fr Ltg (Overall)], [Fr Ltg 1], [Fr Ltg 2], [Fr Ltg
3] (Option)], and [Back Ltg] buttons) is pressed, the "Cmpnt Recog Ltg
Intensity Data" group box appears.
Fig. 103
When the [Default] button is pressed, a numerical value in each text
box is changed to the default.
9.1 "Comp. Recog. Light" Tab
0307-001 50 Tg0930-PM-SO