88192278-01-19 Installation Master.pdf - 第177页
POWER UP SEQUENCE GENERAL Chapter Issue 10, Nov 19 Installation Manual 5.1 CHAPTER 5 POWER UP SEQUENCE GENERAL Before the machine is powered up, a fi nal check is required to ensure proper installation. When fully satisf…
PRINTER PREPARATION
PRE POWER UP CHECKS
4.74 Installation Manual Chapter Issue 15, May 20
Pneumatic Supply The printer requires a pneumatic supply of clean, non lubricated air which
should maintain a minimum pressure 5 Bar and a maximum of 8 Bar.
The air should be to ISO 8573.1 standard, quality class 2.3.3, where:
• 2 dirt = 1 micron
• 3 water = -20°C pressure dew-point
• 3 oil = 1mg/m³
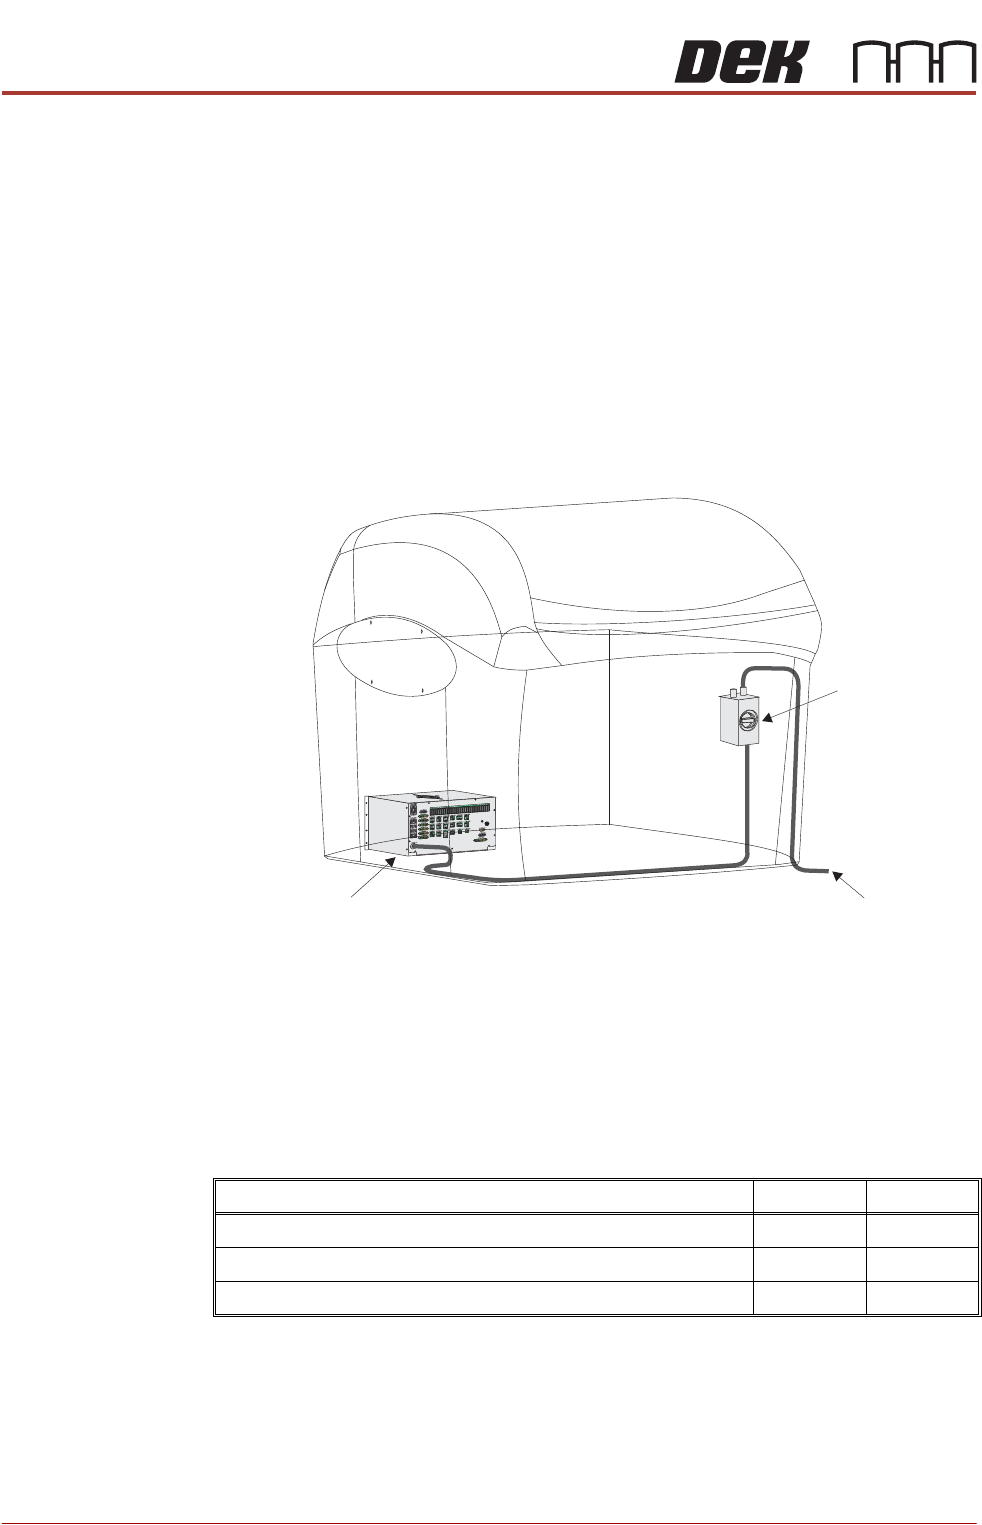
Electrical Supply The factory mains supply for the printer is routed through the front panel
mounted mains isolator switch and on to the M37 power supply enclosure where
various low voltages are distributed throughout the printer.
Figure 3-1 Mains Electrical Supply
The printer operates on 115V to 230V ± 10% 50/60Hz single phase AC mains.
ASM recommends a power supply capacity of 2.4KVA or greater.
ASM requires additional printer supply protection with the fitment of an external
double pole circuit breaker conforming to national, federal or local legislation.
Use the following table to ensure the recommended circuit breaker is used:
NOTE
An over current circuit breaker protects the printers internal wiring and
components from overheating or catching fire during fault conditions. Under no
circumstances must a circuit breaker of value greater than 20 Amps be fitted.
115 Volts 230 Volts
Wall Mounted Type C Circuit Breaker (without Vacuum Unit) 10 Amp 6 Amp
Wall Mounted Type C Circuit Breaker (with VF25 Vacuum Unit) 16 Amp 10 Amp
Wall Mounted Type C Circuit Breaker (with VF30/355 Vacuum Unit) 16 Amp 10 Amp
To Factory Mains Supply
Mains Isolator
Switch
M37 Power Supply Enclosure

POWER UP SEQUENCE
GENERAL
Chapter Issue 10, Nov 19 Installation Manual 5.1
CHAPTER 5 POWER UP SEQUENCE
GENERAL Before the machine is powered up, a final check is required to ensure proper
installation. When fully satisfied that all instructions and preparations have been
carried out as detailed in the Machine Preparation chapter, proceed with the
power up checks detailed in this section.
Electrical Services Measure the customers’ electrical supply to ensure that it is suitable for the
machine.
The machine operates on 115V to 230V ± 10% 50/60Hz single phase AC mains.

POWER UP SEQUENCE
MACHINE POWER UP SEQUENCE
5.2 Installation Manual Chapter Issue 10, Nov 19
MACHINE POWER UP SEQUENCE
Apply Systems
Power
1. Connect the pneumatic supply to the connection on the rear, bottom left of
the machine, External Services the Services Required chapter refers.
2. Connect the mains supply to the machine.
3. Turn the Mains Isolation Switch ON.
4. Select Diagnostics.
5. Ensure that System is highlighted and select Select Module.
6. Select the Previous button once to highlight Terminate Control Program.
7. Select Run Diagnost.
Date and Time In order for the machine PC to log events correctly, the system time, date and
correct time zone must be set.
Windows 7 1. Select the clock displayed at the right hand side of the Windows taskbar.
The following window is displayed:
2. Select Change date and time settings....