Horizon UserManualV6.pdf - 第143页
To enable screen library files carry out the following: 1. Highlight Screen Size in the Set Prefs page. 2. Using Incr. or Decr. select Screen Library . Edit Data is now available on the menu bar. 3. Select Edit Data, the…
Operator Command Issued Remote Barcode Received Comms Adjust ProFlow Pressure
Options.enb file Attribute Error Volume Alarm Evaluation Dongle Detected
Valid Dongle Detected Dongle Error Dongle Changed
Print Speed Front Print Speed Rear Print Speed
Comms Adjust Print Speed Comms Adjust Front Print Speed Comms Adjust Rear Print Speed
Vortex Cassette Replaced Maintenance Monitoring Initialis The Monthly Service is Due
The Six Monthly Service is Due The Yearly Service is Due Equipment Recovery
Equipment Setup Equipment Ready Equipment Maintenance
Equipment Waiting Equipment Running Equipment Down
Tooling Hardware Sets which type of tooling is fitted, options are:
AutoFlex; Vacuum; Magnetic; Vac for Flex
Fiducial Reference Sets whether the fiducial co-ordinates are specified relative to the front/left or
front/right corner of the board, options are:
Left; Right
2D Inspection Sets whether the 2D inspection facility is to be used, options are:
Enabled; Disabled
2Di Movement
Tuning
Used to determine whether camera movement is to be tuneable. While the value
is other than zero; the camera, upon arrival at an inspection site, is allowed to
settle for the period set before proceeding with acquisition and inspection.
Minimum 0 milliseconds
Maximum 250 milliseconds
Default 250 milliseconds
Increment 50 milliseconds
Screen Size Sets the screen size frame, options are:
265; Fuji; 249; Sanyo; Screen Library
With Screen Library enabled the printer is provided with detailed screen
dimensional information from a ‘read only’ library. This information is stored
within the machine configuration and product files.
Once selected in Set Preferences, detailed frame dimensions are provided to the
printer. In Edit Current Parameters, the parameter Image Data provides
comprehensive location and mesh details to the printer.
2.8 User Manual Software Version 6
SET PREFERENCES
PREFERENCES
To enable screen library files carry out the following:
1. Highlight Screen Size in the Set Prefs page.
2. Using Incr. or Decr. select Screen Library.
Edit Data is now available on the menu bar.
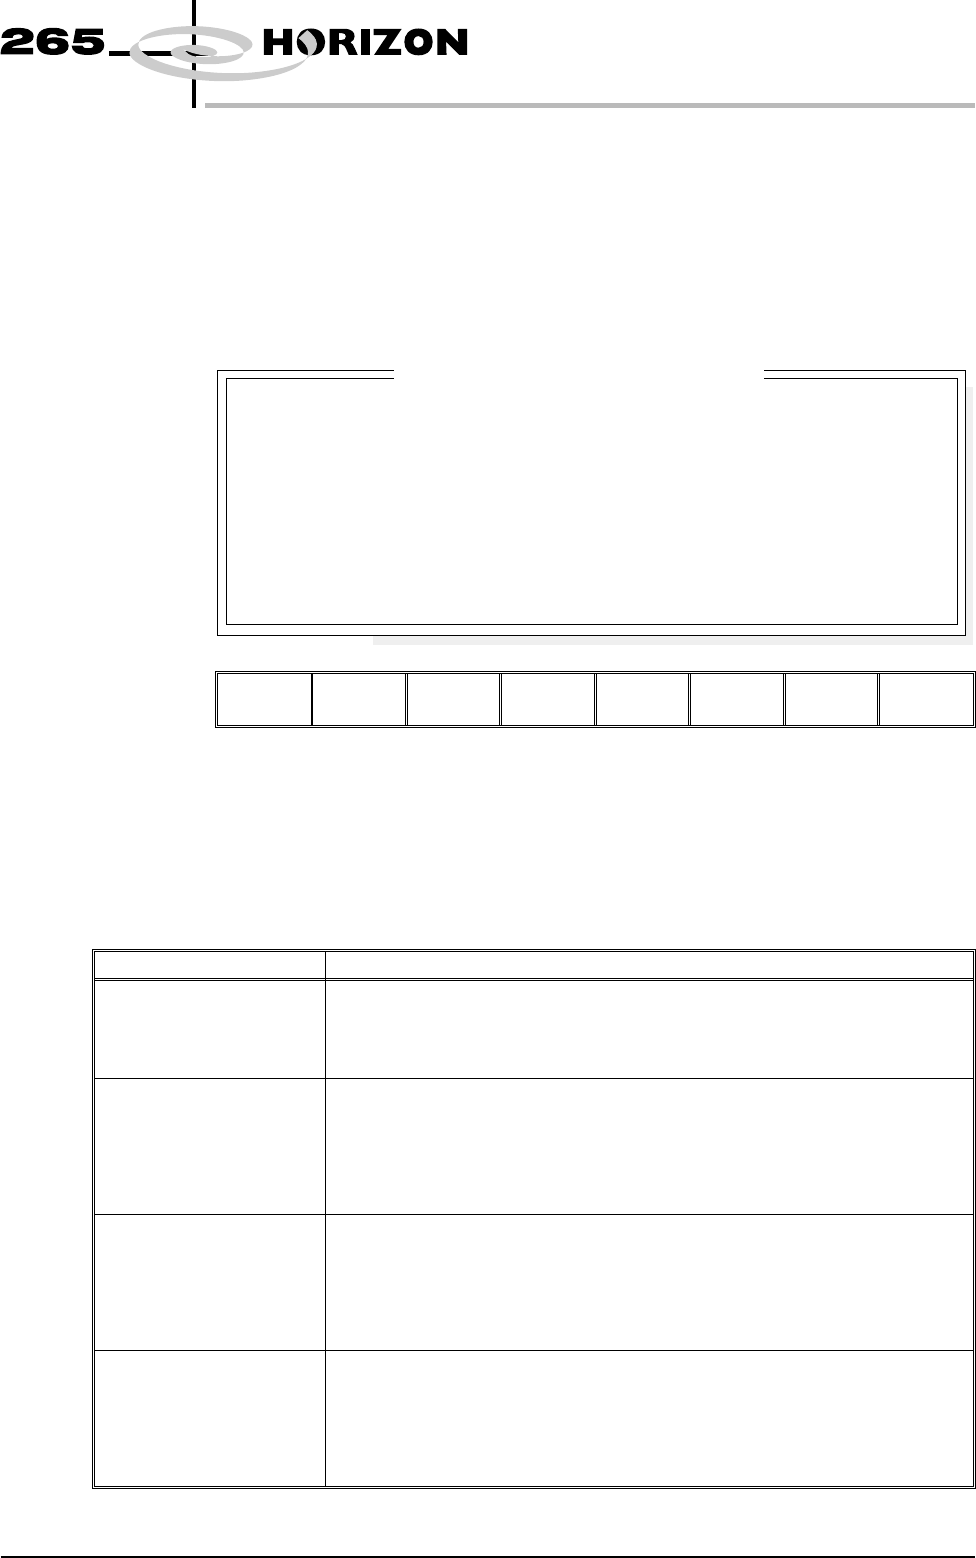
3. Select Edit Data, the following window and menu bar is displayed:
Next Previous Incr. Decr. Exit
Use Incr. or Decr. to select the required Screen Type. If no valid screen library
files are found, the default file DEK 265 Central Image is displayed.
Use the Next or Previous to select and Incr. or Decr. to modify the screen frame
parameters as required.
The screen library menu parameters are defined in the table below:
Parameter Definition
Screen Record ID The identity of the screen type library record containing a text string that
matches the Screen Type selected.
Format Maximum 32 character text string
Default DEK 265 Central Image
Screen Length This parameter sets overall dimension front to rear of the screen frame or
adaptor.
Minimum 550mm
Maximum 860mm
Increment 0.1mm
Default 736.6mm
Screen Width This parameter sets the overall dimension left to right of the screen frame or
adaptor.
Minimum 580mm
Maximum 736.6mm
Increment 0.1mm
Default 736.6mm
Frame Front This parameter sets the distance between the outer edge of the screen frame
or adaptor and the inner edge of the frame, at the front of the frame.
Minimum 20mm
Maximum Screen Length - 250mm
Increment 0.1
Default 38.1mm
Software Version 6 User Manual 2.9
SET PREFERENCES
PREFERENCES
SCREEN TYPE
SCREEN LENGTH
SCREEN WIDTH
FRAME FRONT
FRAME REAR
FRAME LEFT
FRAME RIGHT
DEK 265 CENTRAL IMAGE
XXX
XXX
XXX
XXX
XXX
XXX
mm
mm
mm
mm
mm
mm
Screen Frame Configuration
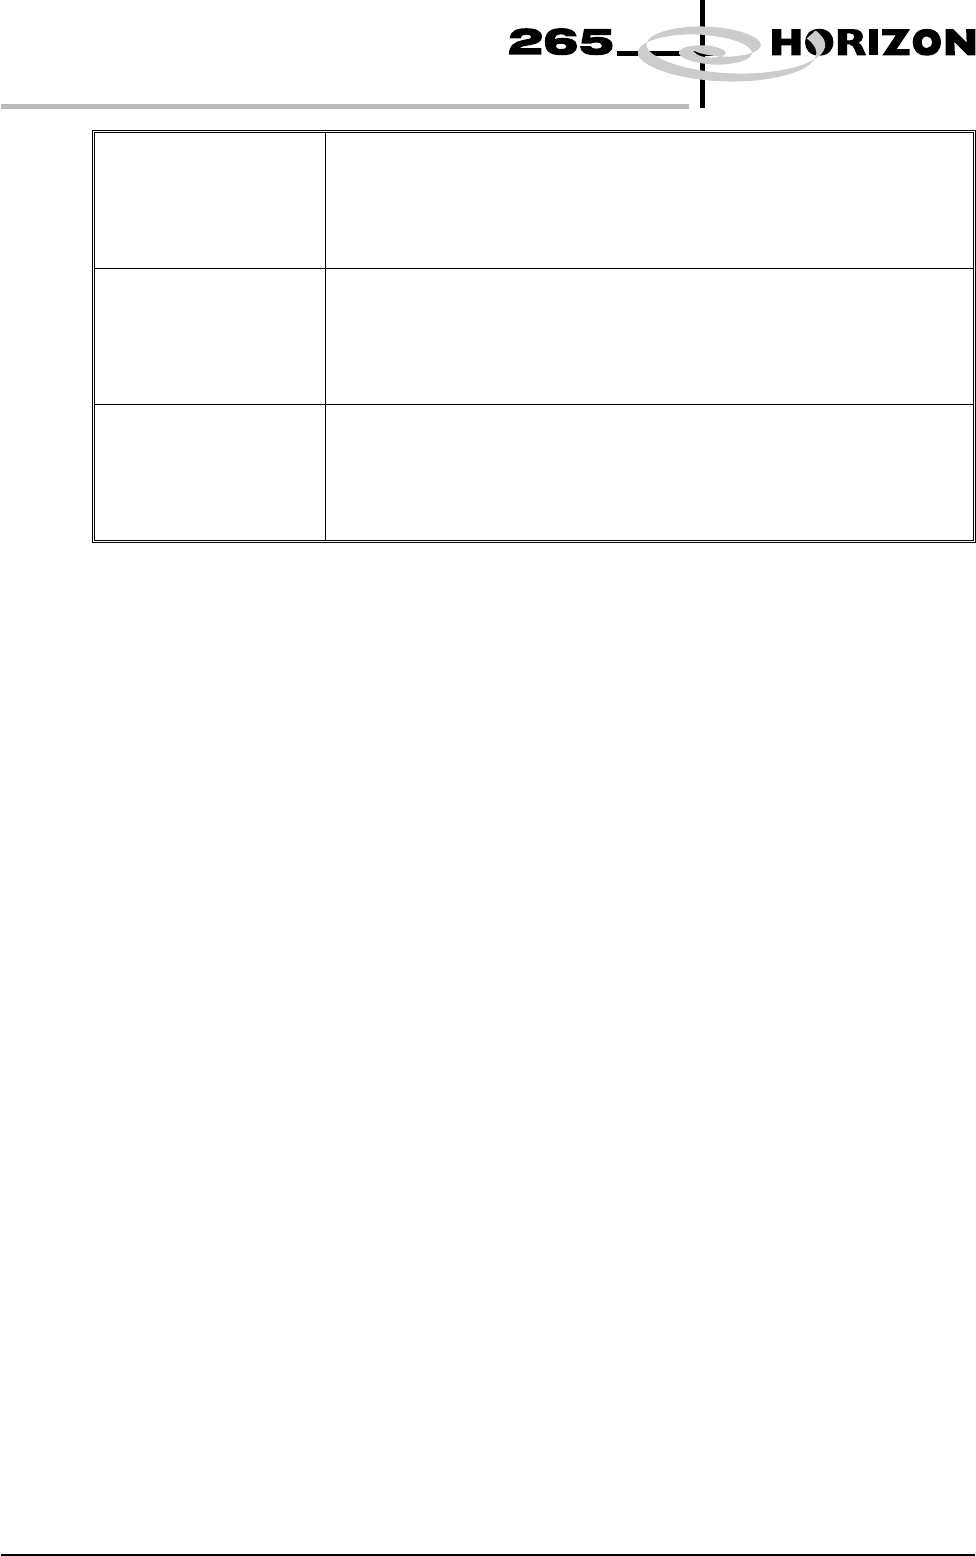
Frame Rear This parameter sets the distance between the outer edge of the screen frame
or adaptor and the inner edge of the frame, at the rear of the frame.
Minimum 20mm
Maximum Screen Length - 250mm
Increment 0.1mm
Default 38.1mm
Frame Left This parameter sets the distance between the outer edge of the screen frame
or adaptor and the inner edge of the frame, at the left of the frame.
Minimum 20mm
Maximum Screen Length - 250mm
Increment 0.1mm
Default 38.1mm
Frame Right This parameter sets the distance between the outer edge of the screen frame
or adaptor and the inner edge of the frame, at the right of the frame.
Minimum 20mm
Maximum Screen Length - 250mm
Increment 0.1mm
Default 38.1mm
Consumable Action Sets how the machine reacts to a cleaner paper low, cleaner solvent low, print
medium low or Vortex cleaning cassette expired, options are:
Warn; Pause; Suspend
Warn - A warning window is displayed, but printing proceeds without
interruption. The tricoloured beacon shows amber/green.
Pause - A pause on warning window is displayed and printing is delayed to
enable the user to either; replenish the consumable resource, or defer the
replenishment until later and continue printing. The tricoloured beacon shows
red.
Suspend - A suspend on warning window is displayed and printing is suspended
and remains suspended, until the consumable resource has been replenished.
The tricoloured beacon shows red. Before printing commences the consumable
resources are checked for availability, before allowing the print run to proceed.
Image Recording Sets whether video images can be recorded, options are:
Off; PC Disk; VP Disk
The default is Off.
PCdisk requires the PC to have 8Mb ram & VPdisk requires a SCSI disk to be
attached to the VP.
Under Screen
Cleaner
Sets whether or not the vacuum option is fitted to the machine, options are:
Vacuum; Standard
The default is Standard.
If standard is selected the vacuum options are removed from the screen clean
mode parameters. If Vortex under screen cleaner is fitted, vacuum is the only
option.
To enable the blue under screen cleaner carry out the following:
2.10 User Manual Software Version 6
SET PREFERENCES
PREFERENCES