晶圆测试说明书Cascade-11861-6-Manual.pdf - 第96页
72 • Summit 11K/12K Probe Station User’ s Guide M ICROSCOPE L IGHT IS N OT O N A UXILIARY P OWER D OES N OT F UNCTION (12000-series Only) N OTE The auxiliar y power test requires y ou to plug a light into A UX PO WER on …

Chapter 6: Troubleshooting •
71
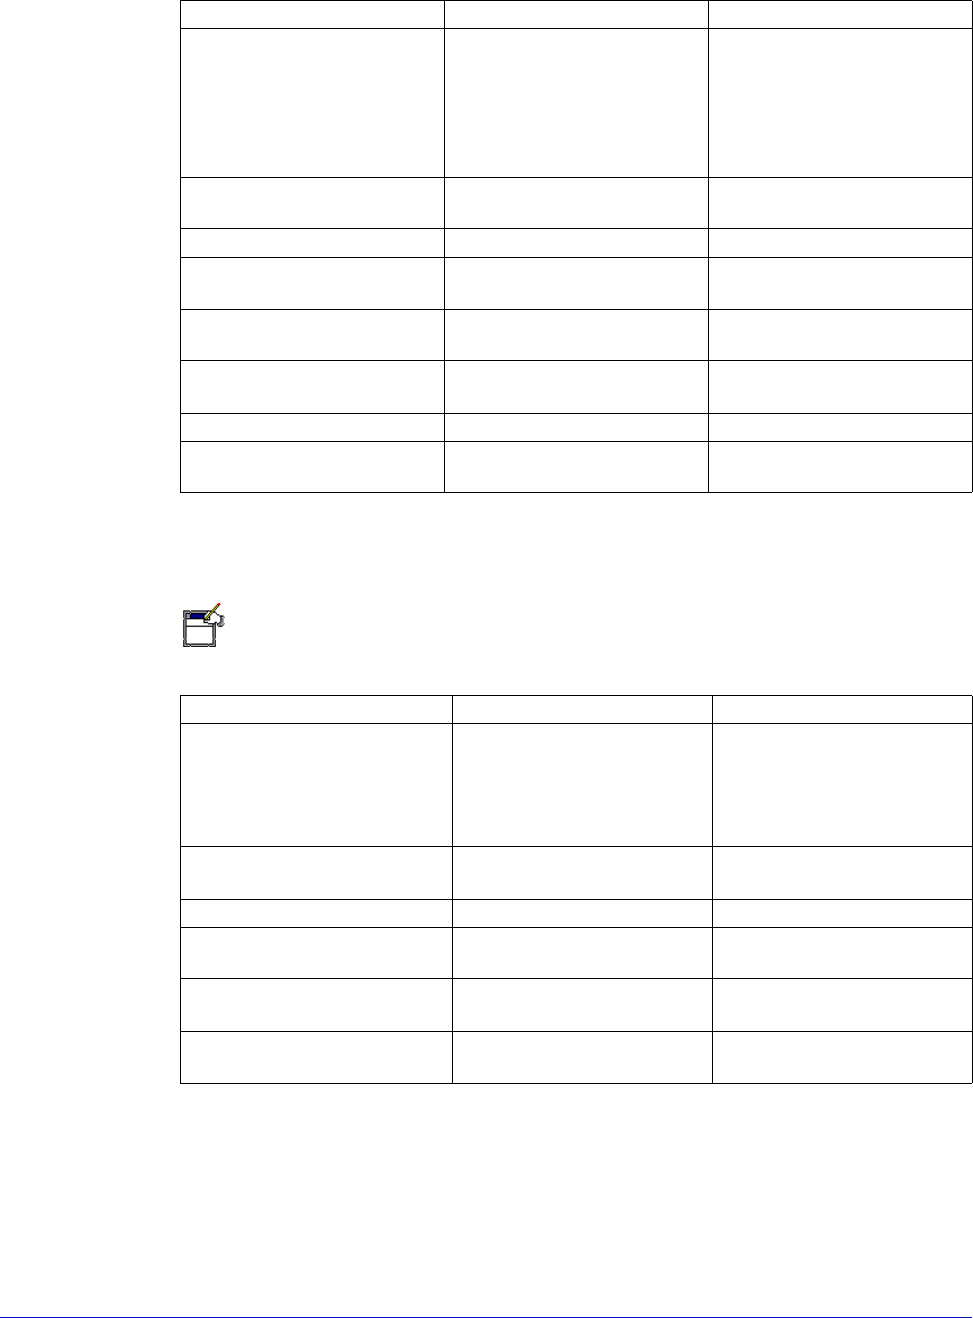
X-Y STAGE OR Z STAGE DOES NOT MOVE
VACUUM NOT DETECTED BY SENSOR OR WAFER NOT HELD ON CHUCK
JOYSTICK ERROR MESSAGE OR STAGE WANDERS IN JOYSTICK MODE
(12000-series Only)
Area to check Check this Refer to
Probe station
12000 and 11000-series
Shipping restraint
removed?
Installing
12000-series Fuses OK? ––
Plugged in and turned
on?
Installing
Main control cable
12000-series
Installed correctly? Installing
Installed in correct slots
at both ends?
Installing
No bent pins on
connectors?
Installing
Area to check Check this Refer to
Vacuum supply
12000 and 11000-series
Turned on? ––
At least 400 mm (15 in.)
of Hg?
––
Connected to VAC IN
on probe station?
Installing
Your DUT Flat on the chuck? ––
Centered on the
chuck?
––
Center vacuum size set
to not larger than your
DUT?
Verifying and Operating
Aux stage vacuum Correct size device(s) in
place where vacuum is
on?
Verifying and Operating
Turned off where not
used?
Verifying and Operating
Area to check Check this Refer to
Joystick tension Set to return the joystick
to center?
Reset, then reinitialize.
Verifying and Operating
Joystick cable Connected to
computer?
Reconnect, then
reinitialize.
Installing
If none of the above eliminates the problem, recalibrate the joystick. Refer to
the Control Panel in Windows.
72
• Summit 11K/12K Probe Station User’s Guide
MICROSCOPE LIGHT IS NOT ON
AUXILIARY POWER DOES NOT FUNCTION
(12000-series Only)
NOTE
The auxiliary power test requires you to plug a light into AUX POWER on the probe
station manifold.
Area to check Check this Refer to
Power for light Power cord plugged
into MICROSCOPE
POWER, not AUXILIARY
POWER on probe
station, or plugged into
wall outlet?
Installing
12000-series only Probe station power
connected?
Installing
12000-series only fuses Probe station fuse OK? ––
Light source fuse OK? Microscope
documentation
Light bulb OK? Microscope
documentation
Microscope Aperture shutter slide
open?
Microscope
documentation
TopHat cover Shutter open? Verifying and Operating
12000-series only
PCS status button
Indicates light is on? PCS User Guide and
online Help
Area to check Check this Refer to
Power for AUX Power cord plugged
into AUXILIARY POWER,
not MICROSCOPE
POWER on probe
station?
Installing
Probe station power
connected?
Installing
Fuses Probe station fuse OK?
Light source fuse OK?
Auxiliary equipment
documentation
Light bulb OK?
Auxiliary equipment
documentation
PCS status button Indicates power is on?
Nucleus or PCS User’s
Guide and online Help

Chapter 6: Troubleshooting •
73
Thermal Station Symptoms and Solutions
This section gives information on symptoms of thermal failures.
THERMAL CONTROLLER SHUTS DOWN
SET AND ACTUAL TEMPERATURE DO NOT MATCH
FROST OR MOISTURE APPEARS IN THE MICROCHAMBER
Area to check Check this Refer to
Thermal controller and
cooler
Adequate airflow
around units to prevent
overheating?
Thermal unit
documentation
Thermal equipment
power source
Source provides
115V@20A or
230V@10A
Overview, Installing
Area to check Check this Refer to
Thermal equipment
cables
All cables properly
connected?
Installing
Air dryer Airflow rate set to
3 SCFM after initial
purge?
Air dryer documentation
Thermal controller and
cooler
Adequate airflow
around units to prevent
overheating?
Thermal unit
documentation
Area to check Check this Refer to
MicroChamber All seals intact (includes
TopHat, access door,
sliding plates)?
Installing
Verifying and Operating
Coolant line
connections intact?
Installing
Air dryer Power on? Air dryer documentation
Dry air at air dryer input
(check air filters for
excess water)?
Air dryer documentation
Air dryer output blowing
into MicroChamber?
Installing
MicroChamber purged
at 7 SCFM for 15 minutes
(30 minutes initially)
before chilling chuck?
Verifying and Operating