晶圆测试说明书Cascade-11861-6-Manual.pdf - 第98页
74 • Summit 11K/12K Probe Station User’ s Guide F RO S T OR M OISTURE O UTSIDE THE M IC RO C HAMBER Tips for Using the Low-noise, Guar ded Thermal Chuck Area to check Check this Refer to Room Room humidity. If operating …
Chapter 6: Troubleshooting •
73
Thermal Station Symptoms and Solutions
This section gives information on symptoms of thermal failures.
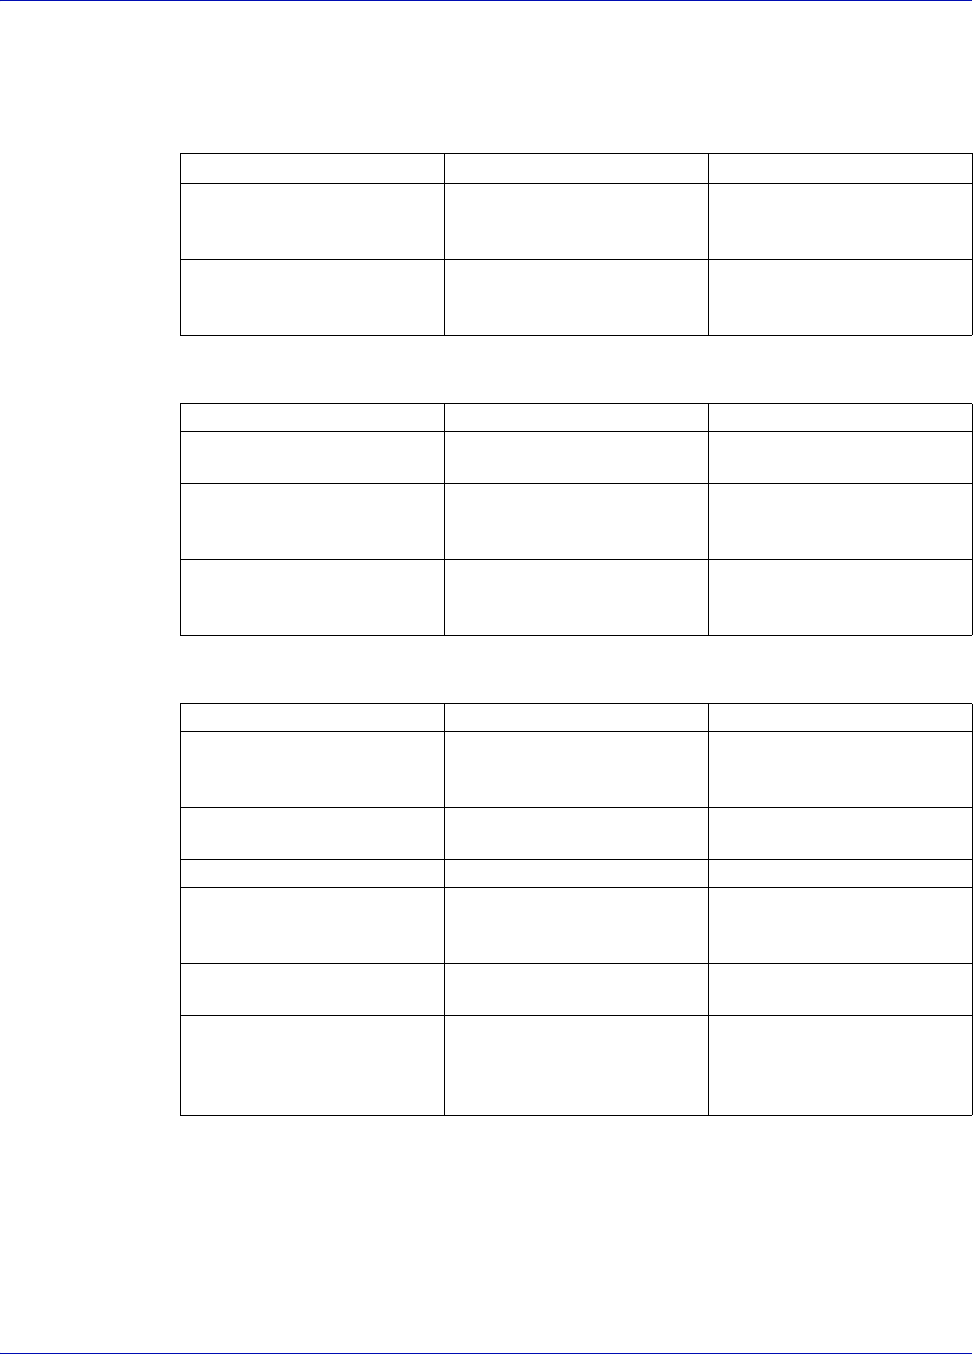
THERMAL CONTROLLER SHUTS DOWN
SET AND ACTUAL TEMPERATURE DO NOT MATCH
FROST OR MOISTURE APPEARS IN THE MICROCHAMBER
Area to check Check this Refer to
Thermal controller and
cooler
Adequate airflow
around units to prevent
overheating?
Thermal unit
documentation
Thermal equipment
power source
Source provides
115V@20A or
230V@10A
Overview, Installing
Area to check Check this Refer to
Thermal equipment
cables
All cables properly
connected?
Installing
Air dryer Airflow rate set to
3 SCFM after initial
purge?
Air dryer documentation
Thermal controller and
cooler
Adequate airflow
around units to prevent
overheating?
Thermal unit
documentation
Area to check Check this Refer to
MicroChamber All seals intact (includes
TopHat, access door,
sliding plates)?
Installing
Verifying and Operating
Coolant line
connections intact?
Installing
Air dryer Power on? Air dryer documentation
Dry air at air dryer input
(check air filters for
excess water)?
Air dryer documentation
Air dryer output blowing
into MicroChamber?
Installing
MicroChamber purged
at 7 SCFM for 15 minutes
(30 minutes initially)
before chilling chuck?
Verifying and Operating

74
• Summit 11K/12K Probe Station User’s Guide
FROST OR MOISTURE OUTSIDE THE MICROCHAMBER
Tips for Using the Low-noise, Guarded Thermal Chuck
Area to check Check this Refer to
Room Room humidity. If
operating in a high-
humidity environment,
then use a fan to direct
airflow across and
around the
MicroChamber.
--
When Do this
After installation and before first
use.(Summit 11700, 11800, 12700, and
12800 stations)
OR
Before use, if station has not been
used for several days.
Install the triax-shorting plug (P/N 104-
740) onto one of the chuck triax
connectors; keep the triax-shorting
plug installed for at least one hour.
N
OTE
Cascade recommends that you install
the shorting plug whenever the station
is not in use to prevent charges from
building up in the chuck. We also
recommend that you install the
shorting plug when you are not
measuring substrate current or biasing
the chuck.
After installation and before first use.
OR
Before use, if the station has not been
used for several days.
Turn on dry air with flow rate set to 3
CFM; keep airflow on for at least one
hour to dry out all moisture from
MicroChamber and chuck.
Before wafer unload and load. Turn the chuck temperature to 41°C to
prevent frost formation on the chuck
when the MicroChamber door is
open. Internal surfaces and hoses
drop to -50°C if the chuck
temperature is programmed to be less
than 40°C, or if the chuck is more than
10° warmer than the setpoint
temperature.
Before setting temperature below
40°C.
Turn on dry airflow to 2 - 3 CFM and
allow MicroChamber to purge for 10 -
15 minutes.
During measurements. Make sure that the wafer is on the
chuck and vacuum is turned on.
Sufficient vacuum is required.
Insufficient vacuum can increase
chuck noise.

Chapter 6: Troubleshooting •
75
During measurements. Ground the chuck with the shorting
plug.
--OR--
Connect the chuck to a voltage
source to prevent slight charge
accumulation.
During measurements. For temperatures above 40°C, dry
airflow is not required.
--OR--
For temperatures below 40°C, turn on
dry airflow to 2 - 3 CFM.
--OR--
If you will be transitioning between
temperatures above and below 40°C,
turn on dry airflow to 2 - 3 CFM.
When station is not in use. We recommend that you install the
shorting plug whenever the station is
not in use to prevent charges from
building up in the chuck.