00197195-02-UG SetupCenter 5.1_en.pdf - 第42页
Configuring Setup Center Docking Stations Connecting a Datalogic Scanner 42 User Guide SIPLACE Setup Center 5.1 Packaging unit XML import 3.8 Docking Stations ► In the main menu open Extras > Settings and the Settings…
Configuring Setup Center
Connecting a Datalogic Scanner Import
User Guide SIPLACE Setup Center 5.1 41
Setup Center Database Settings
In this area the settings for the usage of the database are made.
Database maintenance
3.7 Import
► In the main menu open Extras > Settings; the Settings window will be opened.
► Select the category Import and the settings will be opened.
This is where the settings for importing XML packaging unit data into the database are defined.
Line-specific stock location
Settings Meanings
Server name The instance name of the database server or an MSDE database.
Database name The name of the database. The default setting "SIPLACESetupCenter" is set
during installation, but it can be changed here later.
User The name of the user account with which Setup Center accesses the database.
The user account is compounded by the name of the database pattern + USR,
e.g. SIPLACESetupCenterUSR.
Password SIPLACE Setup Center requires a password to connect to the previously men-
tioned user account to the database.
Settings Meanings
Material reorder Active
This setting is deactivated after the installation of SIPLACE Setup Center and
can be activated here.
This option allows the automatic export of packaging units from the database
that are marked for reordering. The preset time is 3 years but it can be given
exactly to the day. The procedure is triggered manually with the Execute now
button.
Delete orders older
then (days)
The preset time can be changed.
Execute now The procedure is immediately carried out manually.
NOTICE
Changes require a restart
if you make changes to the import settings, you will always need to restart Setup Center.
Settings Meanings
Active To import the input file for line-specific stock locations, activate the "Line-spe-
cific stock locations" option.
Import file Relative path of the input file to the SIPLACE Setup Center directory.
Configuring Setup Center
Docking Stations Connecting a Datalogic Scanner
42 User Guide SIPLACE Setup Center 5.1
Packaging unit XML import
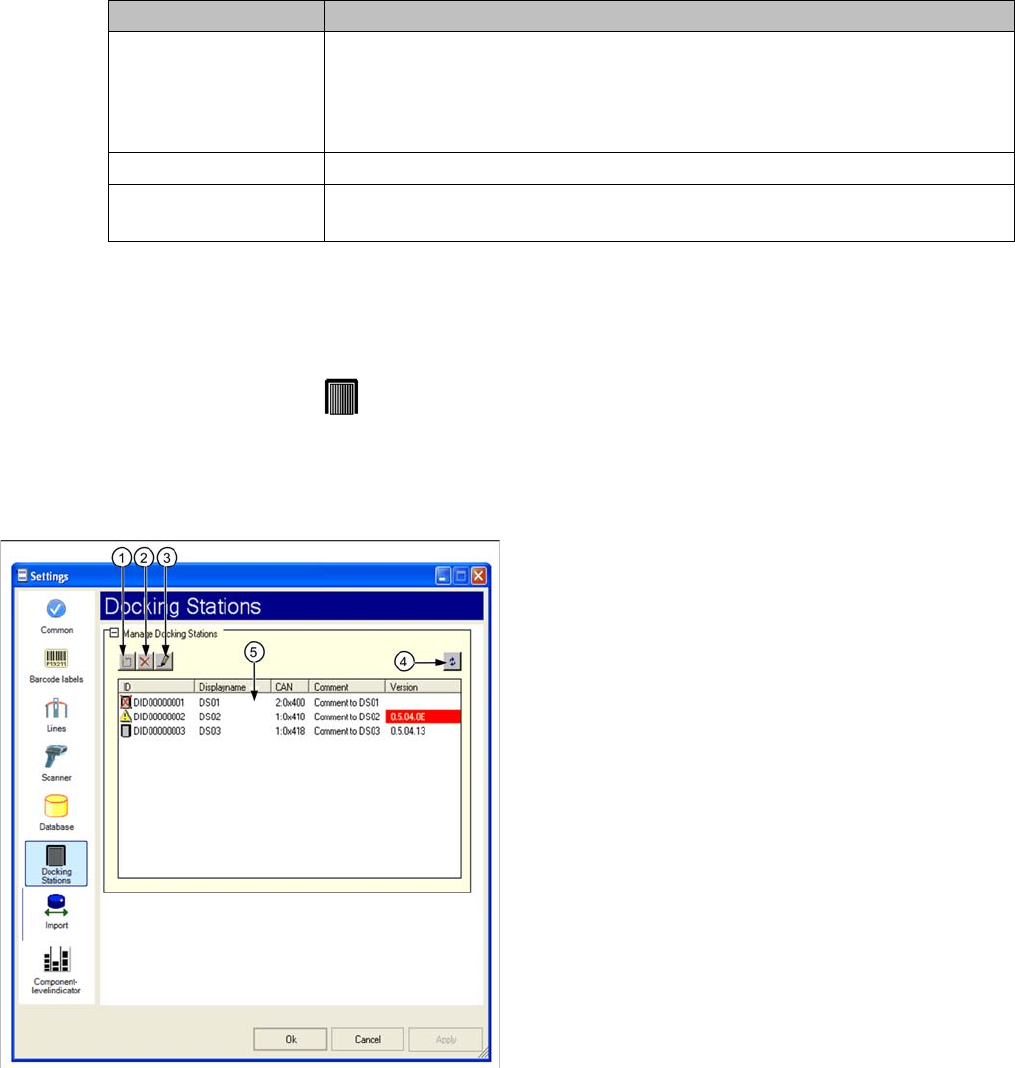
3.8 Docking Stations
► In the main menu open Extras > Settings and the Settings window is opened.
► Select the category Docking Stations and the settings are opened.
In this view the settings for the pre-setup unit of the SX and X series are made.
@ToDo/Review: Neuer Screenshot mit neuen Symbolen (bei 1,2 und 3) und Fördererkitting in der Ta-
belle
Settings Meanings
Active Activate/deactivate to import XML files with packaging unit information.
The XML files are regularly read and imported into the Setup Center database.
If packaging unit information are not imported, the reasons for this are pointed
out in the notifications window.
Polling interval (min) Time interval for importing the XML files.
Import directory Relative path of the XML files to the SIPLACE Setup Center directory. The de-
fault import folder "Import" is created during the installation.
Legend
1. Add docking station
2. Remove selected docking station
3. Edit selected docking station
4. Updating the information on a connected docking sta-
tion
5. List of existing docking stations

Configuring Setup Center
Connecting a Datalogic Scanner Docking Stations
User Guide SIPLACE Setup Center 5.1 43
Functions
Icons in the List of Existing Docking Stations
If no icon is displayed, there is currently no information on the status of the connection and the docking
station.
Icon Designation Description
1 Add docking station Select the Add Docking Station icon.
The Docking Station dialog box will open. See "3.8.1
Docking Station Dialog Box" [ ➙ 44].
2 Remove selected docking station Mark a docking station and select the "remove selected
docking station" icon.
-Or-
Mark a docking station in the selection list and select Re-
move from the context menu.
The entry is removed irrevocably even if you quit the
configuration dialog with Cancel.
3 Edit Selected Docking Station Mark a docking station and select the Edit Selected
Docking Station icon.
-Or-
Mark a docking station in the selection list and select Edit
from the context menu.
The Docking Station dialog box with the relevant settings
will open. See "3.8.1 Docking Station Dialog Box"
[➙44].
4 Update Docking Station You can test the connection of all entered docking sta-
tions and update the version numbers. If the connection
is not established, the corresponding error messages
will be issued in the notifications window.
5 Download Firmware Open the context menu in the list of existing docking sta-
tions and the Download Firmware function will be dis-
played in addition. Select this function to update the
firmware of the selected docking station.
See "7.10.3.1 Firmware Download to the Docking Sta-
tions" [ ➙ 139].
Icon Description
The docking station was recognized and successfully connected.
The displayed software version of the docking station does not correspond to the current sta-
tus.
The docking station could not be connected.