c921199.R00_EN.pdf - 第38页
1-18 1 Handling 6. Disposal of used top tape Dispose of used top tape periodically . n NOTE If too much used top tape accumulates, the tail cover may be automatically opened due to pressure. Cut off the used top tape wit…
1-17
1
Handling
5.
F3 Feeder How to exchange a 12mm feeder and a 16mm feeder
The common body is used for both 12mm feeder and 16mm feeder in F3 Feeder series, therefore you can
exchange them by small changes in the feeder.The following explains the procedures for it.
n
NOTE
At the time of shipment, a feeder has been set with the specification for 12mm and a tape guide for a 16mm feeder is
included.
n
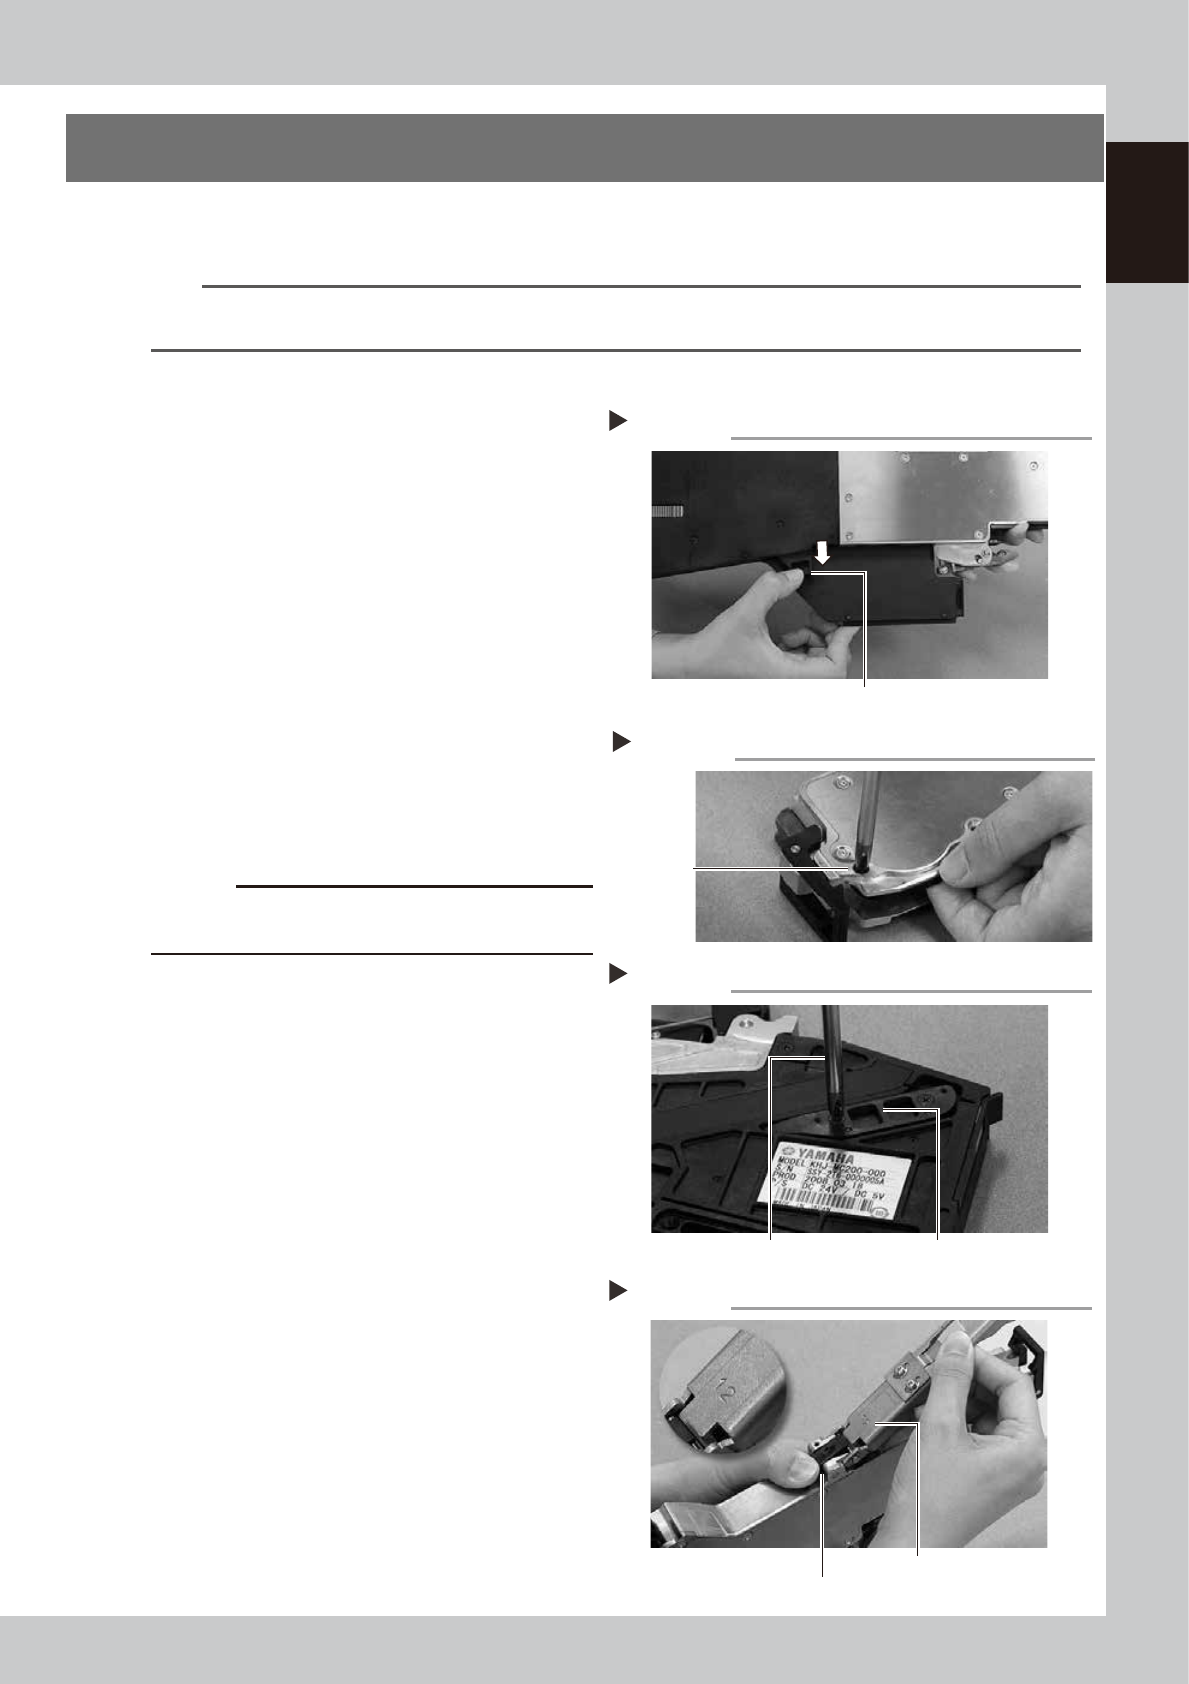
Change from 12mm feeder to 16mm feeder
1
Change the width of the tape path
in the top tape box.
Push down the guide1 plate(a lever for
changing the width of the tape path) to
adjust the width of the tape path to the
16mm feeder.
63290-9L-00
2
Detach the spacer.
Unscrew the two screws to detach the
spacer on the side inside the tape path with
a Phillips screwdriver.
63293-9L-00
3
Put the spacer back to the position.
Attach the removed spacer to the position
described in the right figure.
63291-9L-00
c
CAUTION
Make sure to put the removed spacer back to the
original position so as not to lose it.
4
Remove the tape guide.
Remove the tape guide for the 12mm feeder
from the body.
63292-9L-00
5
Install a tape guide for the 16mm
feeder to the body.
Number "16" is engraved on the tape guide.
n
Change from 16mm feeder to 12mm feeder
Replace the feeder in the reverse order of “Change
from 12mm feeder to 16mm feeder” described above.
1. Detach the spacer from the original position.
2. Attach the spacer to the side inside the tape path.
3. Push up the guide1 plate(a lever for changing the
width of the tape path) to adjust the width of the
tape path to the 12mm feeder.
4. Replace the tape guide for 16mm feeder with the
one for 12mm feeder.
Step 1
Change the width of the tape path
Lever for changing the width of the tape path
Step 2
Detach the spacer
Unscrew the
two screws
Step 3
Put the spacer back
Phillips screwdriver Spacer
Step 4
Remove the tape guide
Tape guide
Engraved
mark
Remove the tape guide holding down
the tape guide rear lever
1-18
1
Handling
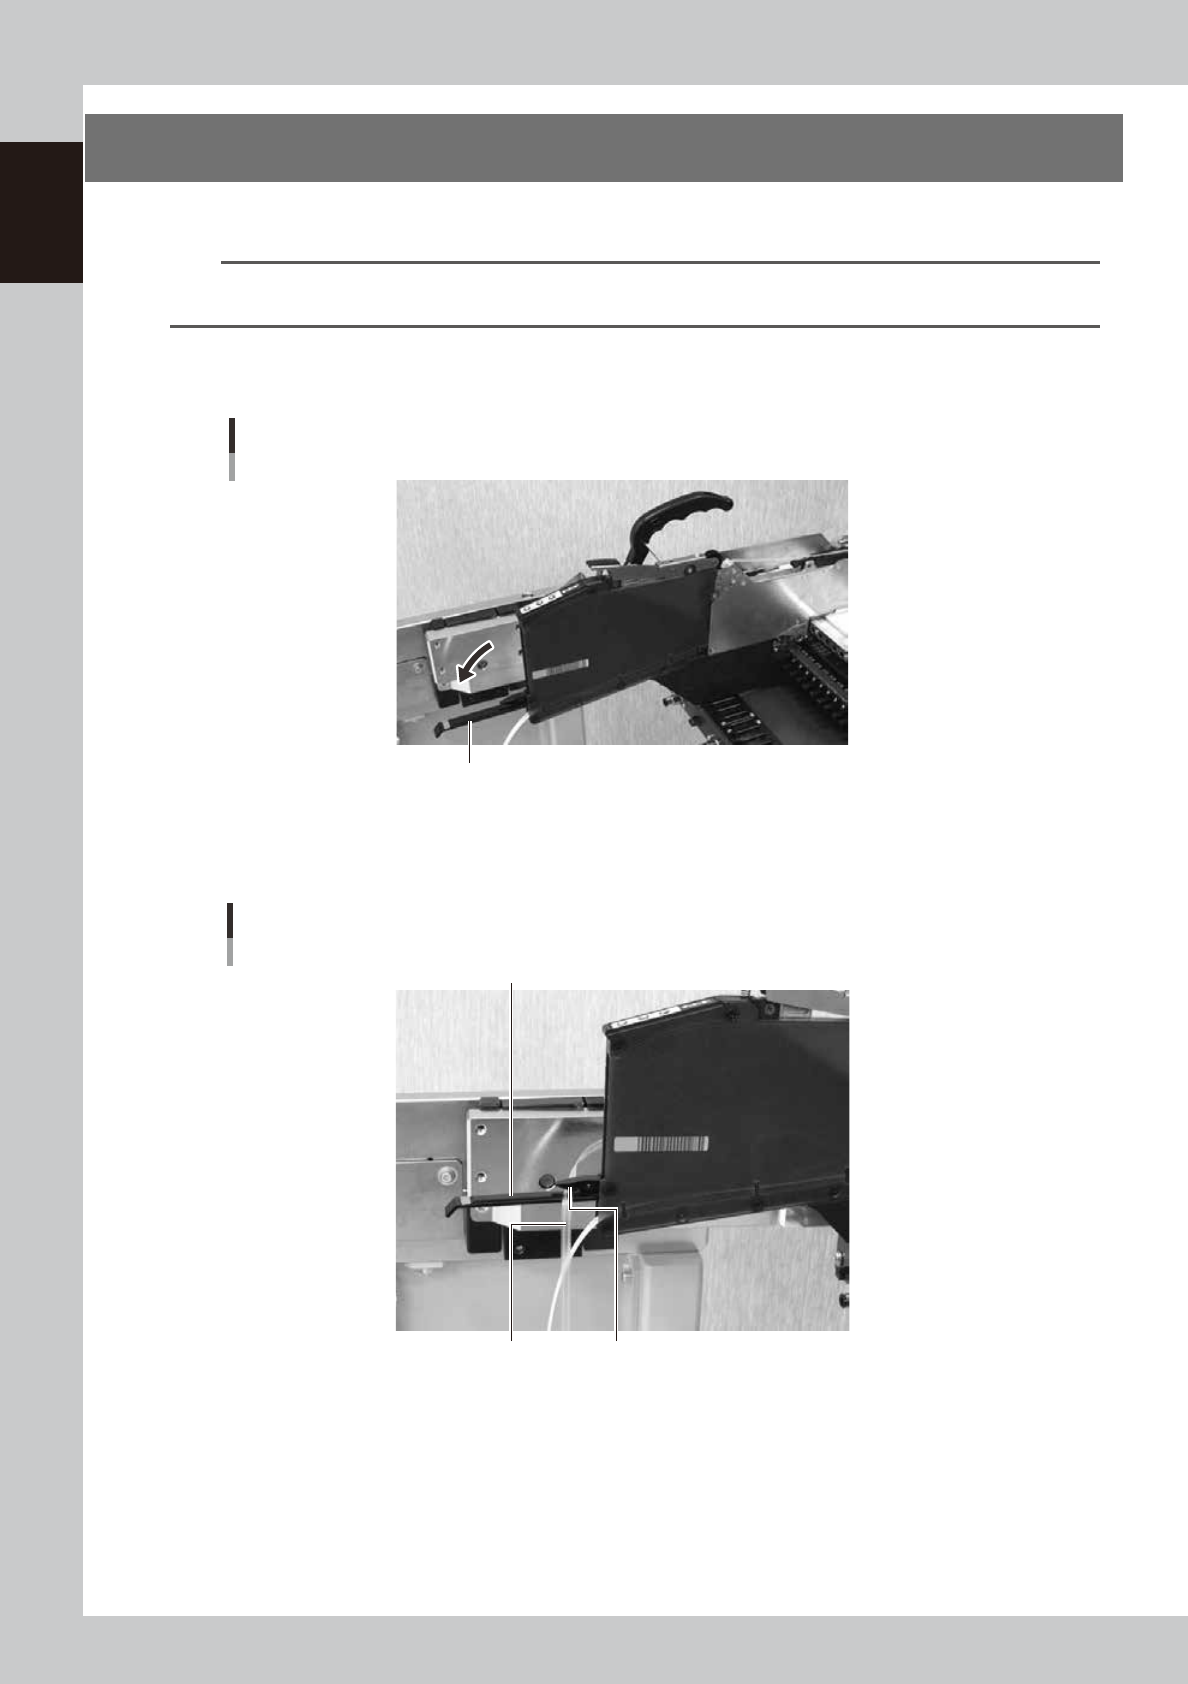
6. Disposal of used top tape
Dispose of used top tape periodically.
n
NOTE
If too much used top tape accumulates, the tail cover may be automatically opened due to pressure. Cut off the
used top tape with the edge cutter inside the tail cover.
1
Check the used top tape.
Open the tail cover and check if there is much used top tape inside.
Checking the used top tape
Tail cover
63117-F3-00
2
Cut off the used top tape.
Cut the top tape with the edge cutter inside the tail cover.
Cutting the used top tape
Edge cutter Top tape
Tail cover
63118-9L-00
3
Close the tail cover.
1-19
1
Handling
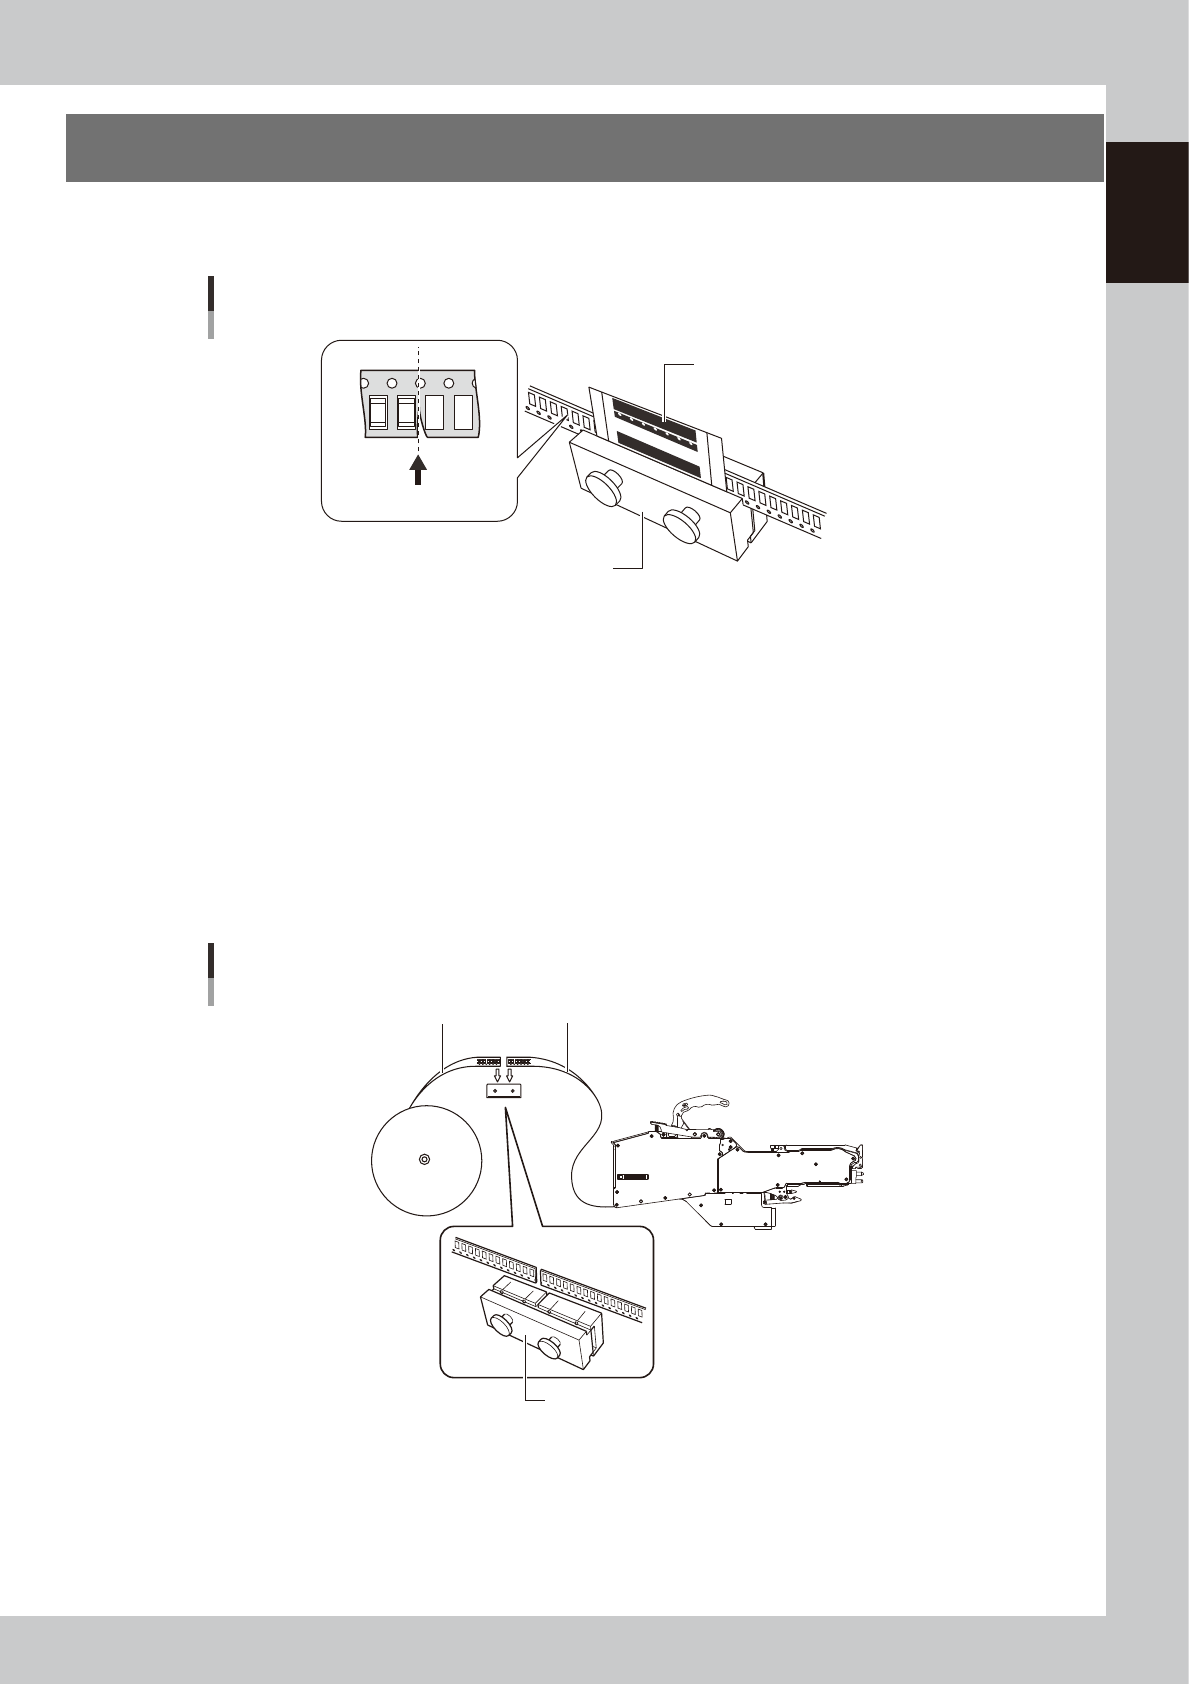
7. Splicing
n
Precautions for connecting a tape
Be sure to use a tape connecting jig when connecting tapes.
Tape connecting jig
Connecting tape
Tape connecting jig
(KJ3-MY020-XXX TAPE CONNECTOR)
Cut here
64905-9L-00
1
Pull out the end of tape in use.
Pull out the end of tape in use.
2
Cut the edge of new tape and the end of tape in use with scissors.
Cut the tape just before the part of the tape with the components. If cut slightly closer to the
component side from a tape feed hole, the tape can be smoothly connected. (See the figure above)
3
Set the tape in the tape connecting jig.
Set the edge of a new tape and the end of tape in use in the clamping part.
Set both tapes in the clamping part of the connecting jig as shown in the figure below.
The clamping part has two pins. Gently slide the tapes back and forth and fit the feed holes into the
pins.
Setting the tape connecting jig
Edge of new tape
End of tape in use
Tape connecting jig
63002-9L-10