Xg系列调整手册.pdf - 第62页
3 Basic adjustments 3- 40 2. R-axis accurac y offset 4 Press the [Save] button on the toolbar to save the changes. [Save] b utton [Save] button 27023-X9-00 5 Return to the Setup screen and select the PCB data. Select the…
3
Basic adjustments
3-39
3. Head offset adjustments
2
Change the Head Specification and Head Offset information as
needed. (YV100Xg family)
Depending on the specifications, some YV100Xg family machines have only one Type
74 nozzle. In this case, change the Head Specification and Head Offset information
as explained below.
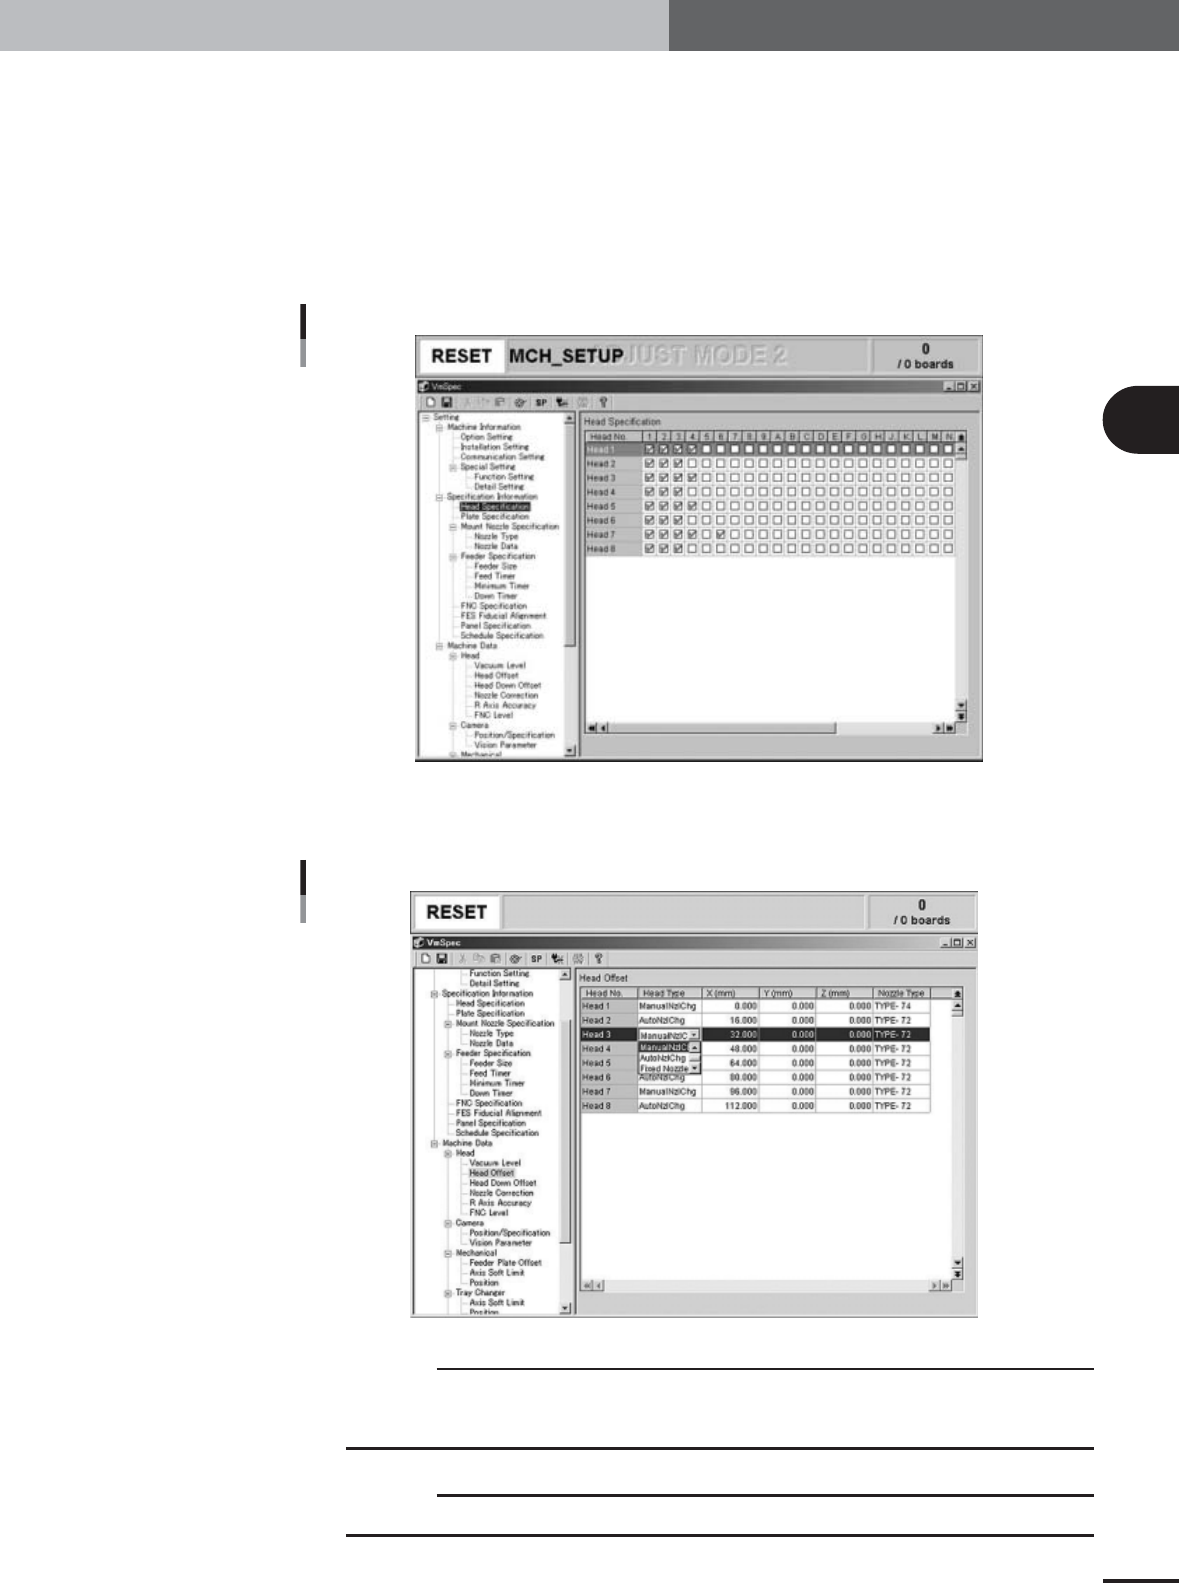
1.Press the [Machine] button to display the machine setting screen (VmSpec screen).
2.Select the "Specification"-"Head Specification" in the left-hand tree view to display
the Head Specification information in the right-hand main view.
3.Mark the check boxes in the "4" (Type 74) column and Heads 1, 3, 5 and 7 rows.
Head Specification change
27106-X9-00
4.Select the "Machine Data"-"Head"-"Head Offset" in the left-hand tree view to
display the Head Offset information in the right-hand main view.
5.Change "AutoNzlChg" to "ManualNzlChg" in the Heads 1, 3, 5 and 7 rows.
Head Offset change
27107-X9-00
c
CAUTION
Head and nozzle specifications differ depending on the machine being adjusted. Check the
machine's specifications before starting head offset adjustments. Adjustments not matching
the machine's specifications will cause poor results and the glass QFP might be damaged.
c
CAUTION
After adjustments are complete, always return the machine settings to the original state.
3
Basic adjustments
3-40
2. R-axis accuracy offset
4
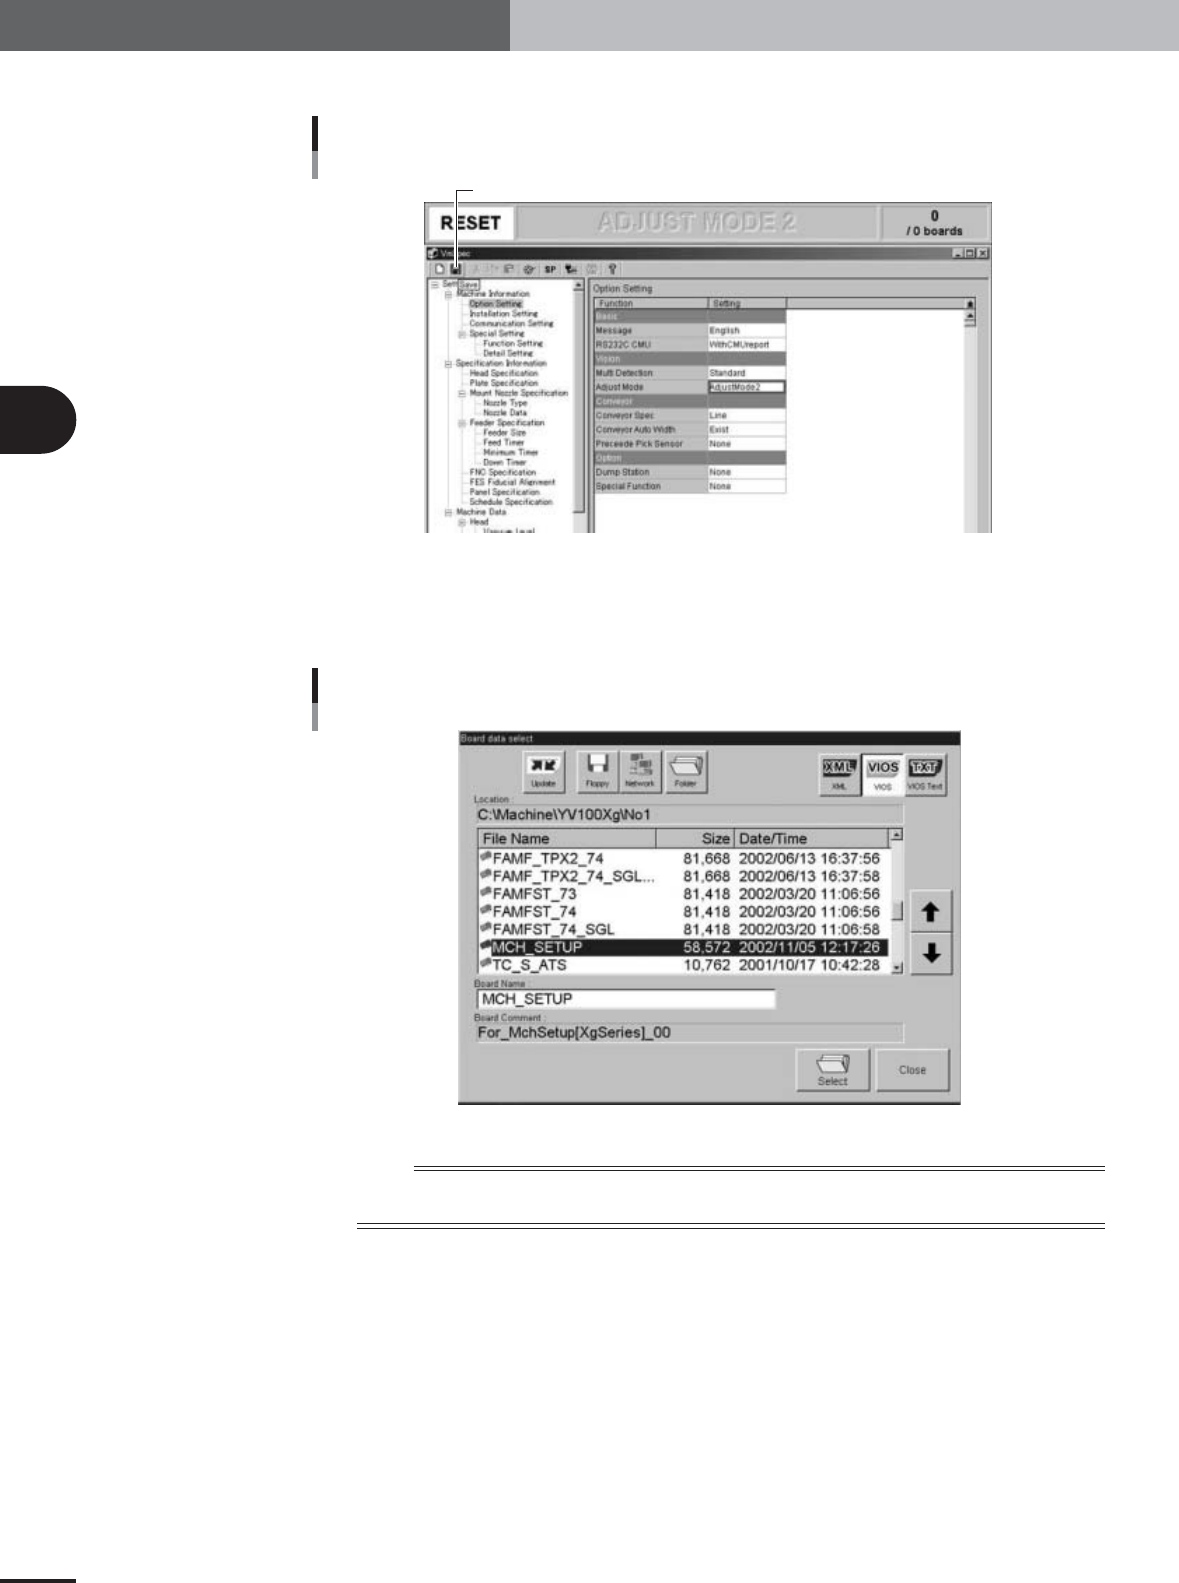
Press the [Save] button on the toolbar to save the changes.
[Save] button
[Save] button
27023-X9-00
5
Return to the Setup screen and select the PCB data.
Select the "MCH_SETUP" PCB data again even if it is currently loaded, to enable the
changes you have made to the machine setting.
Board Data Select dialog box
27024-X9-00
n
NOTE
After changing the machine setting, be sure to load PCB data again to enable the changes you have made to the
machine setting.
3
Basic adjustments
3-41
2. R-axis accuracy offset
3.2 Adjusting the head offset of Heads 3, 5, and 7
(YV100Xg family) or Head 2 (YV88Xg)
Follow these steps to adjust the head offset of Heads 3, 5 and 7 (YV100Xg family) or
Head 2 (YV88Xg) using a glass QFP.
1
Press the [Utilities] button to start the adjustment utility.
n
NOTE
For how to start the adjustment utility, see section 2.4 in Chapter 2.
2
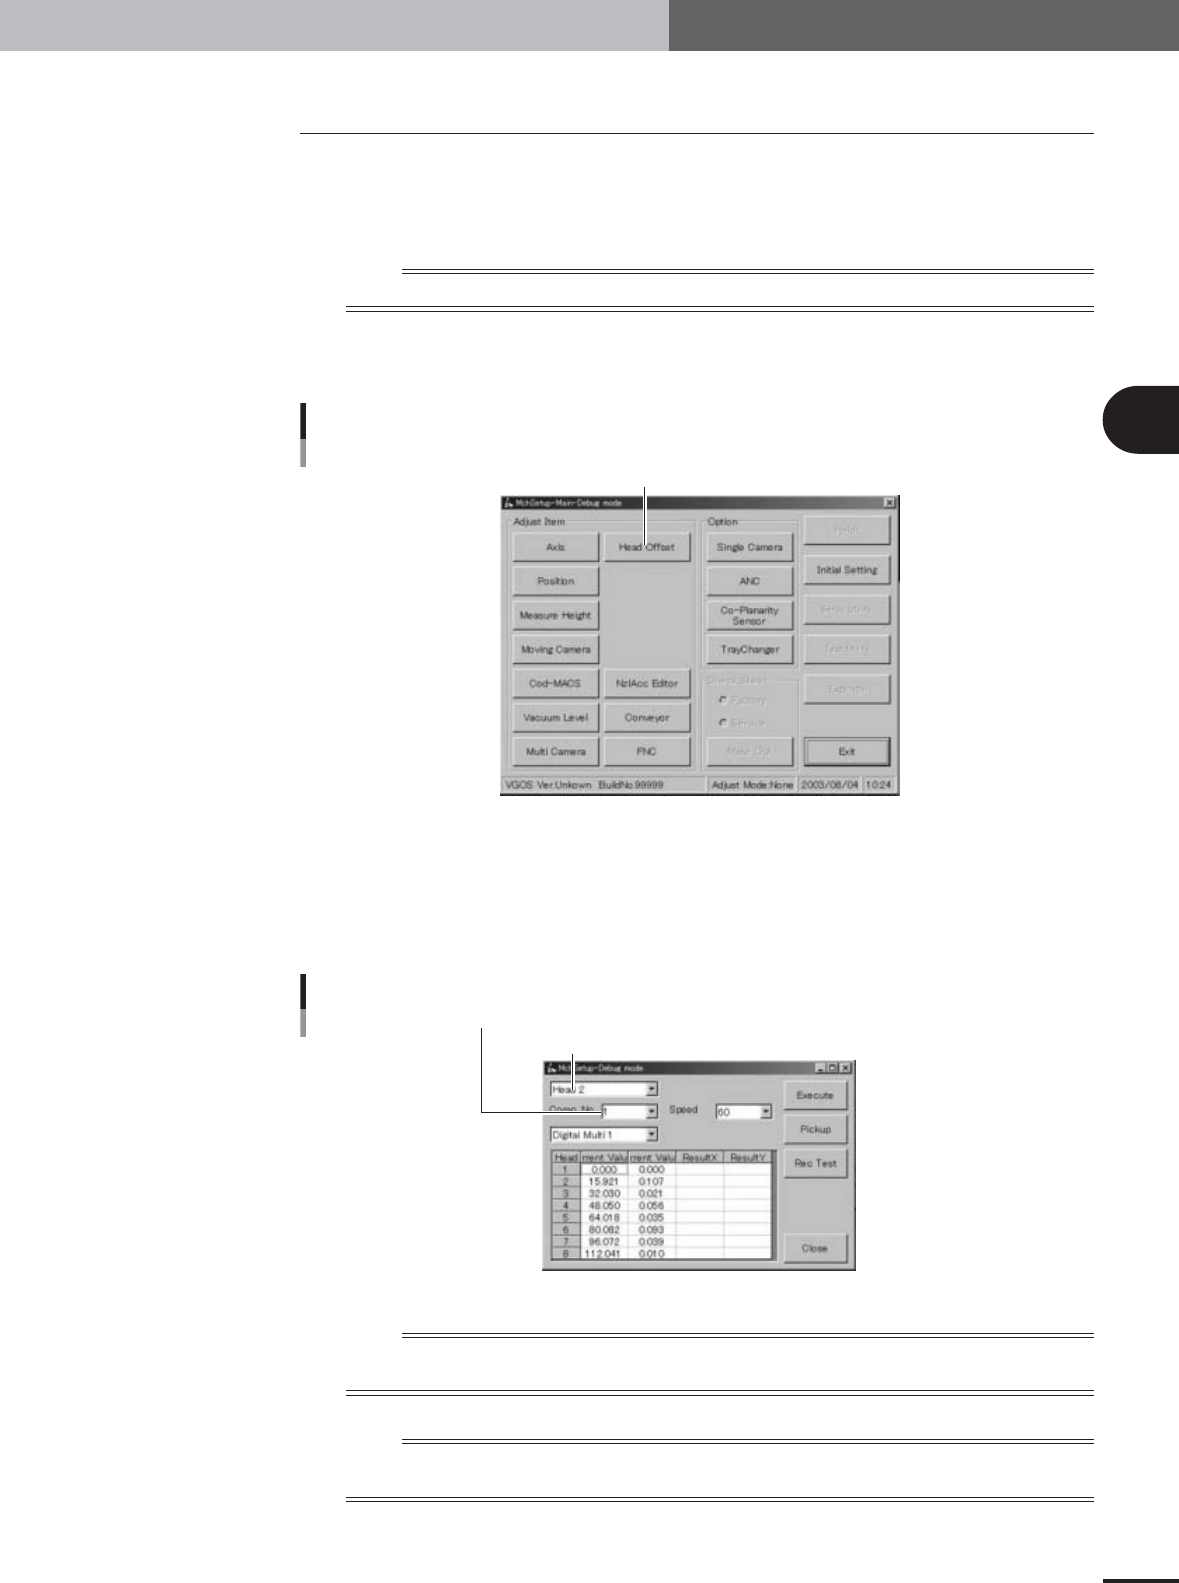
Press the [Head Offset] button to open the head offset adjustment
dialog box.
Adjustment utility menu window
[Head Offset] button
27021-X9-E0
3
Select the adjustment conditions.
Head : Head 3, 5, or 7 (YV100Xg family); Head 2 (YV88Xg)
Comp. No. : 11 (glass QFP)
Camera : Digital Multi 1
Speed : 60
Head offset adjustment dialog box
Enter "11" in the Comp. No. combo box
Select "Head 3", "Head 5" or "Head 7" (YV100Xg family), or "Head 2" (YV88Xg)
27108-X9-A0
n
NOTE
Only numbers up to 10 are selectable from the drop-down list of the "Comp. No." combo box, so enter "11" from
the keyboard. In the "MCH_SETUP" PCB data, component No.11 is assigned to glass QFP (KMO-M880A-202).
n
NOTE
Head 1 cannot be selected for head offset adjustment since Head 1 is the reference position. If you select Head 1,
an alert message appears as shown below.