YSM20R_YSM20WR_Mainte_E.pdf - 第127页
3-66 3 Periodic maintenance items 5.5 Base 5.5.1 Replacing air/mist filter and cleaning cup Air filters and oil mist filters are attached to prev ent oil, water , and impurities, etc., from being introduced into the mach…
3-65
3
Periodic maintenance items
5
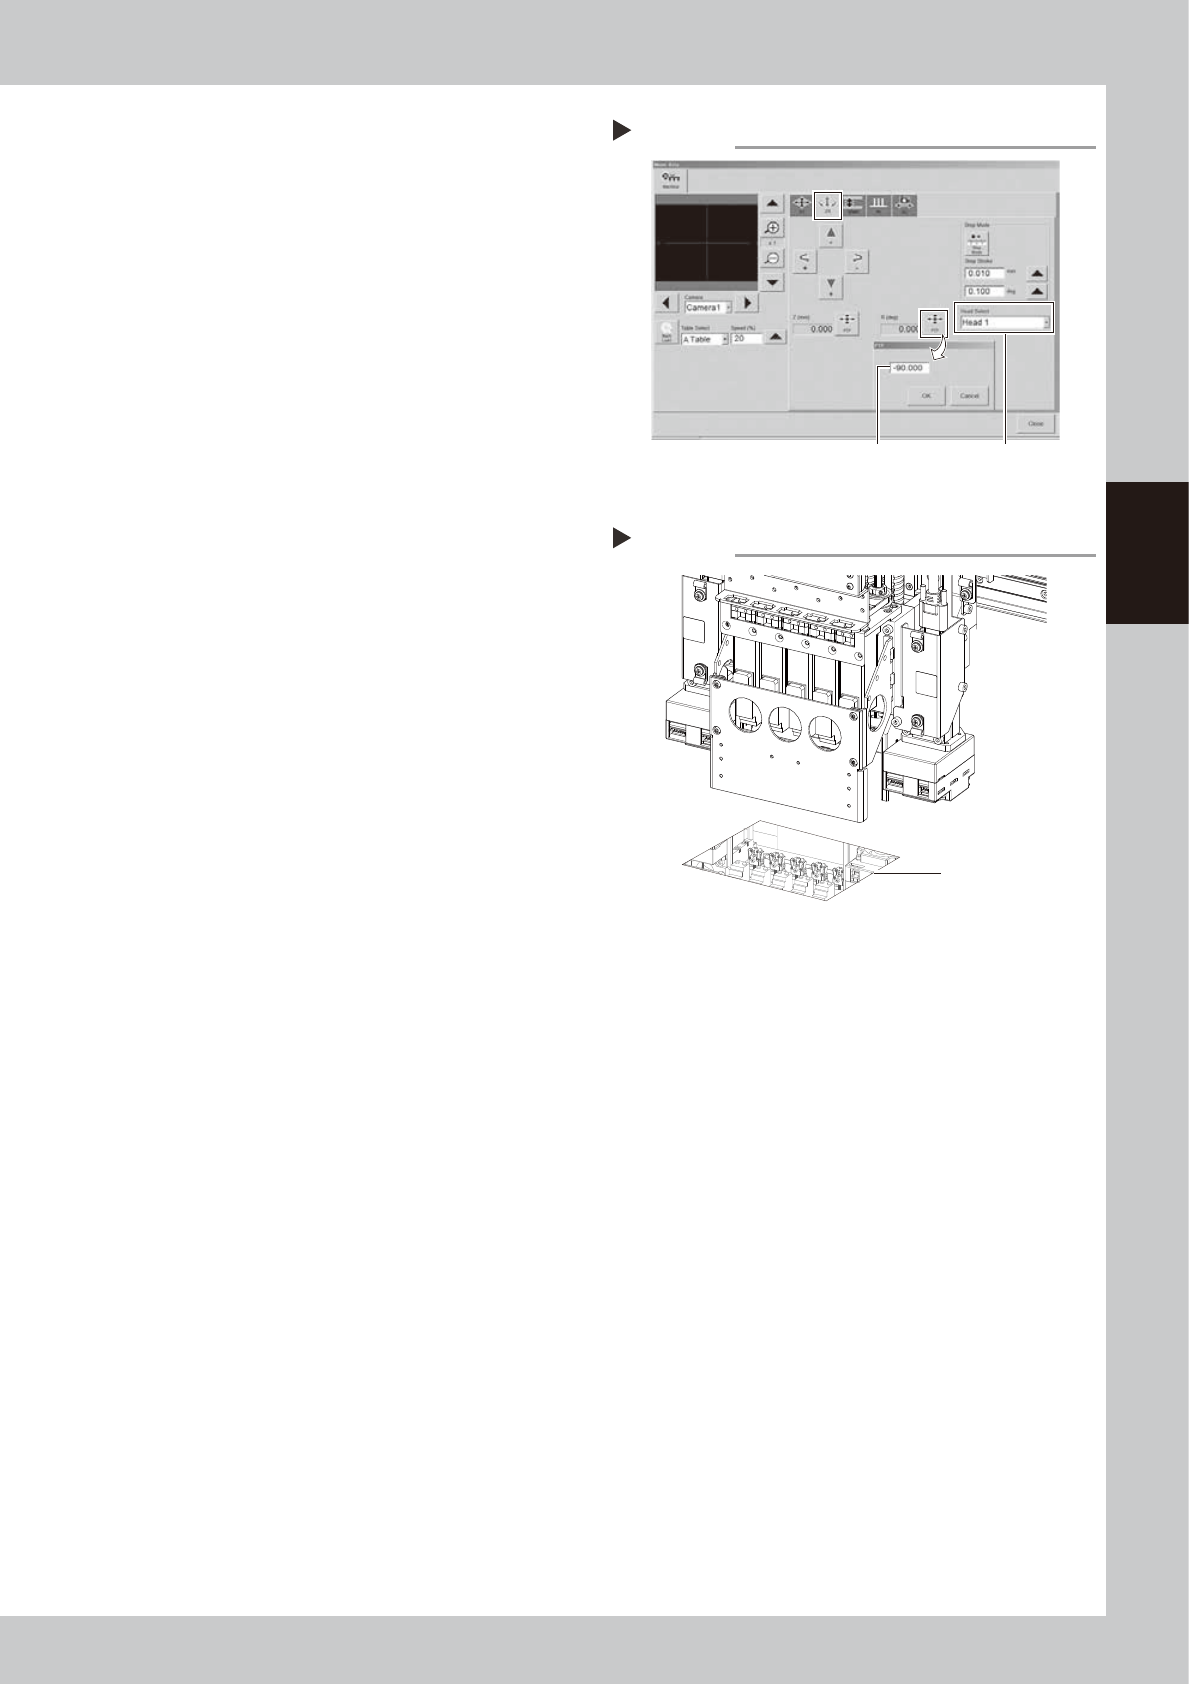
Rotate heads -90°.
1. Close the machine safety cover and
release the emergency stop. Attach the
carriage if the machine is the carriage
type.
2. Rotate heads -90° in the same manner as
Step 3.
e
3. Press the emergency stop button and
then open the machine safety cover.
4. If the machine is carriage type, detach
carriage to easily access to the head unit.
6
Clean the back of shaft tip.
Clean the back of shaft tip in the same
manner as Step 4.
7
Check that shaft tips are clean.
Check that no dirt remains on shaft tips with
hand mirror.
Checking that shaft tips are clean
Step 7
Check reflection
in mirror.
533A2-KMK-00
Rotating heads
Step 5
Enter -90°. Select head.
54322-KMK-00
3-66
3
Periodic maintenance items
5.5 Base
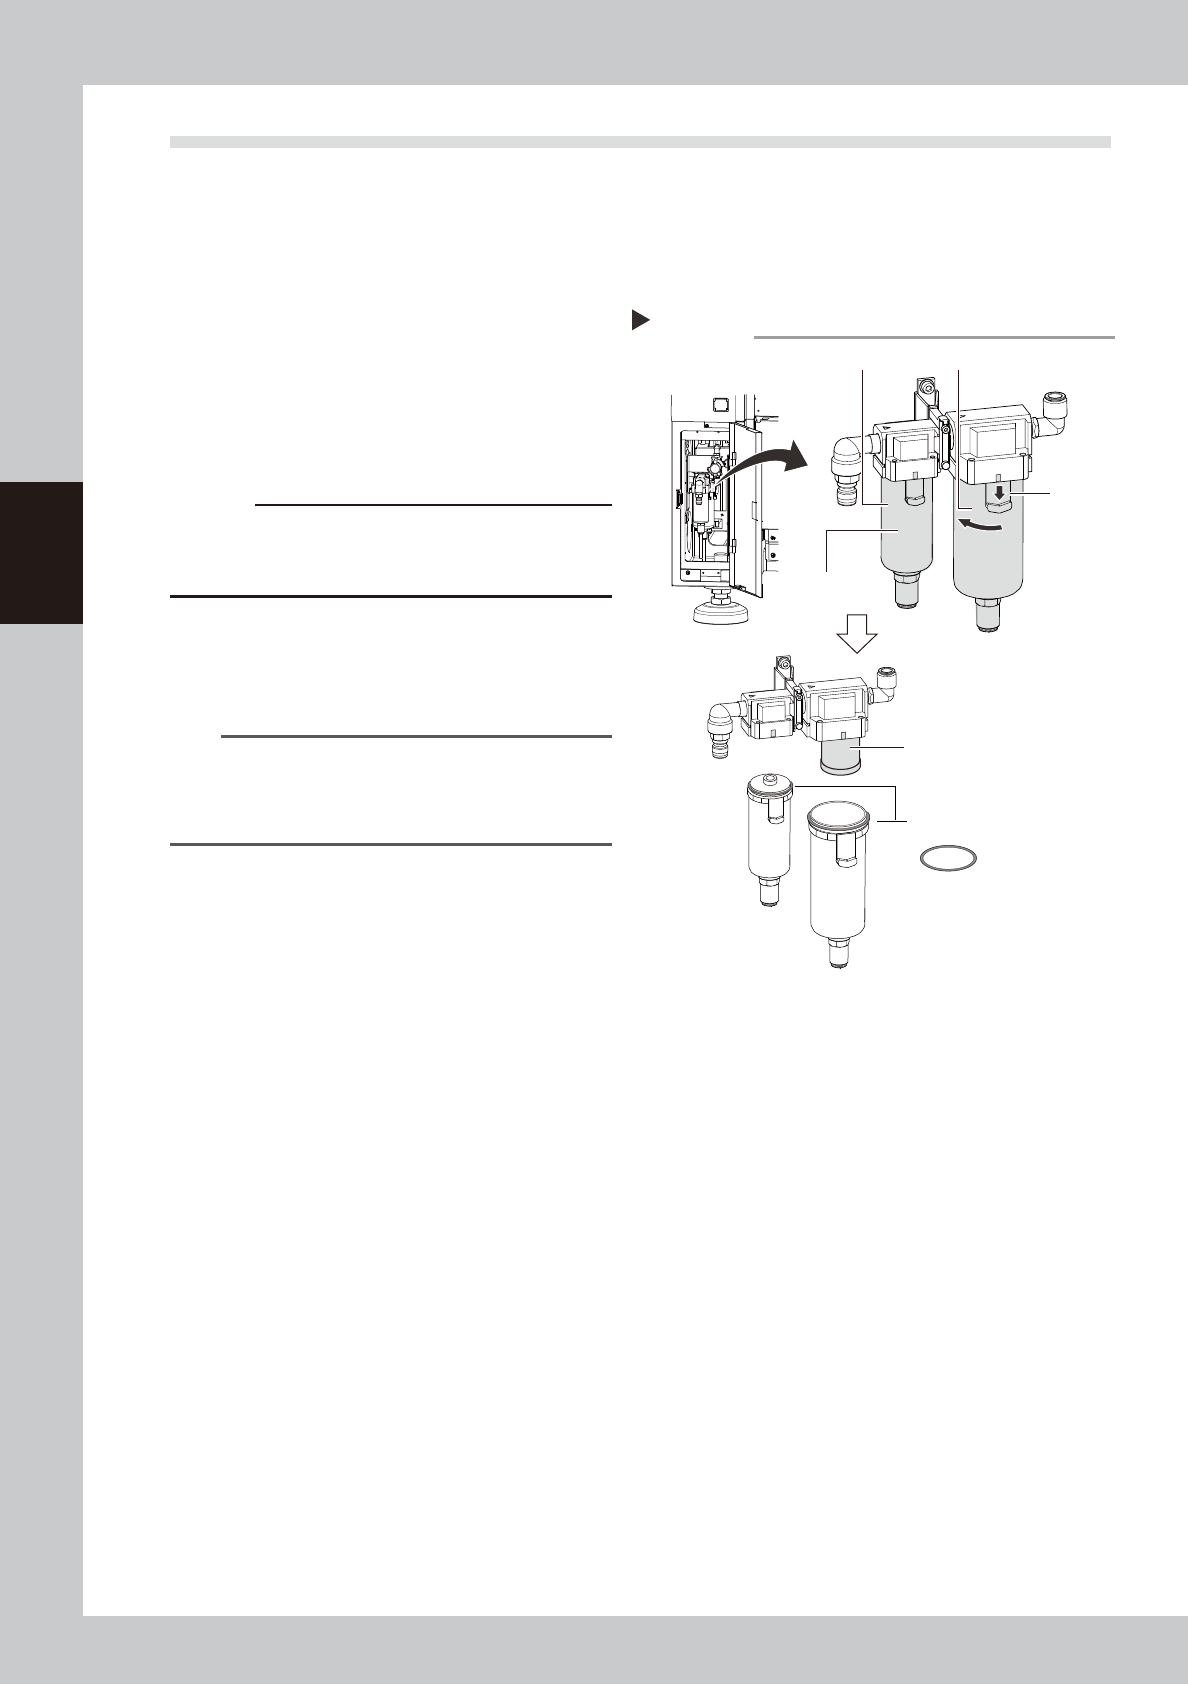
5.5.1 Replacing air/mist filter and cleaning cup
Air filters and oil mist filters are attached to prevent oil, water, and impurities, etc., from being introduced into
the machine from the air compressor. The procedures for inspecting, cleaning, and replacing these filters are
given below. Make sure to disconnect the air coupler connected to the supply air to work safely.
1
Disconnect air coupler of air
supply.
1. Turn the “Air supply/exhaust” switch
(valve) clockwise (Exh) to turn air supply
OFF.
2. Disconnect the air coupler on the air
supply connection unit.
c
CAUTION
Be aware that a loud air exhaust sound is heard when
disconnecting the air coupler. Use care to prevent oil,
water, and impurities, etc., from being sprayed out.
2
Check the inside of cup.
Check for oil or water deposits in filter cup. If
it is dirty, follow the steps 3 to 5 to clean the
cup.
TIP
The drain cock at the bottom of the filter cup is an
auto-drain type. It automatically drains the oil or water
when deposited in the cup. It is recommended to
connect a hose to this drain cock.
3
Detach the filter cup.
Turn the cup 45
°
to the right while pushing
the button. Then pull the cup downward to
detach it. Regarding the air filter, the cup
and media are detached at the same time.
Detaching cup
Step 3
Filter cup
Air filter Oil mist filter
Button
O-ring for cup
Filter element
53383-KMK-00
3-67
3
Periodic maintenance items
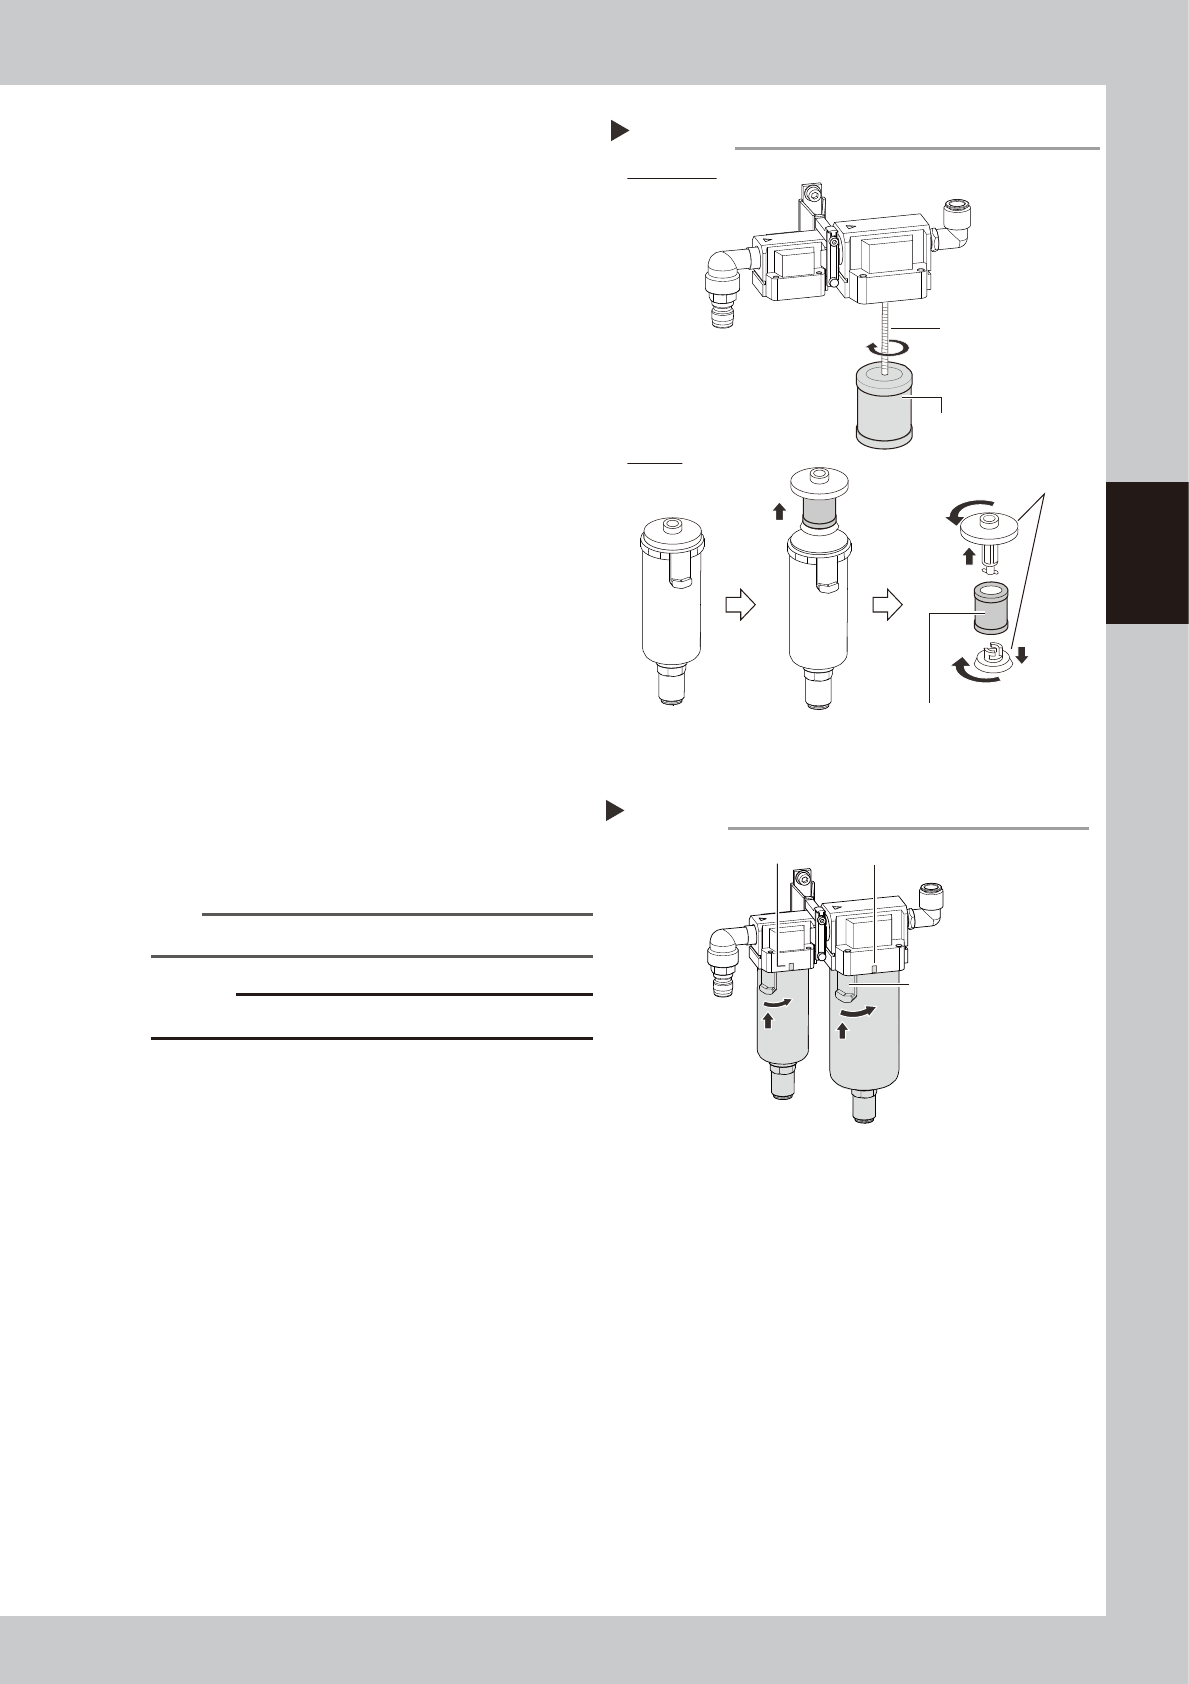
4
Check media status.
Oil mist filter:
The mist filter element is attached with the
screw of main unit. Rotate the oil mist filter
to detach it.
Air filter:
The filter element is attached between the
adopters on top and bottom of filter
element. Pull up the filter element with
adopters. Turn the adopters to detach filter
element.
Check that no dirt or clogging is in the
media. If the media is dirty, replace it with
new one on the consumable parts list.
5
Clean the inside of the filter cup.
1. Lightly clean the filter cup with water.
2. Pour water-diluted neutral detergent into
the filter cup and clean the inside while
shaking it.
3. Air blow the filter cup and wipe away
any moisture with cloth.
6
Attach filter element and cup.
1. Attach the filter element in reverse order
of detaching.
2. Aligning the button with the position
where the cup was pulled (45
°
to the
left), push up the cup.
3. Turn the cup to the mark on the filter
housing clockwise.
n
NOTE
The cup clicks when turning it to the mark.
c
CAUTION
Make sure not to lose the O-ring for cup when attaching.
7
Connect the air coupler.
1. Connect the air coupler and check that
air is not leaking.
2. Turn the “Air supply/exhaust” switch
(valve) counterclockwise (Sup) to supply
air again.
Mist filter element
Detaching media and checking condition
Step 4
Filter element
Attach with screw.
Oil mist filter
Air filter
Adopters
53384-KMK-00
Attaching cup
Step 6
Mark
Mark
Button
53385-KMK-00