00197369-02_AI_PPW_2te_Reihe_X-Serie-S_de_en.pdf - 第82页
Installation X4i S - Installing the NC Row 2 3.1.10 Inserting and Fixing the NC Rows 1 and 2 82 NC Row 2 - NC in Front of MTC 2/WPC PPW 2te R eihe - PPW vor MTC 2/WPC 3.1.10 3 . 1 . 1 0 I n s e r t in g a n d F ix in g t…
Installation
3.1.9 Connecting the NC Row 2 X4i S - Installing the NC Row 2
NC Row 2 - NC in Front of MTC 2/WPC PPW 2te Reihe - PPW vor MTC 2/WPC 81
3.1.9
3.1.9 Connecting the NC Row 2
Connecting the NC Row 2
► Set the jumpers (if present) on the nozzle changers (see "4.1.1 Jumpers on the Nozzle Changer"
[ ➙ 101]).
Data cable for NC 2 and SPS
Labeled data cables have been prepared in the machine
for the various configurations of nozzle changers with and
without Smart Pin Support (SPS).
▪ X1*a (NC 1)
▪ x1*b (SPS (1) or NC 2 (without SPS))
▪ X1*c (NC 2 with SPS)
▪ X1*d (SPS2)
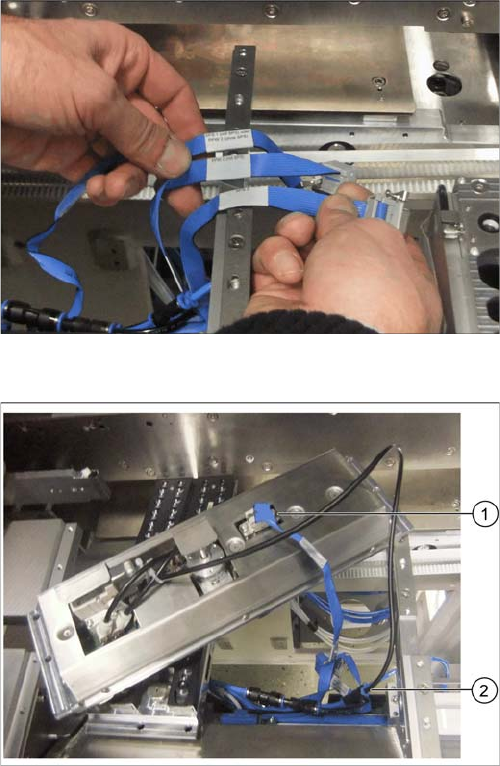
Underside of NC 2 with data cable and compressed air
line
► Connect the relevant data cable to the underside of
the NC 2 (1).
► Connect the compressed air line to the free connec-
tion on the Y coupling (2).
Installation
X4i S - Installing the NC Row 2 3.1.10 Inserting and Fixing the NC Rows 1 and 2
82 NC Row 2 - NC in Front of MTC 2/WPC PPW 2te Reihe - PPW vor MTC 2/WPC
3.1.10
3.1.10 Inserting and Fixing the NC Rows 1 and 2
Inserting and Fixing the NC Rows 1 and 2
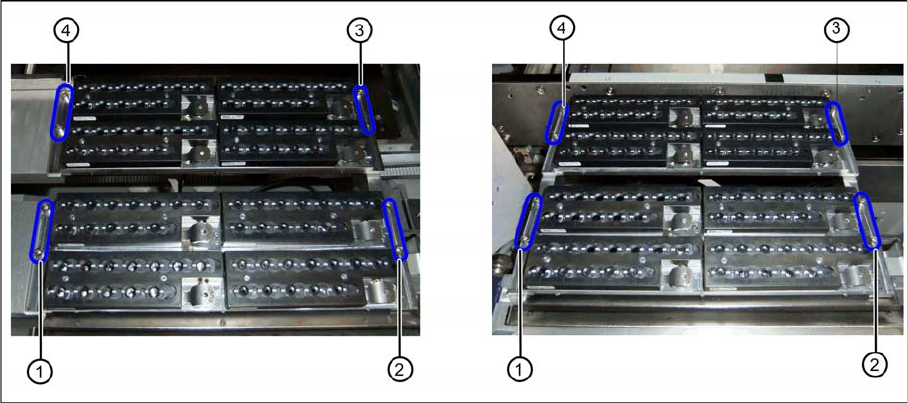
Two nozzle changer rows at location 2 or 4 (left) and location 1 or 3 (right)
► Insert the two nozzle changers and screw these to their mounts.
⇨ NC row 1 at (1) to (2)
⇨ NC row 2 at (3) to (4)
► Insert the relevant magazine.
⇨ The installation is now complete.
If you do not want to install another nozzle changer, continue with the final tasks.
3.1.11
3.1.11 Final Work:
Final Work:
► Push the component trolley back into the relevant location.
► Switch the machine back on and boot the station computer.
► Perform a complete reference run.
► Switch over to the operator level Service.
► Manually configure the second table position in the autoconfiguration.
Table fiducials are measured during job assignment.
► Use the station software to measure the maximum and minimum Y travel path.
► Select either Machine Calibration or Single Calibration and then the nozzle changer calibration.
► Calibrate the magazine position, reject position and pickup heights, one after the other.
► Calibrate the nozzle station and, if present, the SPS magazine(s).
See also
1.2 Preparatory Work... [ ➙ 58]
3.1.11.1
3.1.11.1 Software Settings
Software Settings
► Add the second nozzle changer for the setup in SIPLACE Pro.
Installation
3.2.1 Preparatory Steps X3 S / X4 S - Installing the NC Row 2
NC Row 2 - NC in Front of MTC 2/WPC PPW 2te Reihe - PPW vor MTC 2/WPC 83
3.2
3.2 X3 S / X4 S - Installing the NC Row 2
X3 S / X4 S - Installing the NC Row 2
On machine types X3 S and X4 S, in a configuration without MTC and without TwinHead, the basic as-
sembly of NC row 2/W5 magazine [03089888-xx] is used for installing a second row of nozzle changers
(see "3.2.2 Locations 1 to 4 Without MTC" [ ➙ 83]).
In configurations with MTC and TwinHead at location 2, the nozzle changer TwinHead for MTC X-Series
[00119747-xx] is used (see "3.2.3 Location 2 with MTC" [ ➙ 90]).
In configurations with WPC, another basic assembly may be used, depending on the head type
(see"3.2.4 Location 2 with WPC and Twin/CPP" [ ➙ 92]).
3.2.1
3.2.1 Preparatory Steps
Preparatory Steps
► Switch off the machine, disconnect it from the power supply and secure it to prevent unauthorized
reactivation. Observe the instructions in section "1.2 Preparatory Work..." [ ➙ 58].
► Pull the component trolley out of the machine.
3.2.2
3.2.2 Locations 1 to 4 Without MTC
Locations 1 to 4 Without MTC
See also
3.2.2.3 Preparing the Compressed Air Connection [ ➙ 85]
3.2.2.2 Removing the NC Row 1 [ ➙ 84]
3.2.2.1
3.2.2.1 Overview
Overview
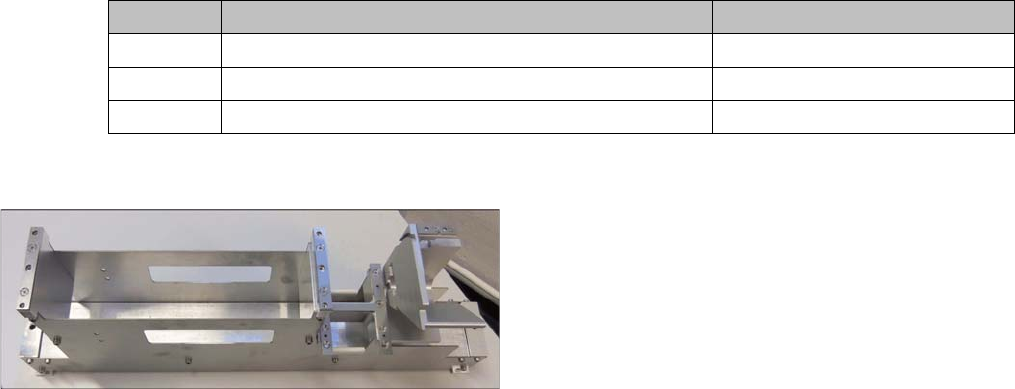
Parts required from the upgrade kit
Basic assembly NC row 2/W5 magazine
Quantity Designation Item number
1 Basic assembly NC row 2/W5 magazine 03089888-xx
2 ISO4762 - M8 x 70-A2-70 03042595-xx
1 Compressed air line for nozzle station
Installation of the basic assembly for the second row of
nozzle changers [03089888-xx] in type X3 S and X4 S
machines is the same for locations 1 to 4 without MTC.