00195166-0402_SM_D4_EN.pdf - 第180页
Service Work C&P12 Placement Head Replacing the Silencer [03003134] 180 Serv ice Manual SIPLACE D4 Installation 4.5.16 Replacing the Silencer [03003134] Removal/Installation X Reconnect the hoses. X Fix t he fo rc ed…
Service Work
Replacing the Forced Air Unit [00367793-xx] C&P12 Placement Head
Service Manual SIPLACE D4
179
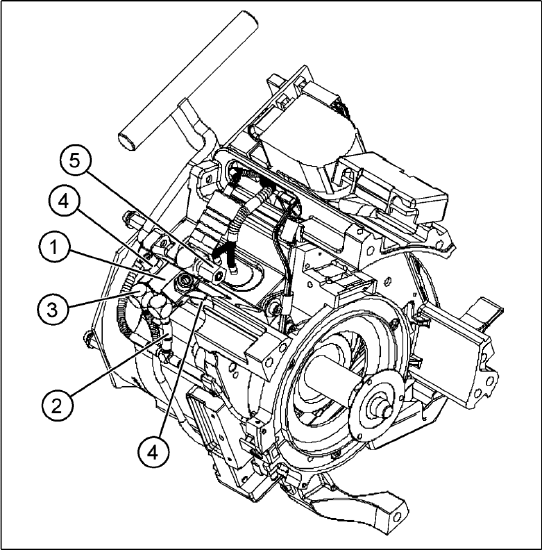
4.5.15 Replacing the Forced Air Unit [00367793-xx]
Removal
Legend
1. Forced air unit / DLM2
2. To the "placement circuit" compressed air tube
and the compressed air sensor on the
intermediate distributor
3. To the "reject circuit" compressed air tube
4. 2 M3x20 hexagon socket-head screws
5. SW8 union nut for the compressed air
connection
X Move the changeover table out of the
machine.
X Switch off the machine.
X Remove the cable plug from the slot on the
intermediate distributor.
X Detach the black compressed air hose from
the plug-in coupling on the vacuum distributor.
X Dismantle the intermediate distributor.
X Detach the compressed air sensor.
X Detach the compressed air hose for the
placement position (2) from the "placement
circuit" compressed air tube.
X Detach the compressed air hose for the reject
position (3) from the "reject circuit"
compressed air tube.
X Loosen the two hexagon socket-head screws
(4).
X Remove the forced air unit (1).
X Loosen the union nut (5) and detach the
compressed air supply hose.
Service Work
C&P12 Placement Head Replacing the Silencer [03003134]
180 Service Manual SIPLACE D4
Installation
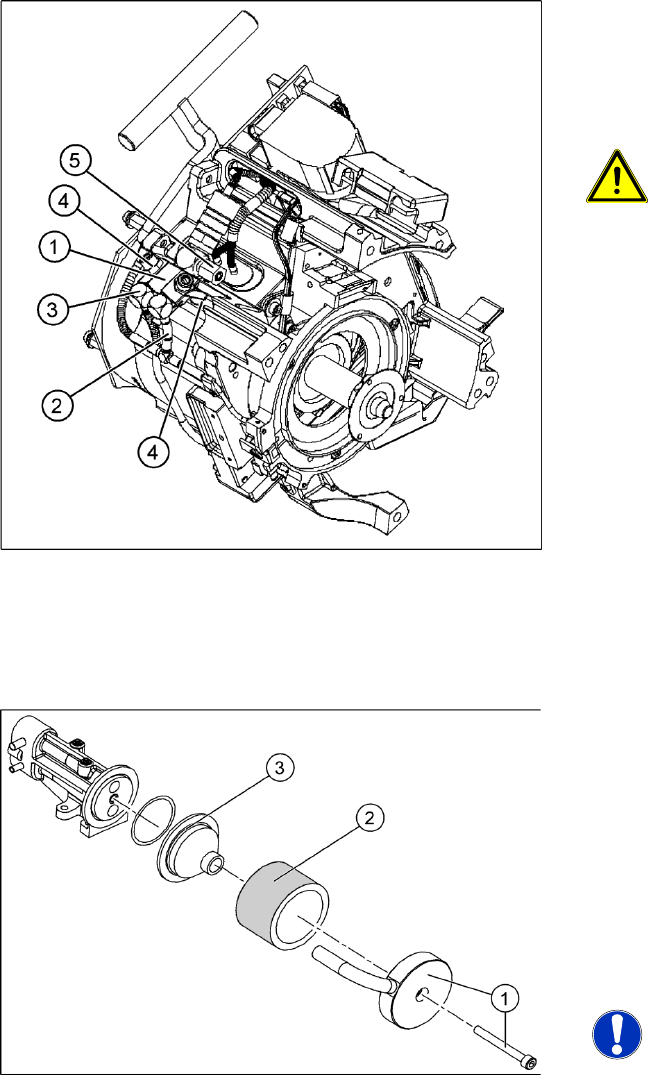
4.5.16 Replacing the Silencer [03003134]
Removal/Installation
X Reconnect the hoses.
X Fix the forced air unit (1) with the two hexagon
socket-head screws (4).
X Connect the plug to the slot on the
intermediate distributor.
ATTENTION: Risk of injury!
Risk of injury from the compensating
tube when the hose is pushed onto the
measuring tube!
X Fit the intermediate distributor.
4-49: Silencer
Legend
1. Fastening screw and cover flap with
discharged air tube
2. Silencer
3. Pre-silencer
X Loosen and remove the fastening screw (1).
Detach the discharged air hose.
X Remove the silencer (2).
X Remove the pre-silencer (3) from the silencer.
NOTE:
X Always wear gloves when handling
new silencers.
X Insert the pre-silencer and the screw provided
and fasten the silencer. Reconnect the
discharged air hose.
Service Work
Replacing the Star [00341181] C&P12 Placement Head
Service Manual SIPLACE D4
181
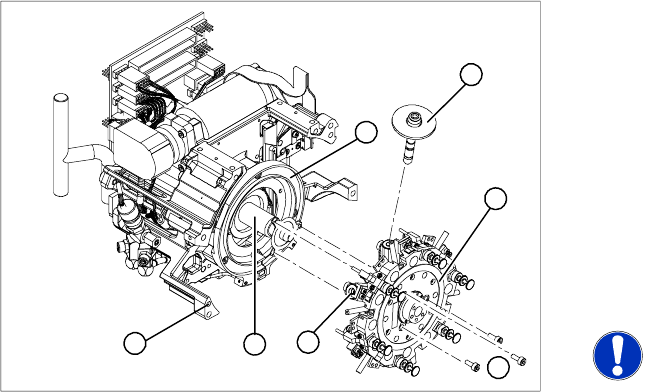
4.5.17 Replacing the Star [00341181]
Removal
Legend
1. Sleeve
2. Star, mounted/ DLM2
3. Star drive
4. C&P head front part
5. 3 x M3x8 hexagon socket-head screws
6. Segment
7. Raceway
X Dismantle the front part of the C&P head.
NOTE:
X Wear laboratory gloves when you
remove the sleeves from the star.
X Remove all sleeves (1) and place them in a
sleeve box or on a clean, soft surface.
X When removing the star, mark its installation
position with a pen, for easier refitting.
X Loosen the three M3x8 hexagon socket-head
screws (5).
X Raise the star slightly.
X Use a rotary movement to lift the star up and
off.
1
7
6
5
4
3
2