KE-750_MS.pdf - 第63页
4. Polarizing Filter Replacement (Main OCC only ) (1) Follow the instructions in 4 - 1 to remove camera unit assy from head plate. (2) Remove the 4 screws (1) and replace lens light. Re move the 4 SEMS cap screws (2) fro…
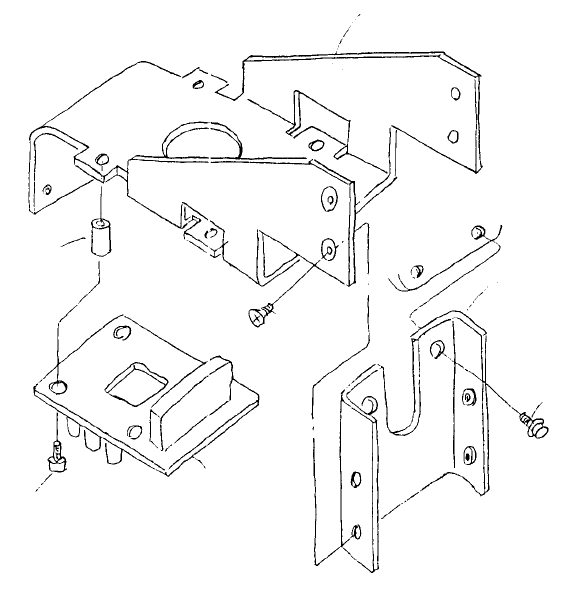
3-2 Sub OCC Unit
(1) Remove the 4 SEMS cap screws (1) and replace BOC light PWB assy.
(2) After replacing camera unit assy, adjust polarizing filter and OCC light.
(Refer to 4 - 7 Summary of Readjustments Required after Replacement.)
Light suppor
t
E3823725000
Space
r
HX00335000E
Head plate
Right light unit suppor
t
E3822725000
EMS cap screw x 2
SL6041092IN
Plate screw x 4
SM1030601SC
BOC light PWB
E86247150A0
SEMS cap screw x 4
SL6031492TN
Fig. 4-3-2
1-55
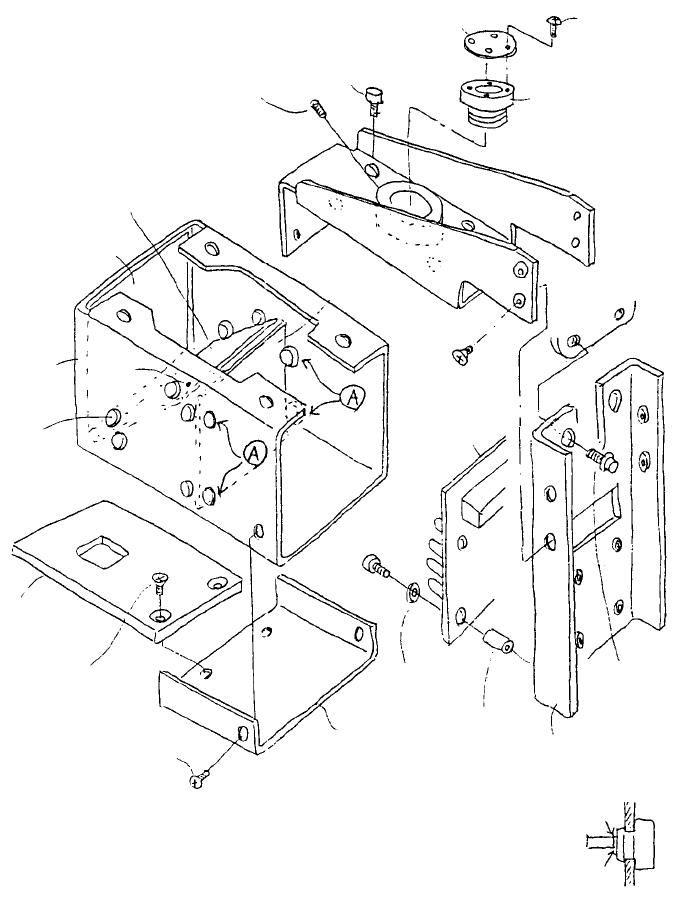
4. Polarizing Filter Replacement (Main OCC only)
(1) Follow the instructions in 4 - 1 to remove camera unit assy from head plate.
(2) Remove the 4 screws (1) and replace lens light. Remove the 4 SEMS cap screws (2) from light filter
and remove mirror box. Remove the 4 cloth frame anti-vibration rubbers (A) and replace.
(3) Reassemble in reverse sequence.
(4) After replacing camera unit assy, adjust polarizing filter and OCC light.
(Refer to 4 - 7 Summary of Readjustments Required after Replacement.)
Light filter
E2863721000
Hex worm screw
SM803612TP
SEMS cap x 4
SL6030592TN
Lens filter
E3861721000
Truss screw x 4
SM0020401SC
Filter holde
r
E3862721000
Mirror box support assy
E38137250A0
SEMS cap x 4
SL6031492TN
Head plate
Plate screw x 4
SM1030601SC
OCC light PWB assy
E86127210A0
SEMS cap x 2
SL6041092TN
Note: Frame anti-vibration rubbers are inserted to
fasten. Once in position, cut as shown at right.
Left light unit support
E3812725000
Spacer
HX00335000E
Cut here
InsideOutside
Undercove
r
E3857721000
Washer
HX002880000
Pot screw x 2
SM4030401SC
Plate screw x 2
SM1030501SC
OCC lens diffuse
r
E3858721000
Frame anti-
vibration rubber
11804606
Mirror box
E3853725000
Cloth pape
r
E3856721000
Beam splitter
E3855721000
Fig. 4-4-1
1-56
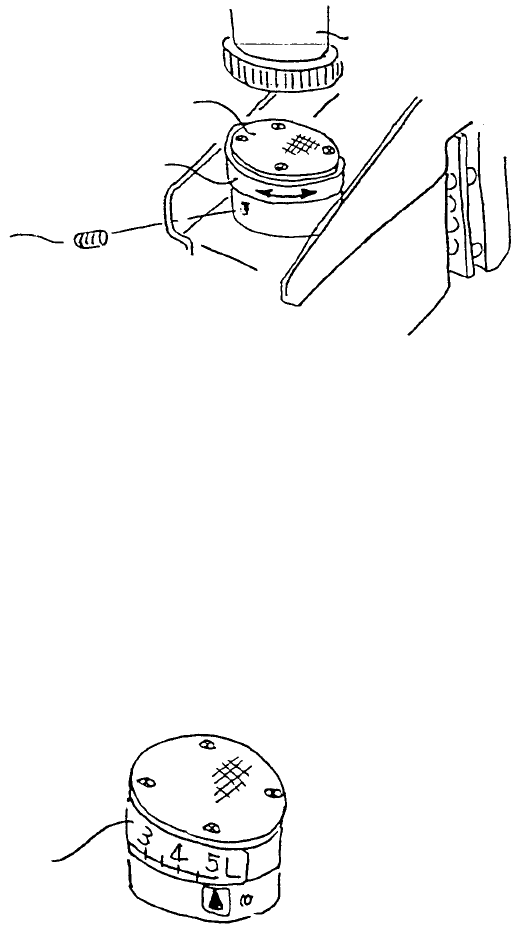
Polarization filter adjustment
(Light unit left assy)
Lens filte
r
(E3861721000)
OCC lens
Stopping scre
w
(SM8030612TP)
Filter holde
r
(E3862721000)
Fig. 4-4-2
(1) The calibration block is furnished with a white ceramic base plate. Position camera over the base
plate.
(2) Loosen stopping screw (2), turn filter holder left and right and fix at position where screen is
brightest.
(3) Affix OCC light level sticker as shown below.
A
lign withbrightes
t
setting.
E3864721000
OCC light label
Fig. 4-4-3
1-57