Forte Max Manual.pdf - 第43页
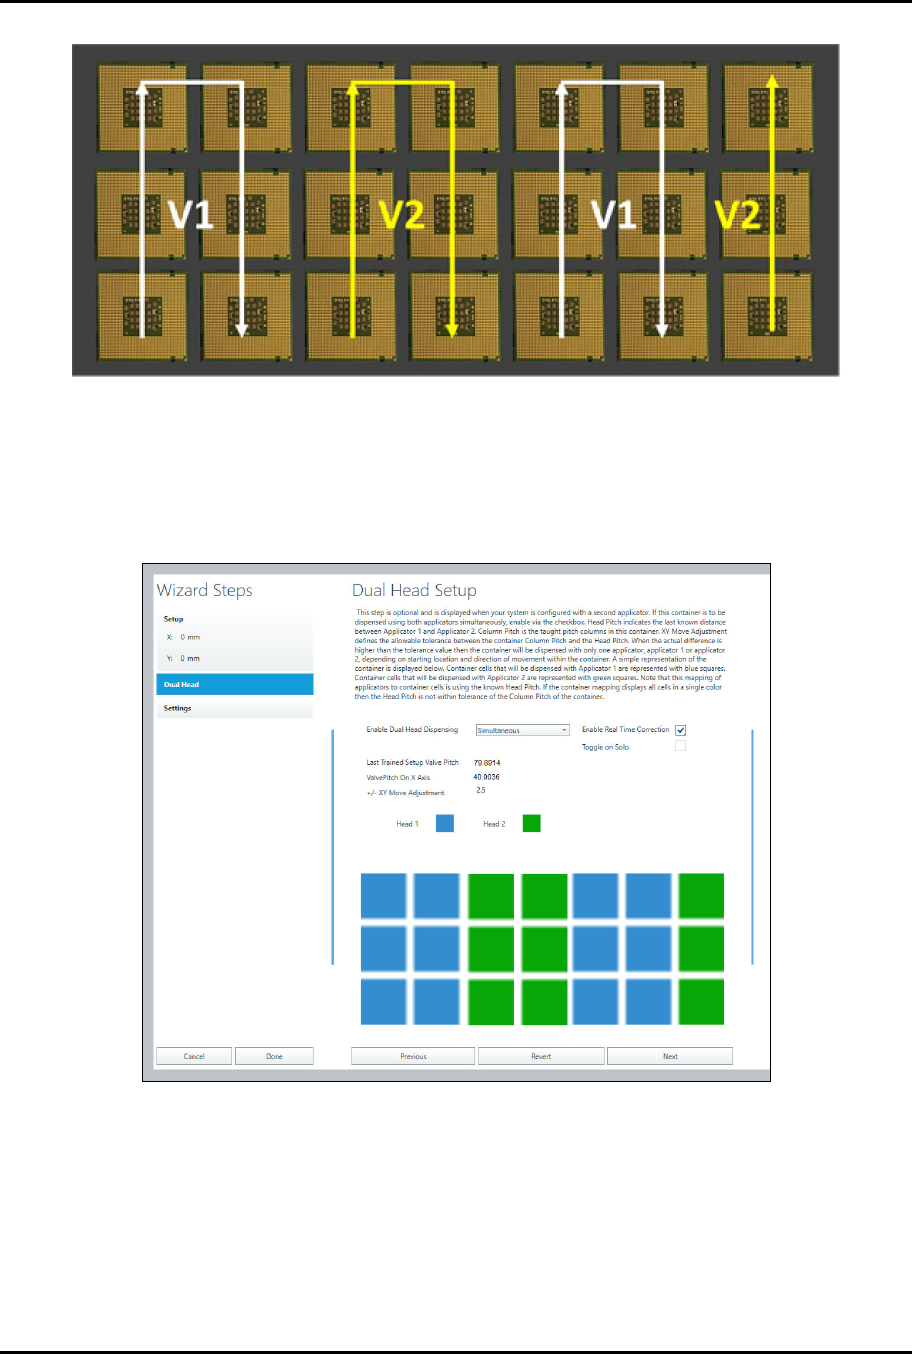
ForteMAXDispensingSystemAddendum Recipe Creation © 2023 Nordson Corporation 39 Figure 4-28 Serpentine by Columns c. Click on Next . d. Select Simultaneous and Enable Re al Time Correction (Figure 4-29). > Th e He …

ForteMAXDispensingSystemAddendum Recipe Creation
38 © 2023 Nordson Corporation
To create the program:
?
NOTE
If necessary, refer to 4.4.1 Creating a Recipe for a Multi-up Panel for detailed instructions
on creating the recipe, pattern, and container.
1. Create a recipe and teach the workpiece fiducials.
2. Create the pattern, teach the pattern fiducials, and add dispensing instructions.
3. Create a container and define the container dimensions, origin and column and row pitch
ends (Figure 4-25).
4. Perform the following steps to place the container.
a.
Select the Workpiece pattern in the Recipe Tree and select Place Container .
b.
Select the Container to Place, Starting Corner, and Dispense Mode (Figure 4-27).
> In this example we are going to select Lower Left and Serpentine by Columns
(Figure 4-28). This will minimize the dispense head motion and therefore speed up
the program.
Figure 4-27 Place the Container
Figure
4
-
26
D
e
f
i
n
e
C
o
n
t
a
i
n
e
r
S
e
t
t
i
n
g
s
ForteMAXDispensingSystemAddendum Recipe Creation
© 2023 Nordson Corporation 39
Figure 4-28 Serpentine by Columns
c.
Click on Next.
d.
Select Simultaneous and Enable Real Time Correction (Figure 4-29).
> The Head 1 (blue) and Head 2 (green) boxes indicate Valve 1 and Valve 2
dispense locations and should appear as shown in Figure 4-29).
Figure 4-29 Dual Head Setup
e.
Click on Done.
> A Do "Container Name" instruction will appear in the Recipe Tree.
ForteMAXDispensingSystemAddendum Recipe Creation
40 © 2023 Nordson Corporation
4.5 Dual Action Dispensing
When creating a dual action recipe, consider an approach that saves cycle time through the reduction of
applicator travel and applicator toggles. It is recommended to dispense all the lines and dots assigned to
one applicator first. Then dispense all the lines or dots associated with the second applicator.
?
NOTE
The following procedure assumes that the layout has been defined, the slide bracket has
been installed in the appropriate position, and a dry valves offsets procedure has been
performed. Refer to Section 3 – Installation and Setup for detailed information.
The following steps are required to create a dual-action dispensing recipe:
• Create the recipe
• Create a pattern
• Add dispensing instructions
• Create a container
• Place the container
For detailed programming information, refer to the Canvas Dispensing Software User Guide.
4.5.1 Creating a Recipe for a Multi-Up Panel
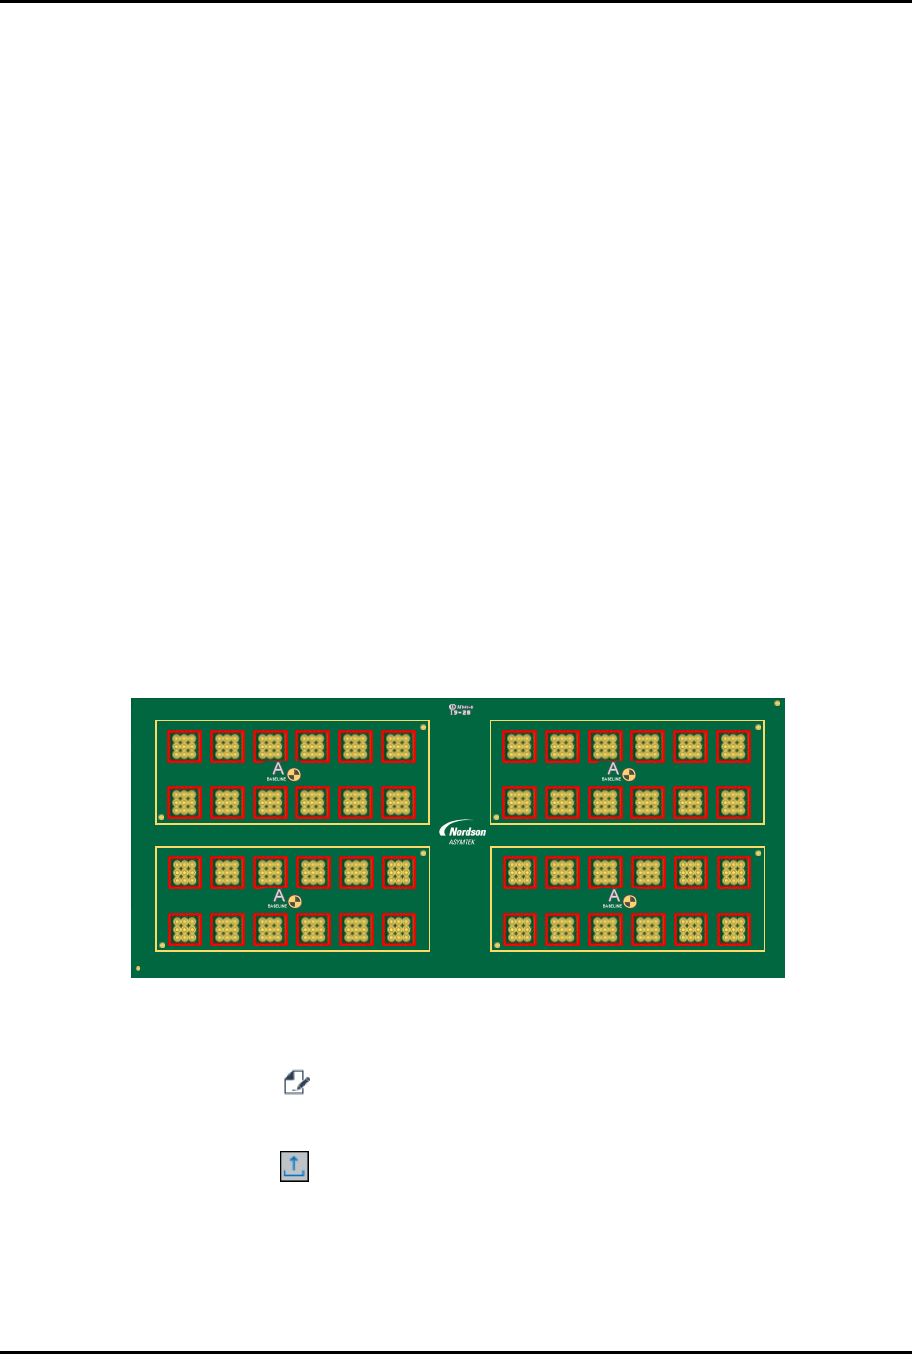
This section outlines the steps required to create a recipe for the multi-up board, layout option 2
(Figure 3-4). Valve 1 will dispense four (4) lines around each cell (red squares). Valve 2 will dispense
nine (9) dots inside each cell (Figure 4-30). The lines will be dispensed first using an IntelliJet followed by
the DV-8000 valve dispensing dots.
Ensure the system is configured for the appropriate valves. Refer to the Canvas Dispensing Software
User Guide if necessary.
1 2 3 4 5 6 7 8 9 10 11 12
4
3
2
1
6130139 REV 1
STRAIGHT
B,1
B,2
2,1 2,2 2,3 2,4 2,5 2,6
1,1 1,2 1,3 1,4 1,5 1,6
4,1 4,2 4,3 4,4 4,5 4,6
A2
A1
3,1 3,2 3,3 3,4 3,5 3,6
A2
A1
4,1 4,2 4,3 4,4 4,5 4,6
A2
A1
3,1 3,2 3,3 3,4 3,5 3,6
A2
A1
2,1 2,2 2,3 2,4 2,5 2,6
1,1 1,2 1,3 1,4 1,5 1,6
Figure 4-30 Dual-Action Recipe Requirement
To create the recipe:
1. Select the Recipe button to access the Recipe Editor.
2. Place the substrate on the conveyor.
3. Click on the Load button on the toolbar.
> The substrate will be lifted off the conveyor and clamped into place. The substrate
should be evenly clamped and level so that the board does not move when
programming.